
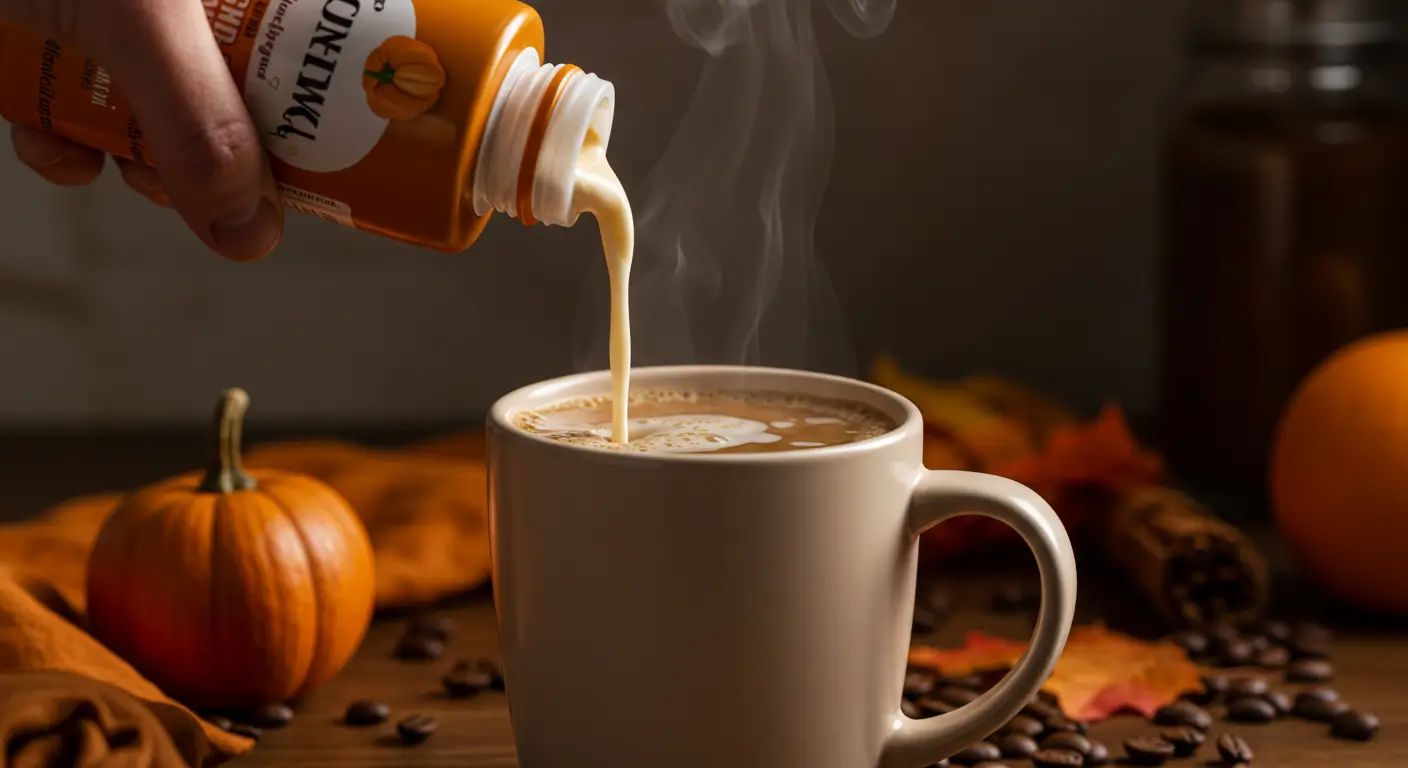
Okay, confession time. I was spending like $6 every morning at that fancy coffee place down the street just to get my pumpkin spice fix. Do the math on that – I was basically funding someone’s vacation with my caffeine addiction.
Then one day, I looked at the ingredient list on the store-bought creamer I grabbed as backup. Words I couldn’t pronounce, chemicals that sounded like they belonged in a lab, and enough sugar to put me in a diabetic coma. That was my wake-up call.
So I decided to make my own. How hard could it be, right?
Spoiler alert: my first attempt tasted like someone mixed pumpkin baby food with expired milk. Not exactly the cozy fall vibes I was going for.
But attempt number four? Pure liquid gold. Now I make a batch every Sunday and my coffee tastes better than anything I ever bought. Plus, my wallet actually thanks me.
Table of Contents :

Why Store-Bought Pumpkin Coffee Creamer is a Scam :
Look, I’m not trying to be all holier-than-thou here, but have you actually read what’s in those bottles? It’s basically corn syrup, artificial flavors, and a bunch of stuff I can’t spell, let alone explain to my kids.
And don’t even get me started on the price. Four bucks for a bottle that lasts maybe a week? That’s like $200 a year just on coffee creamer. I could buy actual pumpkins for less than that.
Plus, the flavor is always too sweet or too artificial. Like they took the idea of pumpkin spice and ran it through a computer that had never actually tasted real spices.
My Learning Curve :
Before we get to what actually works, let me save you from my mistakes:
Disaster #1: I thought I could just blend pumpkin puree with milk and call it a day. The texture was… chunky. Like drinking pumpkin soup. My husband took one sip and made a face I’d never seen before.
Disaster #2: I went overboard with the spices. Used way too much cinnamon and it was like drinking liquid Big Red gum. Gross doesn’t even cover it.
Disaster #3: I tried to make it “healthier” by using skim milk. It was watery and sad and made my coffee taste like disappointment.
Disaster #4: I didn’t strain it properly and ended up with spice chunks floating in my coffee. Not cute.
But you know what? Each failure taught me something, and now I’ve got this recipe down to a science.
The Ingredients That Actually Matter :
After all my trial and error, here’s what you need for about 2 weeks worth of creamer:
Base ingredients:
- 1 cup whole milk (don’t skimp here – the fat content matters)
- 1 cup heavy cream (this is what makes it rich and amazing)
- 1/3 cup pumpkin puree (NOT pumpkin pie filling – learned that the hard way)
- 1/4 cup maple syrup (real stuff, not the fake pancake syrup)
- 1 tablespoon vanilla extract
The spice blend (this is where the magic happens):
- 1 teaspoon ground cinnamon
- 1/2 teaspoon ground nutmeg
- 1/4 teaspoon ground ginger
- 1/4 teaspoon ground cloves
- Pinch of ground cardamom (optional but it adds something special)
- Tiny pinch of salt (trust me on this)
Now, about that pumpkin puree. I cannot stress this enough – use plain pumpkin puree, not pumpkin pie filling. I grabbed the wrong can once and my creamer was weirdly sweet and had this artificial aftertaste. Libby’s plain pumpkin is what I always use.
And the maple syrup? Get the real deal. I know it’s more expensive, but fake syrup just tastes like corn syrup with delusions of grandeur.
The Process :
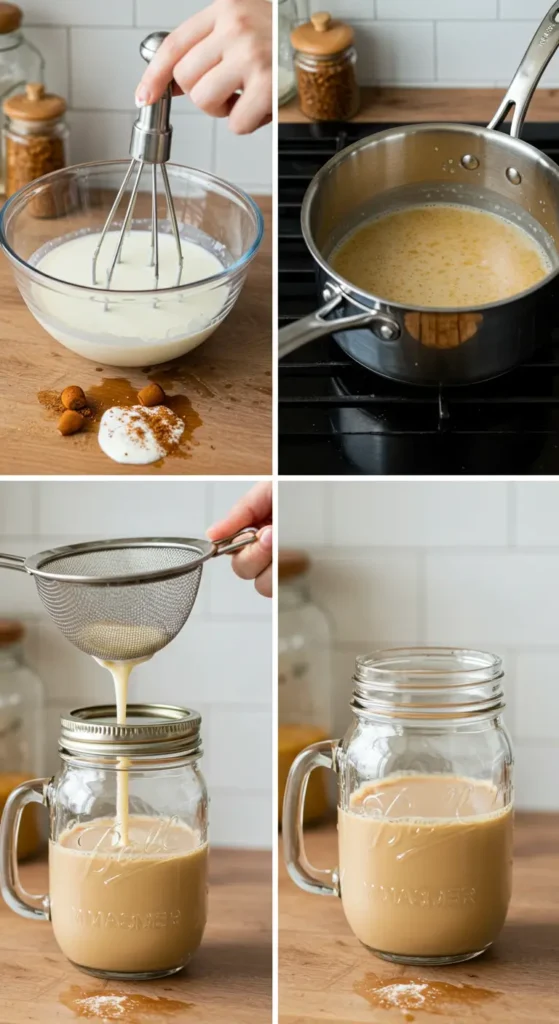
Step 1: Get your spice game together
Mix all your spices in a small bowl. This seems unnecessary, but trust me – it prevents clumping and makes sure everything’s evenly distributed. I learned this after finding a chunk of pure cinnamon in my coffee. Not pleasant.
Step 2: The magical combination
In a medium saucepan, whisk together the milk, heavy cream, and pumpkin puree. And I mean really whisk it – you want that pumpkin completely incorporated. No one wants pumpkin chunks in their morning coffee.
Step 3: Heat it up (but don’t boil it)
Put the pan over medium-low heat. This is crucial – too high heat and you’ll scorch the milk, which tastes terrible and smells worse. Ask me how I know.
Heat it until it’s just starting to steam, stirring occasionally. Don’t let it boil. Seriously. I ruined a whole batch by getting distracted by a text message and coming back to find it bubbling like a science experiment.
Step 4: Spice it up
Add your spice mixture and whisk it in. The smell at this point is incredible – like fall decided to move into your kitchen.
Let it simmer gently for about 5 minutes, whisking every minute or so. This lets the flavors meld and the spices really infuse into the cream.
Step 5: Sweeten the deal
Remove from heat and whisk in the maple syrup and vanilla. Taste it at this point – you might want more sweetness or more spice. This is your creamer, make it how you like it.
Step 6: The straining situation
Here’s the step I used to skip that made all the difference. Strain the whole thing through a fine-mesh strainer into a clean jar or bottle. This removes any spice chunks and makes it silky smooth.
Let it cool completely before refrigerating. I know it’s tempting to try it right away, but hot creamer in cold coffee is just wrong.
Storage and Usage Tips From Someone Who Makes This Weekly :
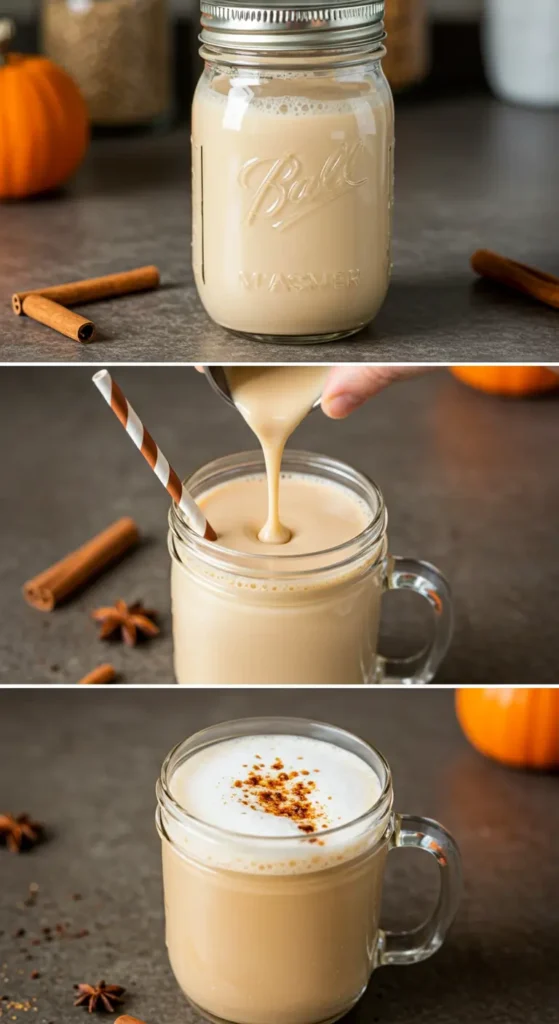
This keeps in the fridge for about two weeks, though it never lasts that long in my house. Give it a good shake before each use because the ingredients naturally separate.
I use about 2-3 tablespoons per cup of coffee, but adjust to your taste. Some people like their coffee barely tinted, others want it to look like a latte. You do you.
Pro tip: I make my coffee a little stronger when I know I’m using this creamer because it does dilute it slightly. But honestly, the flavor is so good I don’t even mind.
Variations That Actually Work :
Once you master the basic recipe, you can get creative:
Extra Rich Version: Replace half the milk with more heavy cream. It’s basically liquid dessert.
Coconut Version: Use canned coconut milk instead of dairy. Perfect for my lactose-intolerant sister.
Bourbon Barrel Aged: Add a teaspoon of bourbon extract. Not for the kids’ hot chocolate, obviously.
Lighter Option: Use half-and-half instead of the milk/cream combo. Not as rich, but still way better than store-bought.
Sugar-Free: Replace maple syrup with sugar-free syrup or stevia. I haven’t tried this personally, but my diabetic neighbor swears by it.
The Real Talk About Homemade Creamer :
Look, I’m not gonna lie – this takes more effort than grabbing a bottle from the store. You have to plan ahead, you have to actually cook something, and you have to remember to shake it every time.
But here’s the thing: it tastes SO much better. Like, embarrassingly better. My mother-in-law, who’s never complimented my cooking in the 15 years I’ve known her, asked for the recipe after trying my coffee.
Plus, you know exactly what’s in it. No weird chemicals, no artificial flavors, just real ingredients that you can actually pronounce.
Cost Breakdown :
Let’s do some quick math here. This recipe costs me about $4 to make and gives me roughly two weeks of creamer. That fancy coffee shop creamer? Four dollars for a bottle that lasts a week if I’m lucky.
I’m saving about $150 a year making my own. That’s a nice dinner out, or new shoes, or just money in my pocket. Either way, I’m winning.
Why This Recipe Works When Others Don’t :
I’ve tried probably a dozen different homemade creamer recipes, and most of them are either too thin, too sweet, or have weird aftertastes.
This one works because:
- The cooking process actually melds the flavors instead of just mixing them
- The straining step removes any grittiness
- The fat content from the heavy cream makes it actually creamy
- The spice ratios are balanced (learned through many failures)
- The maple syrup adds depth, not just sweetness
My Kids’ Verdict :
My 10-year-old daughter tried it in her hot chocolate and declared it “better than the store kind.” High praise from someone who usually thinks anything homemade is automatically inferior.
My 15-year-old son, who’s basically impossible to please, actually asked if I could make it with his iced coffee. That’s when I knew I’d really figured something out.
Even my husband, who drinks his coffee black and usually acts like adding anything is sacrilege, admitted this “doesn’t ruin the coffee.”
Final Thoughts From a Reformed Coffee Shop Addict :
Making your own pumpkin coffee creamer isn’t going to change your life, but it might change your mornings. And honestly, in a world where everything feels complicated and expensive, there’s something really satisfying about making something delicious from scratch.
It’s become part of my Sunday routine now – making a fresh batch while meal prepping for the week. The whole kitchen smells like fall, and I get this little boost of pride every morning when I pour it into my coffee.
Give it a try, and don’t get discouraged if your first batch isn’t perfect. Mine definitely wasn’t. But once you get it right, you’ll never want to go back to the store-bought stuff.
Let me know how yours turns out! And if you come up with any genius variations, I’m always looking for new ways to jazz up my coffee routine.
Happy fall caffeinating! ☕🎃
Homemade Pumpkin Coffee Creamer
Rich and creamy homemade pumpkin spice coffee creamer made with real pumpkin puree, warm spices, and natural ingredients. Better than store-bought and costs a fraction of the price.
Ingredients
- 1 cup whole milk
- 1 cup heavy cream
- 1/3 cup pumpkin puree
- 1/4 cup pure maple syrup
- 1 tablespoon vanilla extract
- 1 teaspoon ground cinnamon
- 1/2 teaspoon ground nutmeg
- 1/4 teaspoon ground ginger
- 1/4 teaspoon ground cloves
- Pinch of ground cardamom (optional)
- Pinch of salt
Instructions
-
Step 1Mix all spices (cinnamon, nutmeg, ginger, cloves, cardamom, salt) in a small bowl and set aside.
-
Step 2In a medium saucepan, whisk together milk, heavy cream, and pumpkin puree until completely combined.
-
Step 3Heat mixture over medium-low heat until just steaming, stirring occasionally. Do not let it boil.
-
Step 4Add spice mixture and whisk to combine. Simmer gently for 5 minutes, whisking every minute.
-
Step 5Remove from heat and whisk in maple syrup and vanilla extract.
-
Step 6Strain mixture through fine-mesh strainer into a clean jar or bottle to remove any spice chunks.
-
Step 7Cool completely before refrigerating. Shake well before each use. Keeps for up to 2 weeks in refrigerator.