
Thumbprint Heart Cookies are my love language in baked form, and also the reason my kitchen looked like a crime scene the first time I made them. Jam everywhere. Flour in my hair. One cookie actually melted into a kind of buttery pancake situation.
Everyone keeps asking for this thumbprint heart cookies recipe, so here goes nothing. I think I first saw heart thumbprint cookies on Pinterest back when everyone was stress-baking banana bread during lockdown, but the version I actually use now is a Frankenstein mash-up of my mom’s old jam cookies, something my neighbor Sarah swears by, and my own stubborn need to make the thumbprint heart cookies aesthetic super cute for Valentine’s Day.
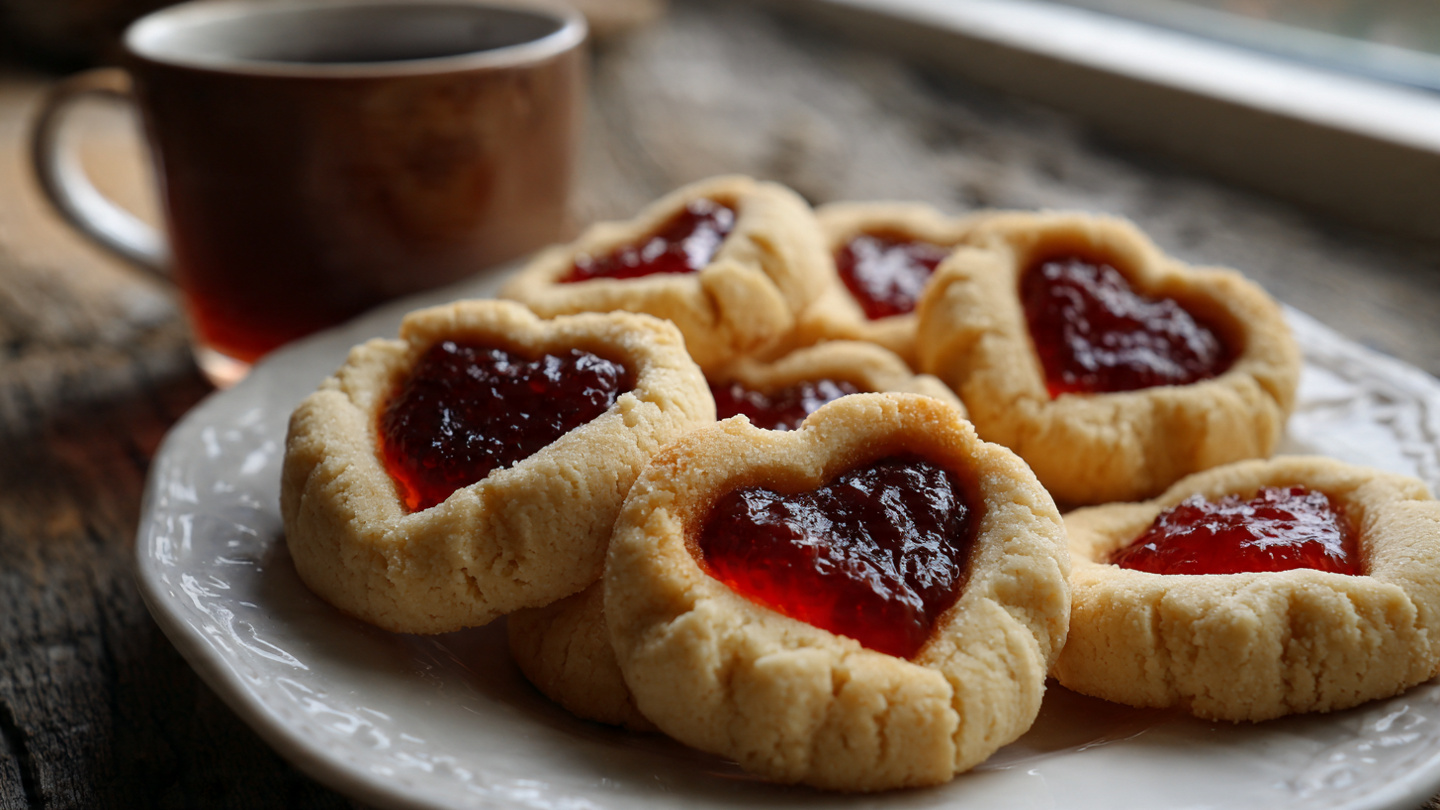
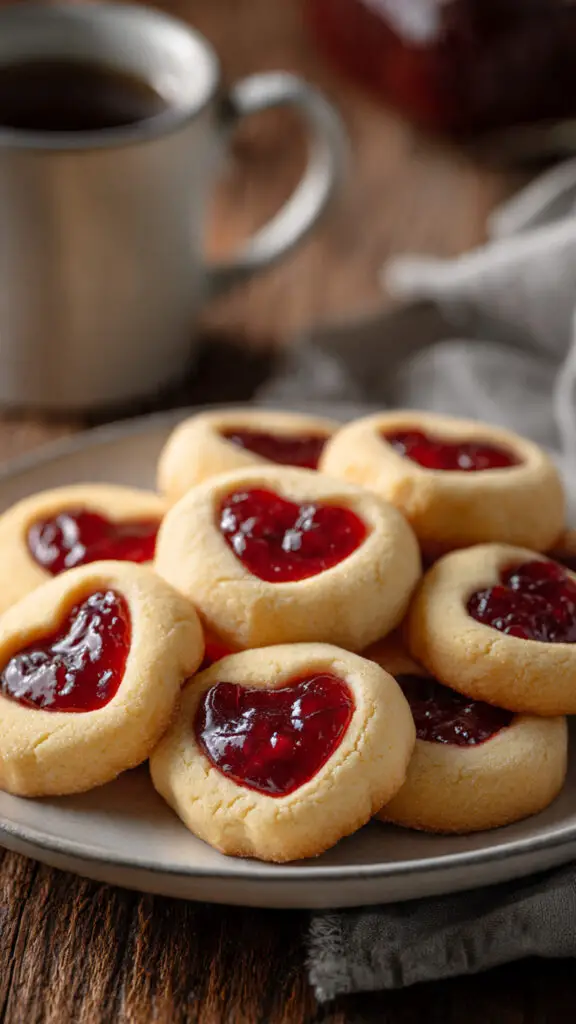
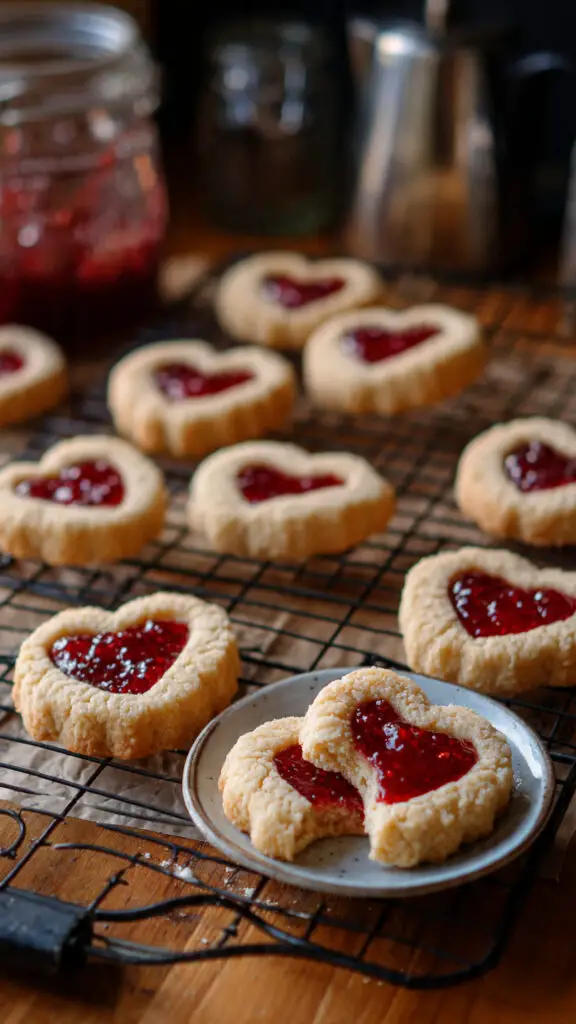
Now, here’s the thing. Heart thumbprint cookies look fancier than they are. They’re literally a soft, buttery cookie you press with your thumb (well, two thumbs) into a heart shape and fill with raspberry or strawberry jam. That’s it. But if you overbake them by even two minutes—disaster. Dry. Crumbly. I did that with my first batch and almost threw the whole tray in the bin.
Table of Contents :
Why I Love These Thumbprint Heart Cookies :
I’ll be honest: I’m not a big “cut-out sugar cookies with royal icing” person. Too much faff. But these thumbprint cookies, heart shaped and filled with jam, feel special without hours of decorating.
- The dough is simple and forgiving.
- You can swap fillings: raspberry heart thumbprint cookies, strawberry thumbprint cookies heart shaped, even a little heart of melted chocolate if you’re in that mood.
- They freeze well, so you can stash a batch for sudden “Oh no, it’s Valentine’s Day tomorrow” moments.
My 8-year-old refuses to eat anything green, but somehow loves these heart thumbprint cookies chocolate version where I pipe a tiny line of chocolate along the jam heart. Kids are weird.
Ingredients :
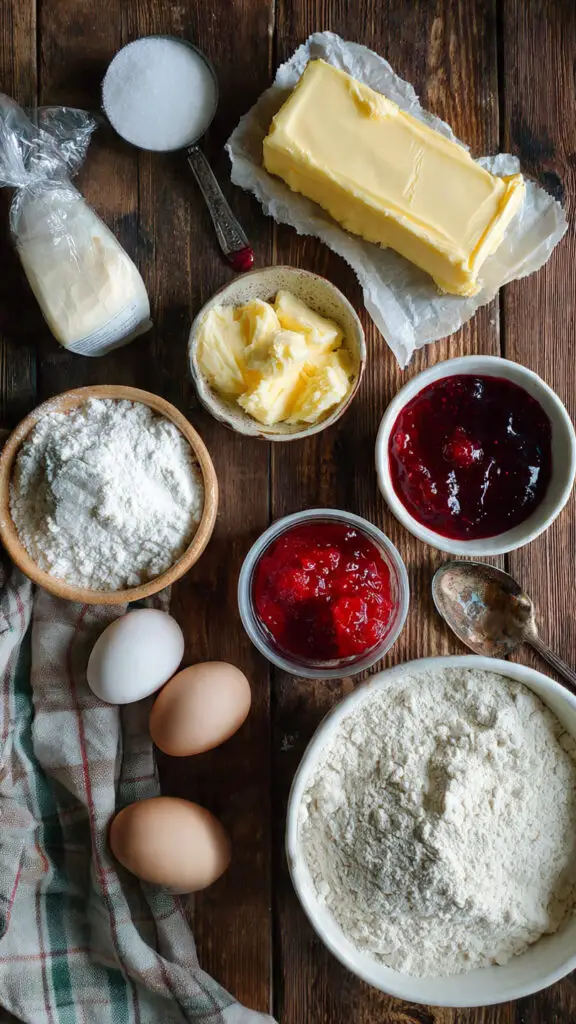
This makes about 24–28 cookies, depending on how big you roll them and how generous your “taste testing” is.
- 1 cup (225 g) unsalted butter, softened (room temp, not melted, not cold – this matters)
- ⅔ cup (135 g) granulated sugar
- 1 large egg
- 1 ½ teaspoons vanilla extract (I go heavy-handed, always)
- 2 ¼ cups (280 g) all-purpose flour
- ¼ teaspoon fine salt
- ⅓–½ cup raspberry jam (for raspberry heart thumbprint cookies)
- ⅓–½ cup strawberry jam (for strawberry thumbprint cookies heart style)
Optional but fun:
- A few tablespoons melted dark chocolate for heart thumbprint cookies chocolate drizzle
- Powdered sugar for a light dusting after baking
Use a thicker jam if you can. Runny jam will ooze all over your baking sheet and turn your cute thumbprint valentine heart cookies into jam puddles. Learned this the hard way.
If you need heart thumbprint cookies gluten free, you can swap the all-purpose flour for a good 1:1 gluten-free baking blend. The texture is slightly more delicate, but it works. Just chill the dough a little longer so it doesn’t spread too much.
How to Make Thumbprint Heart Cookies :
1. Get Ready:
The key is—oh wait, I forgot to mention—you need to preheat your oven first.
- Preheat to 350°F (175°C).
- Line a baking sheet with parchment paper.
I always put the butter out first thing because if it’s too cold, the dough gets weird and cracks when you try to make the little heart.
2. Make the Dough
- Beat the butter and sugar together in a bowl until light and a bit fluffy. You can use a hand mixer or a stand mixer, or just a wooden spoon if you’re feeling strong.
- Add the egg and vanilla, mix until it looks smooth and slightly creamy.
- In another bowl, whisk the flour and salt.
- Add the dry ingredients to the butter mix and stir until you get a soft dough. It might look crumbly at first, but keep going—it should pull together.
If the dough feels super sticky, pop it in the fridge for 15–20 minutes. If it’s too dry and won’t come together, add 1 teaspoon of milk and mix again. Just a tiny bit.
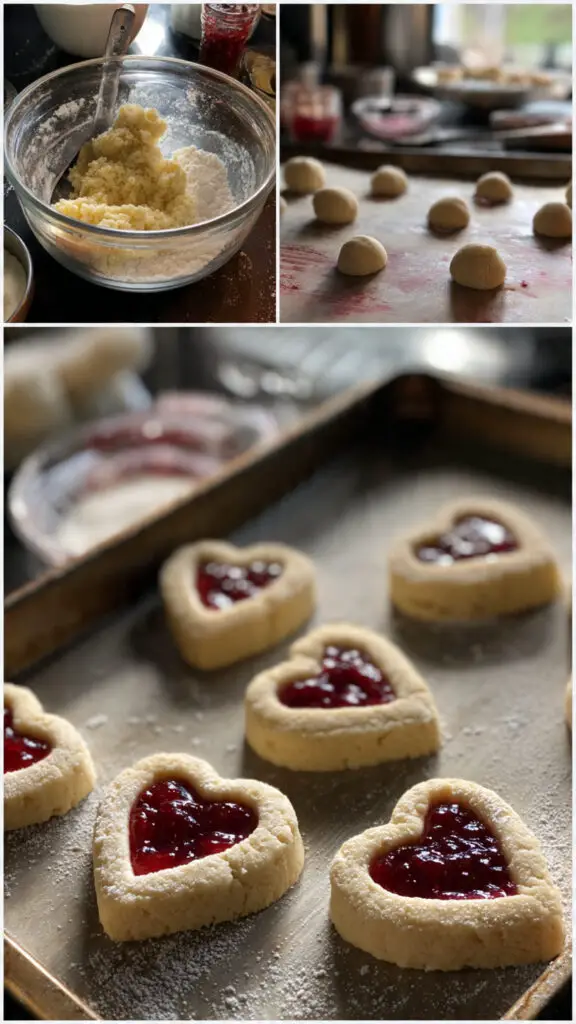
3. Shape the Thumbprint Cookies Heart Shaped
Roll the dough into small balls, about 1 tablespoon each. Place them on the baking sheet with some space between them.
Now for the fun part: the heart thumbprint.
- Use your thumb to press a small indent at a slight angle.
- Then press with your thumb again from the other side so the two dents meet and form a little heart shape.
It’ll look a bit lopsided at first. It’s fine. Imperfect hearts are kind of cute anyway.
If the dough cracks around the edges, just gently pinch it back together. This drove me crazy until I figured out that slightly warmer dough cracks less, but too warm dough spreads too much. There’s a sweet spot.
4. Fill With Jam
Stir your jam so it’s smooth. Using a small spoon or a piping bag (or honestly, a ziplock bag with the corner cut off), fill each little heart with jam. Don’t overfill—when these bake, the jam will bubble a bit and you don’t want it overflowing everywhere.
I like to do half raspberry and half strawberry, because indecision is my brand.
5. Bake (And Try Not to Forget Them)
Bake for 10–12 minutes, until the edges look just set and barely golden. Don’t wait for full browning. If they look fully golden, they’re probably overbaked.
The first time I made these, I set a 10-minute timer, got distracted scrolling on my phone, and checked them at 14 minutes. They were… fine. But dry. Good dipped in tea, but not soft and buttery like I wanted.
So, um, basically what happens is they keep firming up as they cool. Take them out while they still look a little underdone in the middle.
Let them cool on the tray for 5 minutes, then move to a wire rack.
6. Optional Chocolate & Finishing Touches
If you want heart thumbprint cookies chocolate style, melt some dark chocolate and:
- Drizzle over the cooled cookies in zigzags, or
- Pipe a tiny chocolate outline around the jam heart for peak thumbprint heart cookies aesthetic.
A light dusting of powdered sugar looks pretty too. Totally optional, but it hides cracks and makes everything look intentional.
Personal Tips & Little Fixes :
- If your jam cookies thumbprint heart spread too much, next time chill the shaped dough on the tray for 15 minutes before baking.
- For heart shaped jam thumbprint cookies recipe that holds up for gifting, go a bit smaller with each cookie so they’re sturdier.
- Heart thumbprint cookies gluten free: use a 1:1 gluten-free flour blend and chill the dough well. Handle gently when making the heart shape.
- Want easy heart thumbprint cookies for a busy day? Make the dough the day before, keep in the fridge, and just roll, press, fill, bake when you’re ready.
Actually, you know what? These are way better than most store-bought Valentine’s treats. Some recipes online are just wrong—too much flour, not enough butter, not enough vanilla. Don’t skimp on the vanilla. I don’t care what anyone says, this ingredient is essential.
Anyway. If I can pull off thumbprint valentine heart cookies while wearing my “lucky” apron (the one with a permanent coffee stain) and trying to stop the kids from taste-testing the raw dough every five seconds, you can absolutely make them too.
People keep asking for this recipe, so I guess I did something right.
Seriously, try these Thumbprint Heart Cookies and tell me what you think—especially if you find a new filling combo I haven’t tried yet.
Now I’m craving these again. Thanks a lot, brain. ❤️🍪
Thumbprint Heart Cookies Recipe
Soft, buttery Thumbprint Heart Cookies filled with raspberry or strawberry jam. An easy heart-shaped jam thumbprint cookies recipe perfect for Valentine’s Day and gifting.
Ingredients
- 1 cup (225 g) unsalted butter, softened
- 2/3 cup (135 g) granulated sugar
- 1 large egg
- 1 1/2 teaspoons vanilla extract
- 2 1/4 cups (280 g) all-purpose flour
- 1/4 teaspoon fine salt
- 1/3–1/2 cup raspberry jam
- 1/3–1/2 cup strawberry jam
- 2–3 tablespoons melted dark chocolate for drizzling (optional)
- Powdered sugar for dusting (optional)
Instructions
- Step 1Preheat the oven to 350°F (175°C). Line a baking sheet with parchment paper and set aside.
- Step 2In a mixing bowl, beat the softened unsalted butter and granulated sugar together until light and slightly fluffy.
- Step 3Add the egg and vanilla extract to the butter mixture and mix until smooth and creamy.
- Step 4In a separate bowl, whisk together the all-purpose flour and salt. Add the dry ingredients to the wet mixture and stir until a soft dough forms.
- Step 5If the dough is very sticky, chill it in the refrigerator for 15–20 minutes. If it is too dry and crumbly, add about 1 teaspoon of milk and mix again until it comes together.
- Step 6Roll the dough into balls about 1 tablespoon each and place them on the prepared baking sheet, leaving space between the balls.
- Step 7Use your thumb to press a small indent into the center of each dough ball at a slight angle, then press from the opposite side so the two indents meet to form a heart shape. Gently smooth any cracked edges.
- Step 8Stir the raspberry and strawberry jams until smooth. Carefully spoon or pipe a small amount of jam into each heart-shaped indent, being careful not to overfill.
- Step 9Bake the cookies in the preheated oven for 10–12 minutes, or until the edges are just set and barely golden. Do not overbake.
- Step 10Remove the baking sheet from the oven and let the cookies cool on the tray for 5 minutes, then transfer them to a wire rack to cool completely.
- Step 11If desired, drizzle melted dark chocolate over the cooled cookies or outline the jam hearts with chocolate. Lightly dust with powdered sugar before serving.