

Red velvet cookies are one of those things I never thought I’d be obsessed with until I made them by accident. I was actually trying to make red velvet cupcakes for Christmas last year and ran out of cupcake liners halfway through. So I just… dropped spoonfuls of the batter onto a cookie sheet and hoped for the best.
Best mistake ever.
Now, here’s the thing—I’ve tried making these cookies three different ways. The red velvet cookies from cake mix version (total emergency situation when my sister announced she was coming over in two hours), the from-scratch version (when I’m feeling ambitious), and the one with cream cheese frosting (which is basically heaven). They all work, but each has its own vibe.
My mom saw these cooling on my counter last week and immediately called my aunt to tell her I’d “finally learned to bake properly.” Not sure if that was a compliment or shade, but I’ll take it.
Table of Contents :
Why Red Velvet Cookies Recipe Beats Regular Chocolate Cookies :
Look, I love a good chocolate chip cookie. But red velvet cookies homemade just hit different. They’re soft, they’re chewy, they’ve got that slight cocoa tang without being super chocolatey, and—let’s be real—they LOOK fancy even when you mess up.
I brought these to a work thing once and people thought I bought them from that expensive bakery downtown. Didn’t correct them. Why would I?
The color is what gets people. That deep red makes them perfect for Christmas, Valentine’s Day, or literally any time you want cookies that don’t look boring. My kid’s teacher requested them for the class party after seeing them in his lunch box. Felt like a celebrity for about five minutes.
Red Velvet Cookies From Scratch :
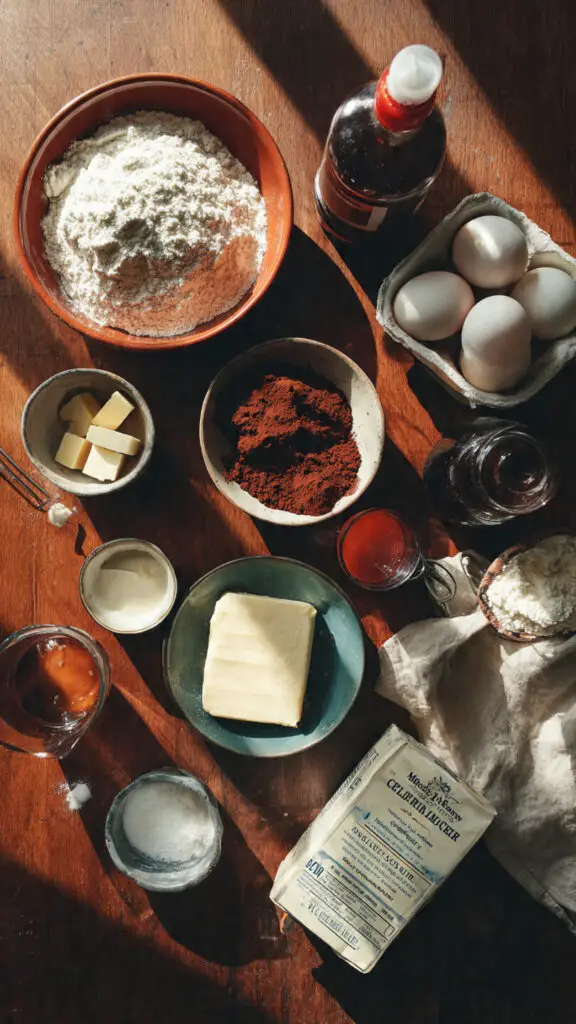
What You Actually Need :
For the Cookies:
- 2 cups all-purpose flour (I’ve used cake flour too—works fine, maybe even better?)
- 2 tablespoons unsweetened cocoa powder (NOT the hot chocolate mix—learned that one the hard way)
- 1 teaspoon baking soda
- 1/2 teaspoon salt
- 1/2 cup unsalted butter, softened (not melted, not cold—room temp is key)
- 1 cup granulated sugar
- 1 large egg
- 1 teaspoon vanilla extract
- 1 teaspoon white vinegar (sounds weird, tastes right)
- 1 tablespoon red food coloring (I use the gel kind from Wilton because the liquid stuff is… a lot)
- 1/2 cup buttermilk (or make fake buttermilk with milk + lemon juice like I usually do)
For the Cream Cheese Frosting (optional but you should):
- 4 oz cream cheese, softened (leave it out for like an hour, seriously)
- 2 tablespoons butter, softened
- 1 1/2 cups powdered sugar
- 1/2 teaspoon vanilla extract
Quick rant about food coloring: Some recipes say “1-2 tablespoons” which is USELESS guidance. I use exactly 1 tablespoon and they come out perfect. More than that and your hands will be stained red for days. Ask me how I know.
Making Red Velvet Cookies Easy :
Step 1: Dry Stuff First
Whisk together the flour, cocoa powder, baking soda, and salt in a medium bowl. Set it aside and try not to sneeze in it like I did last month. (Had to throw it out and start over. Tragic.)
Step 2: The Wet Mix
In your mixer—or just use a big bowl and wooden spoon if you’re feeling old-school—cream the butter and sugar until it’s fluffy and light. Takes about 3 minutes with a mixer, longer by hand but better for your arms I guess?
Add the egg and vanilla. Mix until combined. Then add the vinegar and food coloring. The batter will look WEIRD at this point, kinda pink and separated. That’s normal. Keep going.
Step 3: Alternate Like a Pro
This is where it gets slightly annoying but necessary. Add about 1/3 of your flour mixture to the wet stuff. Mix on low. Then add half the buttermilk. Mix. Then more flour. Then rest of buttermilk. Then rest of flour.
Why this way? I don’t know, I’m not a food scientist. But I tried dumping it all in once and the cookies came out flat and sad. So just do the alternating thing and save yourself the disappointment.
Step 4: The Baking Part
Preheat your oven to 350°F. Line your baking sheets with parchment paper (or use a silicone mat if you’re fancy).
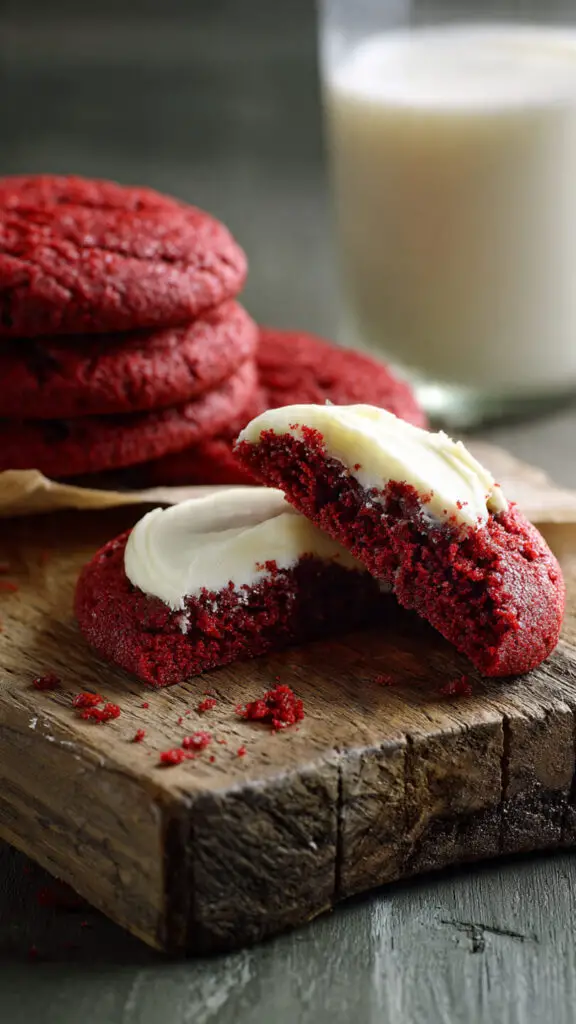
Drop rounded tablespoons of dough onto the sheets about 2 inches apart. They spread a bit but not too much. Bake for 10-12 minutes. They should look set on the edges but still soft in the middle.
Pro tip: I always underbake cookies by like a minute because they keep cooking on the hot pan. Nobody wants crunchy red velvet cookies. That’s just wrong.
Let them cool on the pan for 5 minutes before moving them to a wire rack. If you try moving them too soon, they’ll fall apart and you’ll be sad. Trust me.
Step 5: The Frosting Situation
While cookies are cooling (and this is important—they need to be COMPLETELY cool), make your cream cheese frosting.
Beat the cream cheese and butter together until smooth. Add powdered sugar gradually. Add vanilla. Beat until fluffy. Taste it. Try not to eat it all with a spoon.
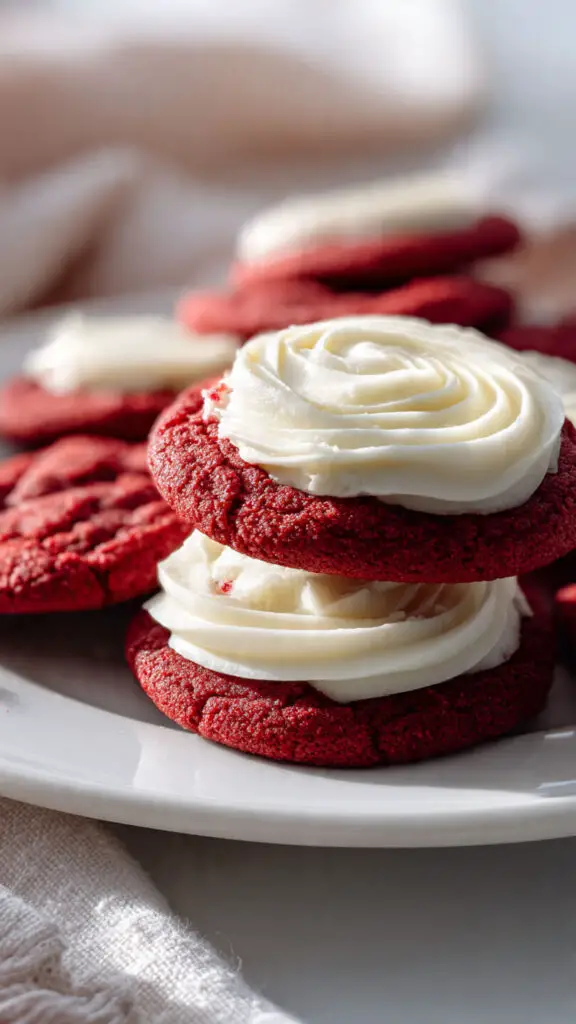
Once cookies are cool, spread or pipe frosting on top. I usually just use a knife because I’m lazy and my piping skills are questionable. They still look good though.
Red Velvet Cookies With Cake Mix :
Okay, so sometimes you don’t have time for from-scratch. I get it. Here’s the shortcut that actually works:
- 1 box red velvet cake mix
- 2 eggs
- 1/3 cup vegetable oil
- 1 teaspoon vanilla extract
Mix everything together. Drop spoonfuls on a baking sheet. Bake at 350°F for 10-12 minutes. Done.
Are they as good as from-scratch? Eh, maybe 85% as good. But they take like 5 minutes to prep and still taste way better than store-bought. My husband literally can’t tell the difference, so there’s that.
You can still add the cream cheese frosting to these. Nobody will judge you. Well, I won’t judge you.
Red Velvet Cookies Christmas Edition :
Last Christmas, I made a double batch of these and they disappeared in approximately 45 minutes at my family gathering. My cousin asked if I’d used “the family recipe” and I just nodded because I didn’t want to admit I’d found it on Pinterest two years ago.
For Christmas, I add some red and green sprinkles on top of the frosting. Sounds cheesy but looks cute. My mom puts them on her cookie platters now and acts like SHE made them, which is hilarious but also slightly annoying.
They freeze really well too, which is clutch for holiday baking. Make them ahead, freeze without frosting, then thaw and frost day-of. Game changer when you’re hosting.
Things I Wish Someone Had Told Me :
The dough will be softer and stickier than regular cookie dough. This is correct. Don’t panic and add more flour thinking you messed up. (I did this the first time and the cookies were dry and terrible.)
Food coloring brands matter. The cheap stuff from the grocery store works fine for lighter colors, but for that deep red you see in photos, you need gel coloring. I buy mine at craft stores when they’re on sale.
These red velvet cookies with frosting are best eaten within 2-3 days. After that, the frosting gets kind of crusty and weird. Still edible, just not as good.
If you’re making these for kids and worried about the food coloring, you can use beet powder instead. They’ll be more brownish-red than bright red, but they taste the same. I did this once for a friend’s kid who has dye allergies and honestly couldn’t tell the difference.
Storage and Make-Ahead Tips :
Room temperature in an airtight container: 2-3 days (with frosting)
Refrigerator: Up to a week (frosting stays fresher)
Freezer: 3 months unfrosted, 1 month frosted
I usually freeze them unfrosted because the frosting gets weird textures when frozen. Just pull them out the night before you need them, let them thaw, then frost.
Actually, you know what? Sometimes I eat them straight from the freezer because I have no self-control. Still good. Just… cold.
Why These Work for Everything :
Valentine’s Day? Obviously.
Christmas? Already covered that.
Random Tuesday when you want to feel productive? Perfect.
Trying to impress your in-laws? Will work.
Need something for a bake sale? These sell out first.
I’ve made these for birthdays, anniversaries, “just because” days, and that one time I was mad at my husband and stress-baked at midnight. (We’re fine now. The cookies helped.)
Final Thoughts :
Are these red velvet cookies recipe from scratch worth the effort? Absolutely. Are the cake mix ones acceptable when you’re in a rush? Also yes. Do they taste better with cream cheese frosting? Obviously, what kind of question is that?
Make these. Seriously. Make them this weekend and see what happens. I bet you’ll get at least three people asking for the recipe, and you can feel all smug about it like I do.
Let me know if you make them! And if you have any tricks for getting the frosting to spread easier, please share because mine always looks kinda messy. Works for me but I’m curious what other people do.
Now I want cookies and it’s almost midnight. This is a problem I’ve created for myself. 🍪❤️
Red Velvet Cookies
Red velvet cookies recipe from scratch or cake mix—soft, chewy cookies with optional cream cheese frosting. Perfect for Christmas, Valentine's Day, or any special occasion.
Ingredients
- 2 cups all-purpose flour
- 2 tablespoons unsweetened cocoa powder
- 1 teaspoon baking soda
- 1/2 teaspoon salt
- 1/2 cup unsalted butter, softened
- 1 cup granulated sugar
- 1 large egg
- 1 teaspoon vanilla extract
- 1 teaspoon white vinegar
- 1 tablespoon red food coloring
- 1/2 cup buttermilk
- 4 oz cream cheese, softened
- 2 tablespoons butter, softened
- 1 1/2 cups powdered sugar
- 1/2 teaspoon vanilla extract
Instructions
- Step 1Whisk together 2 cups flour, 2 tablespoons cocoa powder, 1 teaspoon baking soda, and 1/2 teaspoon salt in a medium bowl. Set aside.
- Step 2In a mixer, cream 1/2 cup softened butter and 1 cup sugar until fluffy and light, about 3 minutes.
- Step 3Add 1 egg and 1 teaspoon vanilla extract to butter mixture. Mix until combined. Add 1 teaspoon vinegar and 1 tablespoon red food coloring. Mix well.
- Step 4Add 1/3 of flour mixture to wet ingredients, mix on low. Add half the buttermilk, mix. Add half remaining flour, mix. Add rest of buttermilk, mix. Add remaining flour, mix until just combined.
- Step 5Preheat oven to 350°F (175°C). Line baking sheets with parchment paper.
- Step 6Drop rounded tablespoons of dough onto prepared baking sheets about 2 inches apart.
- Step 7Bake for 10-12 minutes until edges are set but centers are still soft. Do not overbake.
- Step 8Let cookies cool on baking sheet for 5 minutes, then transfer to wire rack to cool completely.
- Step 9Beat 4 oz softened cream cheese and 2 tablespoons softened butter until smooth. Gradually add 1 1/2 cups powdered sugar. Add 1/2 teaspoon vanilla extract. Beat until fluffy.
- Step 10Once cookies are completely cool, spread or pipe cream cheese frosting on top of each cookie.