
Okay, so here’s the thing. My dog Luna has been giving me those puppy eyes every time I eat my fall pumpkin muffins, and I felt terrible. Like, genuinely bad. So I decided to make her some dog cookies that actually smell good enough that I won’t gag while baking them. And honestly? These turned out way better than I expected.
I’m not gonna lie—my first attempt was a disaster. Complete disaster. I added way too much pumpkin (because more pumpkin equals more flavor, right? Wrong.) and ended up with orange mush that wouldn’t hold shape. My kitchen looked like a pumpkin exploded. But after three tries and one minor breakdown, I finally nailed it.
Table of Contents :
Why I Love These Dog Cookies :
Look, I’ve bought those store-bought dog treats that cost like $15 for a tiny bag, and half the time I can’t even pronounce the ingredients. These homemade dog cookies? I know exactly what’s going in them. Plus, Luna goes absolutely bonkers for them, which makes me feel like parent of the year.
The pumpkin is great for digestion (learned this from my vet during Luna’s last checkup), and carrots are basically crunchy vitamins. Win-win. And the best part? My neighbor’s dog, Max, who is the pickiest eater I’ve ever met, actually ate these. His owner texted me three times asking for the recipe.
What You’ll Need for These Dog Cookies :
Okay, so here’s what you need. Most of this stuff you probably already have, which is awesome because I hate special trips to the store just for one ingredient.
The Basics:
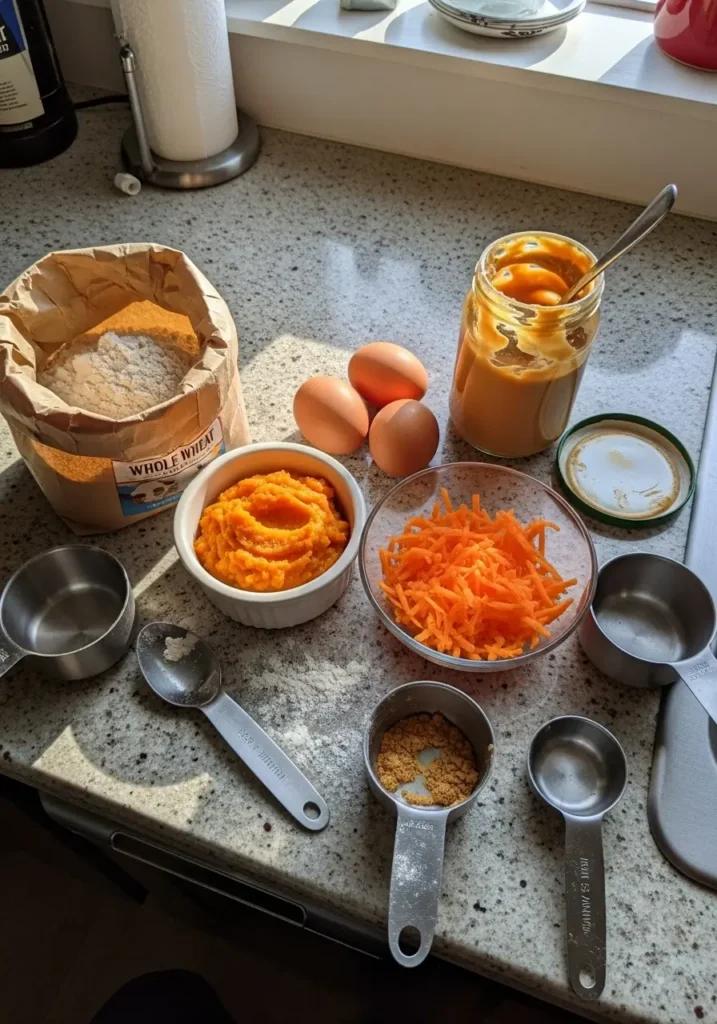
- 1 cup pumpkin puree (NOT pumpkin pie filling—I made that mistake once and my dog was wired from all the sugar)
- 1/2 cup finely shredded carrots (I use the small holes on my grater)
- 2 1/2 cups whole wheat flour (white flour works too, but whole wheat is healthier)
- 2 eggs (room temperature works better, but cold is fine if you’re impatient like me)
- 3 tablespoons peanut butter (make sure it’s xylitol-free! Seriously, check the label)
- 1/4 cup water (might need a bit more or less depending on humidity or whatever)
That’s it. No weird ingredients you need to hunt down at specialty stores.
Shopping tip: I get the canned pumpkin from Trader Joe’s because it’s cheap and I trust it. Also, for the carrots, I just grab whatever’s on sale. Don’t overthink it.
How to Make Dog Cookies :
Step 1: Preheat and Prep
Set your oven to 350°F. I always forget this step and end up waiting around awkwardly while the oven heats up, so do it first. Trust me.
Line two baking sheets with parchment paper. You can skip this, but then you’ll be scrubbing baked-on cookie bits for like twenty minutes. Been there, not fun.
Step 2: Mix the Wet Stuff
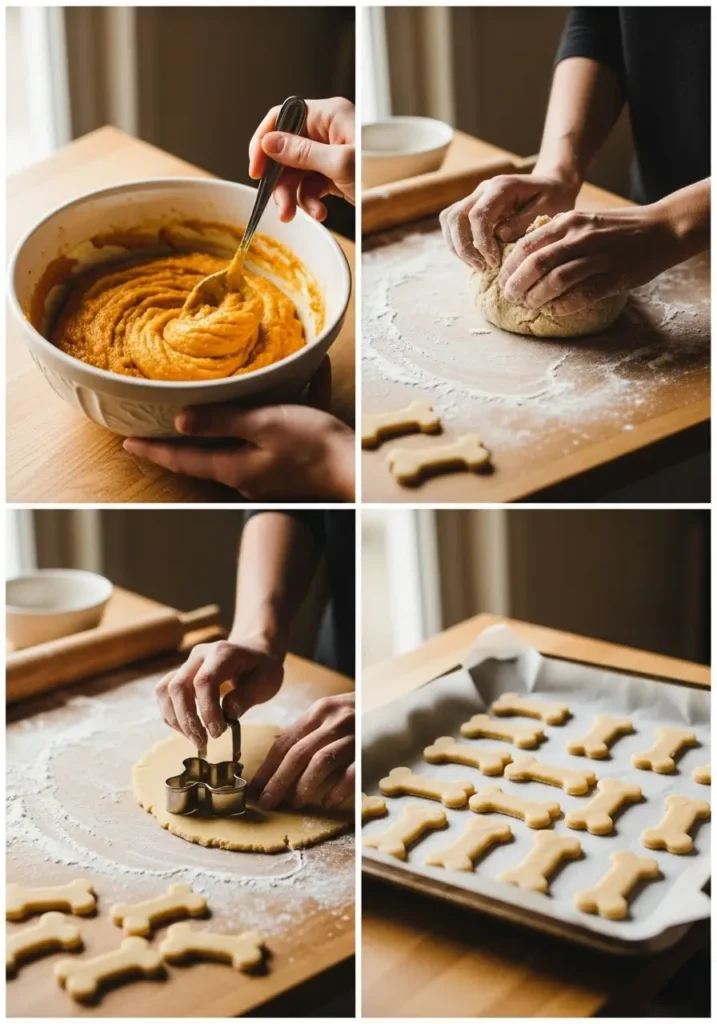
Grab a big bowl—and I mean big, because this gets messy. Throw in your pumpkin puree, eggs, and peanut butter. Mix it all together with a wooden spoon or spatula.
Here’s where I messed up the first time: I used a whisk thinking it would be faster. Don’t. The pumpkin gets all stuck in the whisk wires and it’s annoying. Just use a spoon.
The mixture will look kinda orange and gloppy. That’s normal. If it smells really good and you’re tempted to taste it… well, it’s technically safe, but maybe don’t?
Step 3: Add Carrots
Toss in your shredded carrots. I use the fine shred because big carrot chunks make the dough weird and lumpy. Mix it in until everything’s combined.
Pro tip: If you’re lazy like me, buy pre-shredded carrots. They work fine. Anyone who judges you for that is not your friend.
Step 4: The Flour Situation
Start adding your flour, about 1 cup at a time. This is where it gets thick and your arm starts hurting. Sorry.
After the second cup, add your water. Then add the last half cup of flour gradually. You want dough that’s firm but not crumbly. Kind of like… play-doh? That’s the best way I can describe it.
If it’s too sticky, add more flour (like a tablespoon at a time). If it’s too dry and cracking, add a tiny splash more water. Every time I make these, the dough feels slightly different depending on how humid it is outside. Just go with it.
Step 5: Roll and Cut
Flour your countertop or a big cutting board. Dump the dough out and knead it a few times. Just fold it over itself like five times—you’re not making artisan bread here.
Roll it out to about 1/4 inch thick. I use a wine bottle when I can’t find my rolling pin (which is most of the time, honestly).
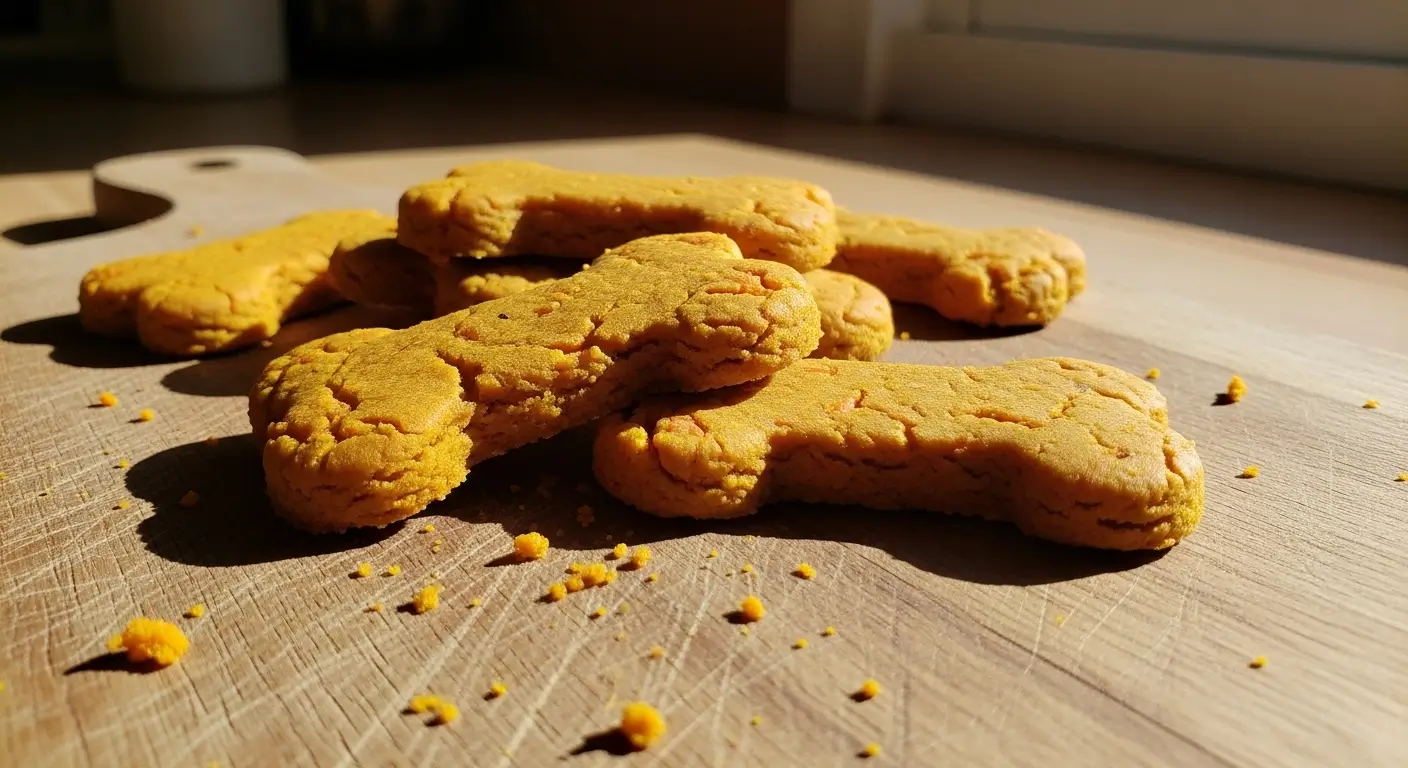
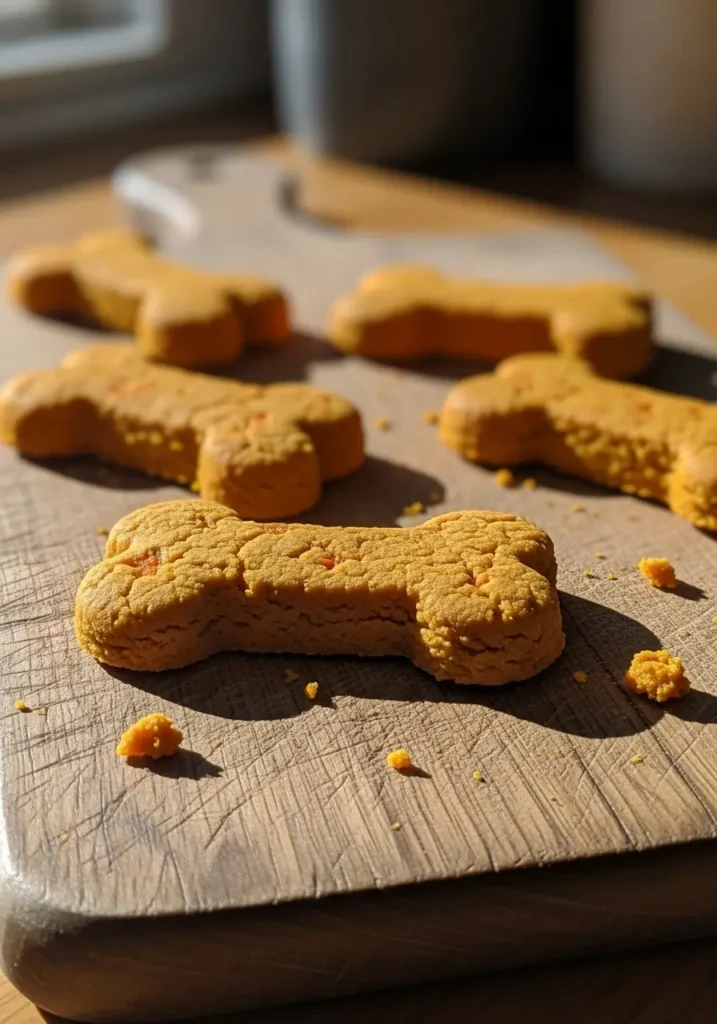
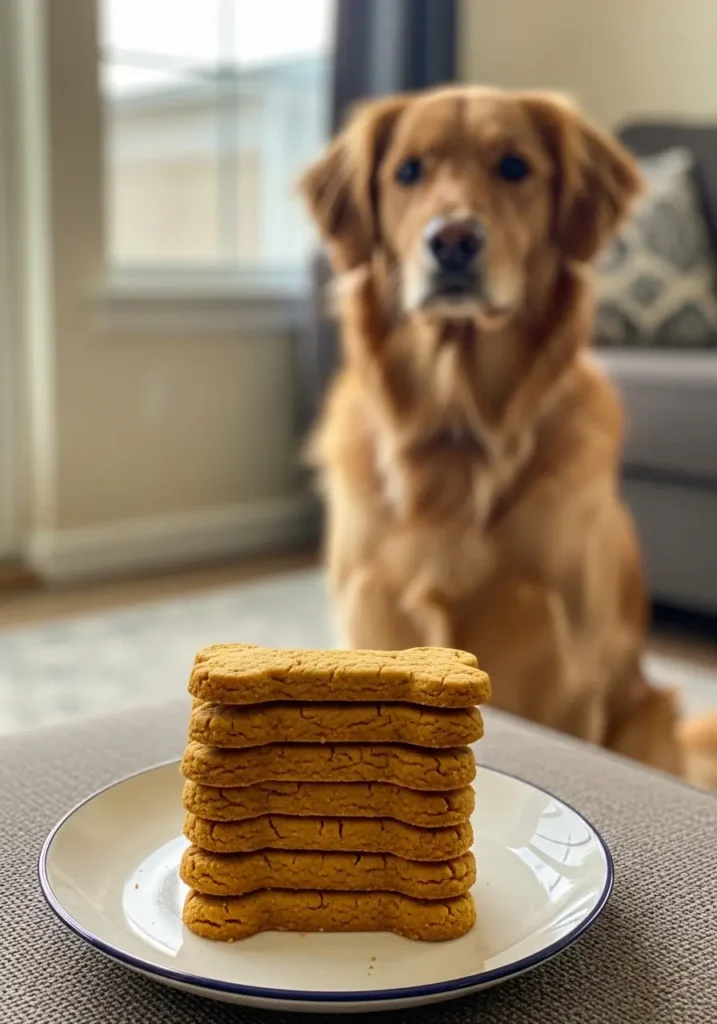
Now for the fun part: cookie cutters! I have bone-shaped ones because I’m basic like that, but literally any shape works. Luna doesn’t care if her cookie is a bone or a star or whatever. Use what you have.
Step 6: Bake These Dog Cookies
Place your cut-out cookies on the baking sheets. They don’t spread, so you can put them pretty close together.
Bake for 25-30 minutes. They should be firm and slightly golden on the edges. The middle might still feel a tiny bit soft, but they’ll harden as they cool.
Here’s the thing nobody tells you: they smell AMAZING while baking. Like, fall candle amazing. My husband walked in and asked what I was making for us. Had to break it to him that it was dog food. He was disappointed.
Step 7: Cool Completely
This is important. Let them cool on the baking sheet for about 10 minutes, then move them to a cooling rack or just your counter.
They need to cool completely before you give them to your dog. I learned this when Luna burned her tongue on a warm cookie and gave me the most betrayed look I’ve ever seen. Felt terrible.
Storage Tips :
These dog cookies last about 2 weeks in an airtight container on the counter. I use an old cookie jar that I labeled “LUNA’S COOKIES” so nobody accidentally eats them. Although honestly, they’re probably safe for humans—just really bland.
You can also freeze them! I make double batches and freeze half. They last like 3 months in the freezer. Just thaw them out before giving them to your dog.
My Honest Thoughts on These Dog Cookies :
Luna is obsessed. Like, she hears the container open from two rooms away and comes running. It’s actually hilarious.
They’re super easy once you get the hang of the dough consistency. The first time took me like an hour because I kept second-guessing everything. Now I can whip these up in 30 minutes, not counting baking time.
Are they perfect? No. Sometimes they come out a little harder than other times depending on how long I bake them. Sometimes the shapes get a bit wonky. But does my dog care? Absolutely not.
The pumpkin and carrot combo is great for fall, but honestly, I make these year-round now because they’re healthier than store-bought treats and way cheaper.
One thing: if your dog is picky, these might take some getting used to. They’re not super flavorful compared to those meat-flavored treats with a million additives. But most dogs seem to love them once they try them.
Quick Tips from Trial and Error :
- Don’t skip checking your peanut butter for xylitol. Seriously. It’s toxic to dogs.
- If the dough is sticky, don’t panic. Just add flour.
- Smaller cookies bake faster and crunchier. Bigger ones stay a bit softer inside.
- You can add a tablespoon of cinnamon if you want. Dogs can have cinnamon in small amounts, and it makes your house smell incredible.
- Store them in something airtight or they’ll get soft and gross.
Anyway, if you have a dog and some basic ingredients, give these a try. Even if you mess up the first batch (like I did), it’s worth it to see your pup’s excited face. Luna literally does a little dance now when she sees me getting the ingredients out.
Let me know if your dog loves these as much as mine does! And if anyone has tips for making these even better, I’m all ears 🙂
Happy baking! (And may your kitchen not end up covered in pumpkin like mine did that first time)
Homemade Pumpkin & Carrot Dog Cookies – Healthy Fall Treats
Healthy homemade dog cookies made with pumpkin and carrots. Easy fall treat recipe using simple ingredients that's perfect for dogs with sensitive stomachs. No artificial additives, just wholesome goodness your pup will love.
Ingredients
- 1 cup pumpkin puree (not pumpkin pie filling)
- 1/2 cup finely shredded carrots
- 2 1/2 cups whole wheat flour
- 2 eggs (room temperature)
- 3 tablespoons peanut butter (xylitol-free)
- 1/4 cup water
Instructions
- Step 1Preheat oven to 350°F (175°C). Line two baking sheets with parchment paper.
- Step 2In a large bowl, combine pumpkin puree, eggs, and peanut butter. Mix with a spoon until well combined.
- Step 3Add finely shredded carrots to the wet mixture and stir until evenly distributed.
- Step 4Add flour 1 cup at a time. After the second cup, add water, then gradually add remaining flour until dough is firm but not crumbly.
- Step 5Turn dough onto a floured surface and knead 5-6 times until smooth.
- Step 6Roll dough to 1/4 inch thickness. Use cookie cutters to cut into desired shapes.
- Step 7Place cookies on prepared baking sheets. Bake for 25-30 minutes until firm and slightly golden on edges.
- Step 8Let cookies cool on baking sheet for 10 minutes, then transfer to cooling rack. Cool completely before serving to dogs.