
Why do people throw away pumpkin seeds?! I used to do this until like two years ago when my neighbor mentioned she roasts hers every fall and I felt like an absolute idiot for wasting them my entire life. So much wasted snacking potential.
Now I’m completely obsessed with roasted pumpkin seeds and I actually get excited when it’s pumpkin carving season because it means I get fresh seeds. My kids think I’m weird but they also eat like half the batch before I can even store them, so they can’t judge.
I think the first time I tried making pumpkin seeds was after we carved pumpkins for Halloween three years ago and I found a recipe online that said to boil them first. Big mistake. They turned out soggy and gross and I almost gave up on the whole thing. Then my friend told me you don’t need to boil them at all and it changed everything.
Honestly, roasting pumpkin seeds is one of the easiest things you can make and it feels like you’re being all sustainable and not wasting food, which makes me feel good about myself even though I definitely threw away a perfectly good cucumber last week because it got squishy in the back of my fridge.
Table of Contents :
What Makes Roasted Pumpkin Seeds So Good :
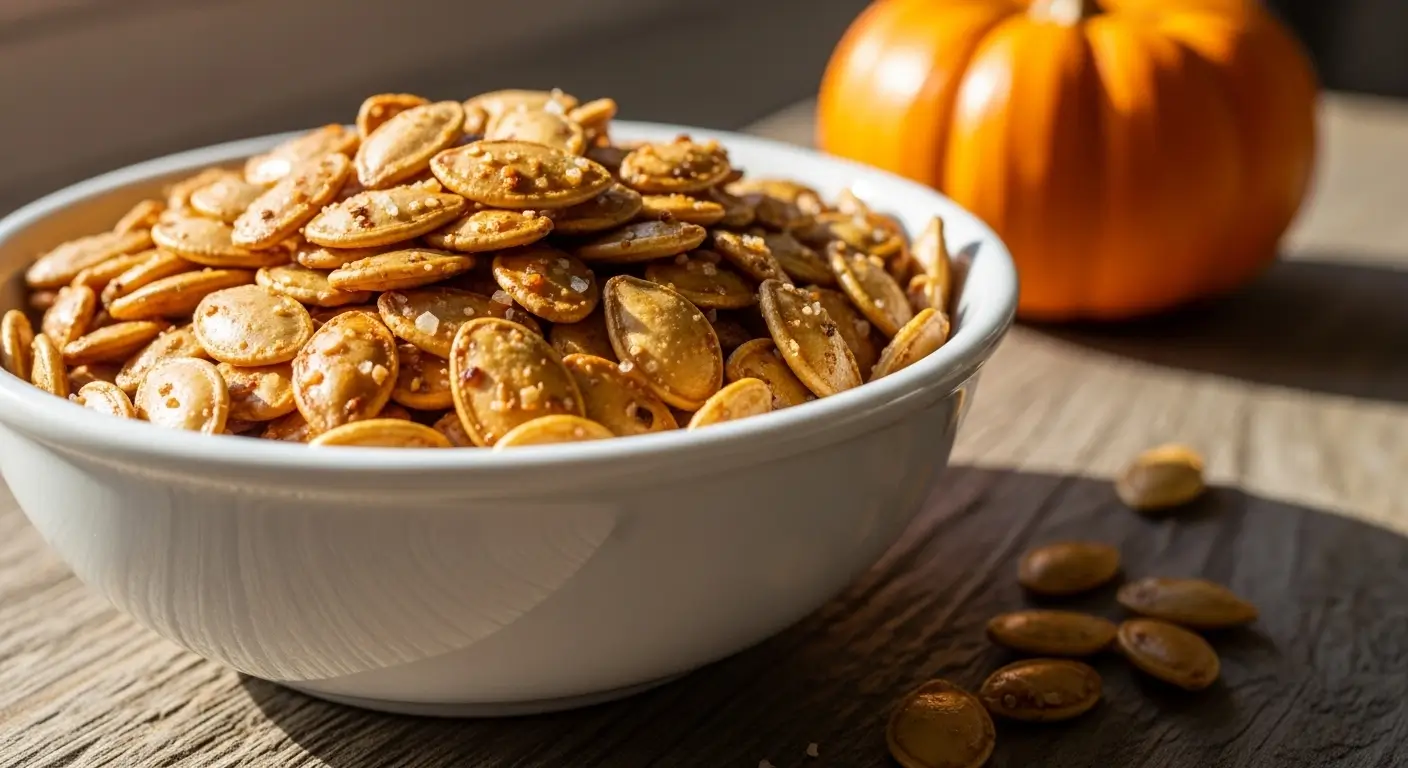
Here’s the thing—fresh pumpkin seeds are just BETTER than the ones you buy at the store. They’re crunchier, they taste fresher, and you can season them however you want. Plus they’re basically free if you’re already buying pumpkins for carving or cooking.
The seeds themselves have this nutty flavor that’s really satisfying, and when you roast them with salt and a little oil they get all crispy and addictive. I can’t stop eating them once I start, which is both good and bad because they’re healthy but also I’ve definitely eaten an entire bowl in one sitting more than once.
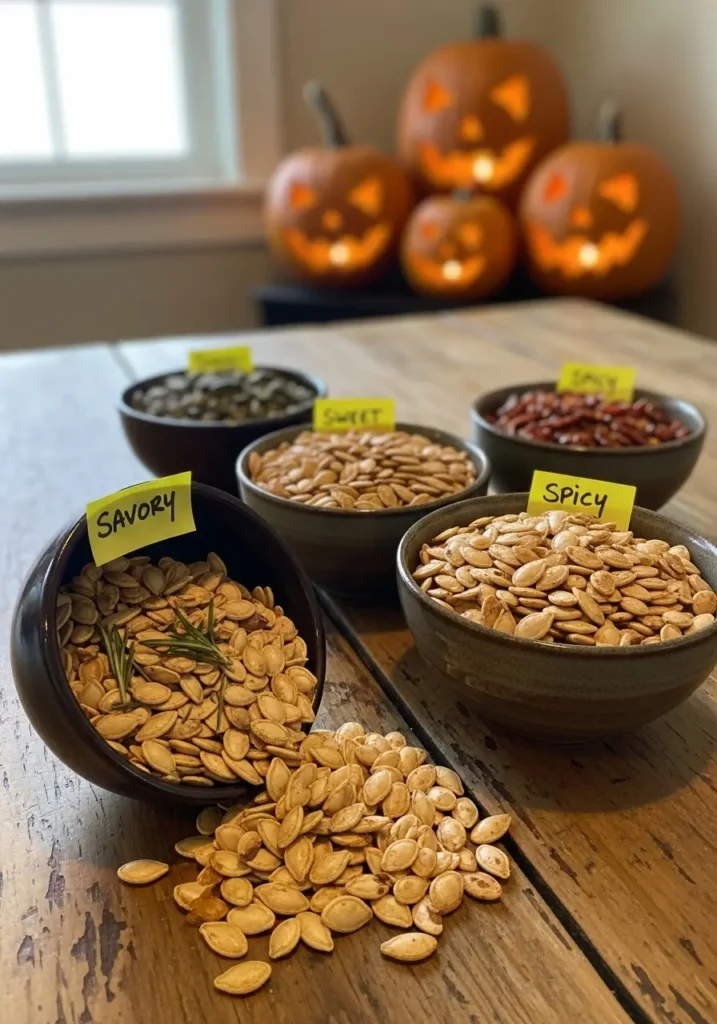
And the best part? You can make them sweet, savory, spicy, whatever you want. I’ve tried probably ten different seasoning combinations at this point and they’re all good in different ways.
Why I Almost Gave Up on Pumpkin Seeds :
So that first batch I made with the boiling method was such a disaster. The seeds were chewy instead of crunchy and they tasted kind of bland even though I’d added salt. I was so disappointed because I’d spent like 20 minutes cleaning the stringy pumpkin guts off each seed (which is annoying, by the way).
I complained to my friend about it and she said “Why did you boil them? Just rinse them and roast them.” Apparently the boiling makes them absorb water and then they don’t get crispy. Who knew? Well, probably lots of people, but not me at the time.
Second attempt without boiling was SO much better. Crispy, crunchy, actually tasted good. I was hooked.
How To Make Perfect Roasted Pumpkin Seeds :
Ingredients :
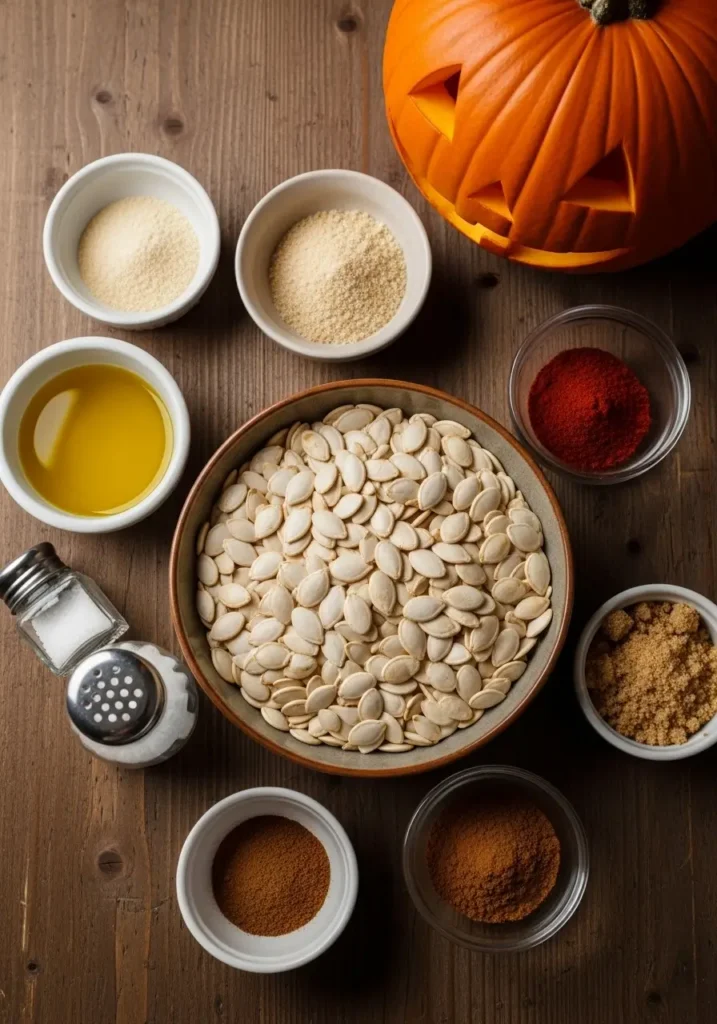
Okay, here’s what you need. The amounts are approximate because honestly who counts pumpkin seeds? Just use however many you get from your pumpkin.
Basic Recipe:
- 2 cups raw pumpkin seeds (from about 1 large pumpkin, cleaned)
- 1 tablespoon olive oil or melted butter (I use olive oil because it’s healthier but butter tastes amazing)
- 1 teaspoon salt (sea salt if you’re fancy, regular salt if you’re normal like me)
Optional Seasonings – Pick Your Favorite:
Savory Options:
- 1/2 teaspoon garlic powder
- 1/2 teaspoon onion powder
- 1/2 teaspoon smoked paprika
- 1/4 teaspoon black pepper
- Parmesan cheese (like 2 tablespoons, grated)
Sweet Options:
- 1 tablespoon brown sugar
- 1/2 teaspoon cinnamon
- Tiny pinch of nutmeg
Spicy Options:
- 1/2 teaspoon chili powder
- 1/4 teaspoon cayenne pepper (less if you’re sensitive to heat)
- 1/2 teaspoon cumin
Prep tip: Cleaning the seeds is the worst part. There’s no way around it—it’s just tedious. I usually put on a podcast and just accept that it’s gonna take 15 minutes to separate all the seeds from the stringy pumpkin guts. My hands smell like pumpkin for hours afterward but whatever, it’s worth it.
Step-by-Step Instructions For Crunchy Pumpkin Seeds :
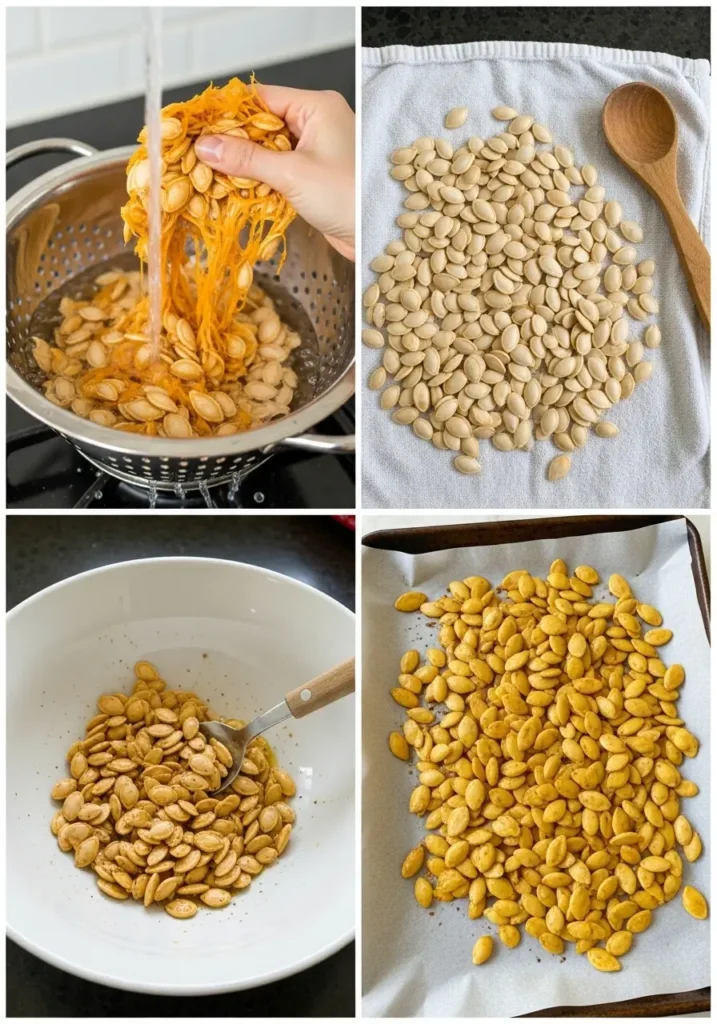
Step 1: Clean Your Pumpkin Seeds
After you scoop the seeds out of your pumpkin, put them in a colander and rinse them under cold water. Use your hands to separate the seeds from all that stringy pulp stuff. It’s messy and kind of gross but just push through.
You don’t have to get every single tiny piece of pulp off—I used to spend forever trying to make them perfectly clean but honestly a few strings won’t matter once they’re roasted.
Spread the cleaned seeds on a kitchen towel or paper towels and pat them dry. The key is—oh wait, I forgot to mention—you want them pretty dry before roasting or they’ll steam instead of getting crispy.
I usually let mine sit on the towel for like 30 minutes while I clean up the pumpkin carving mess. By then they’re dry enough.
Step 2: Preheat Your Oven
Preheat to 300°F. Not 350°F like you might think. Lower temperature means they roast more evenly and don’t burn. I learned this after burning multiple batches at higher temperatures.
Some recipes say 350°F but those people are wrong. Trust me on this one.
Step 3: Season the Seeds
Put your dried pumpkin seeds in a bowl. Drizzle with olive oil and add your salt and whatever other seasonings you’re using.
Toss everything together with your hands or a spoon until all the seeds are coated. Make sure the oil and seasonings are distributed evenly—some seeds always try to stay naked but don’t let them.
Step 4: Spread on Baking Sheet
Line a baking sheet with parchment paper (makes cleanup easier) and spread the seeds in a single layer. Don’t pile them on top of each other or they won’t crisp up properly.
If you have too many seeds for one pan, use two pans. I’ve tried cramming them all on one sheet before and the middle ones stayed soft while the edges burned. Not ideal.
Step 5: Roast
Roast for 20 minutes, then take the pan out and stir the seeds around. This is important because the ones on the edges cook faster.
Put them back in for another 10-15 minutes until they’re golden brown and crunchy. The exact time depends on your oven and how big your seeds are.
Start checking at 30 minutes total. They should be golden and when you bite one it should be crunchy all the way through. If they’re still soft in the middle, give them another 5 minutes.
The tricky part is they continue crisping a bit as they cool, so don’t wait until they’re SUPER dark brown or they’ll be overdone. I’ve burned so many batches trying to get them extra crispy.
Step 6: Cool and Store
Let them cool completely on the baking sheet. They’ll get crunchier as they cool down. This is when I usually start eating them even though I know I should wait.
Once cool, store them in an airtight container. They’ll stay crunchy for about a week—theoretically, because mine never last that long.
My Tips For the Best Roasted Pumpkin Seeds :
Don’t Boil Them
Seriously, just don’t. I know some recipes say to boil them first but it makes them soggy and they won’t get properly crispy. Just rinse and dry them well.
Dry Them Thoroughly
Wet seeds = steamed seeds = not crunchy. Pat them really dry and even let them air dry for 30 minutes before roasting if you have time.
I forgot this once and roasted them while they were still damp and they were fine but not as crispy as usual. Dry seeds are happy seeds.
Lower Temperature is Better
I know 300°F seems low and you’ll be tempted to crank it up to 350°F or higher to make them cook faster. Don’t do it. They’ll burn on the outside before getting crispy inside.
Slow and steady wins the race with pumpkin seeds.
Stir Them Halfway Through
Set a timer so you don’t forget like I do constantly. Stirring them ensures even roasting and prevents the edges from burning while the middle stays pale.
Taste Test While They’re Hot
The best way to tell if they’re done is to eat one (carefully—they’re hot). It should be crunchy all the way through, not chewy in the middle. If it’s still soft, keep roasting.
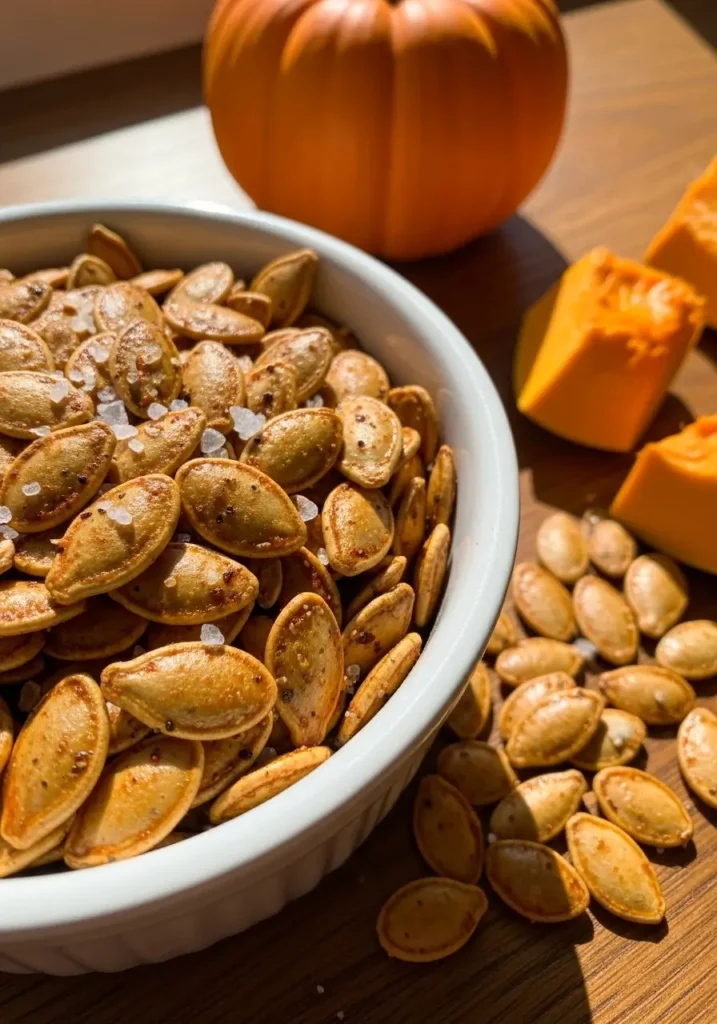
My Favorite Seasoning Combinations :
Everything Bagel Style: Garlic powder, onion powder, sesame seeds, poppy seeds, and salt. Tastes EXACTLY like everything bagel seasoning and I’m obsessed.
Sweet Cinnamon Sugar: Toss with melted butter instead of oil, then coat with cinnamon and brown sugar. These are dangerous because I can’t stop eating them.
Spicy Ranch: Mix ranch seasoning powder with a little cayenne pepper. My teenager is obsessed with these.
Parmesan Garlic: Garlic powder, salt, and freshly grated Parmesan cheese added right when they come out of the oven while they’re still hot so the cheese melts a little.
Simple Salted: Sometimes plain salt is the best. Don’t overthink it.
Why Pumpkin Seeds Are Perfect For Fall Snacking :
So obviously they’re seasonal since you get them from pumpkins, but they’re also just really satisfying to snack on. Crunchy, salty (or sweet), and they’re actually good for you with protein and healthy fats and fiber.
I started bringing them to work for afternoon snacks instead of hitting the vending machine and I feel way better. Plus people always ask what I’m eating and act impressed when I say I made them myself, even though they’re literally one of the easiest things ever.
They’re also perfect for football season. My husband and I watch games on Sundays and I make a big batch of spicy pumpkin seeds and we destroy them by halftime. Better than chips and I don’t feel as guilty.
Zero Waste Cooking at Its Finest :
One thing I love about making roasted pumpkin seeds is that you’re using something that would normally get thrown away. Like, you already bought the pumpkin for carving or cooking, so the seeds are basically a free bonus snack.
I’ve gotten so into this that I bought an extra pumpkin last week just for the seeds. Scooped them out, roasted them, and then used the pumpkin flesh for soup. Felt very “sustainable living” and Pinterest-worthy even though my kitchen was a total disaster afterward.
My mom used to throw away pumpkin seeds when I was a kid and now I’m like “Mom, you wasted SO MANY SNACKS!” She’s started making them now too after I brought her a batch. Better late than never.
My Honest Opinion on Roasted Pumpkin Seeds :
Look, roasted pumpkin seeds aren’t going to change your life or anything. But they’re a really good, really easy snack that costs basically nothing and you can customize them however you want.
Are they as addictive as chips? Maybe not quite. But they’re healthier and more interesting and you can feel good about making them yourself instead of buying overpriced snacks at the store.
The cleaning part is annoying, I won’t lie. But once you get past that, the actual roasting is super simple and takes maybe 5 minutes of active work.
If you’re carving pumpkins this year, PLEASE don’t throw away the seeds. Give them a try. Start with just salt and olive oil to keep it simple, and then experiment with seasonings once you get the basic technique down.
Let me know if you try these! And if you have seasoning combinations I haven’t thought of, share them because I’m always looking for new flavor ideas. Happy roasting! 🎃✨
Roasted Pumpkin Seeds – Crunchy & Healthy Fall Snack
Easy roasted pumpkin seeds recipe with sweet, savory, and spicy seasoning options. Perfectly crunchy homemade snack using fresh pumpkin seeds. Zero waste fall recipe ready in 35 minutes.
Ingredients
- 2 cups raw pumpkin seeds, cleaned and dried
- 1 tablespoon olive oil or melted butter
- 1 teaspoon salt
- 1/2 teaspoon garlic powder (optional, for savory)
- 1/2 teaspoon onion powder (optional, for savory)
- 1/2 teaspoon smoked paprika (optional, for savory)
- 1/4 teaspoon black pepper (optional, for savory)
- 2 tablespoons grated Parmesan cheese (optional, for savory)
- 1 tablespoon brown sugar (optional, for sweet)
- 1/2 teaspoon cinnamon (optional, for sweet)
- 1/2 teaspoon chili powder (optional, for spicy)
- 1/4 teaspoon cayenne pepper (optional, for spicy)
Instructions
- Step 1After scooping seeds from pumpkin, place in colander and rinse under cold water. Use hands to separate seeds from stringy pulp. Don't worry about removing every tiny piece. Spread cleaned seeds on kitchen towel or paper towels and pat dry. Let air dry for 30 minutes if possible for crunchiest results.
- Step 2Preheat oven to 300°F (150°C). Lower temperature ensures even roasting without burning.
- Step 3Put dried pumpkin seeds in a bowl. Drizzle with olive oil and add salt plus any optional seasonings of choice. Toss with hands or spoon until all seeds are evenly coated with oil and seasonings.
- Step 4Line a baking sheet with parchment paper. Spread seasoned seeds in a single layer without overcrowding. Use two pans if necessary to avoid piling seeds on top of each other.
- Step 5Roast for 20 minutes. Remove pan from oven and stir seeds to ensure even cooking. Return to oven and roast for additional 10-15 minutes until golden brown and crunchy. Start checking at 30 minutes total. Seeds should be golden and crunchy when bitten.
- Step 6Let seeds cool completely on baking sheet. They will continue to crisp as they cool. Once completely cool, store in airtight container at room temperature for up to 1 week.