
So here’s how this whole thing started. Last November, I was supposed to bring apple crisp to my aunt’s Thanksgiving dinner. Classic, safe choice, right? Except I completely forgot to buy apples, and the only grocery store open was charging like $8 for a bag of sad, mealy apples that looked like they’d been sitting there since Halloween.
But I had pumpkin puree in my pantry from my failed pumpkin cookie experiment (don’t ask), and I thought, “How different could it be?”
Turns out, very different. And way better.
My uncle Dave, who’s basically a human garbage disposal and will eat anything, went back for thirds. My cousin’s 6-year-old, who normally picks around anything that isn’t chicken nuggets, cleaned his entire bowl. And my grandmother? She asked for the Pumpkin Crisp recipe. ASKED FOR THE RECIPE. This is a woman who’s been making the same apple crisp for 40 years.
That’s when I knew I’d accidentally stumbled onto something special.
Table of Contents
Why Apple Crisp Has Competition Now :
Look, I’m not trying to start a crisp war here, but hear me out. Apple crisp is great and all, but it’s kinda… predictable? Sweet apples, cinnamon, oat topping. We’ve all been there.
But pumpkin crisp? It’s like apple crisp’s sophisticated cousin who studied abroad and came back with interesting stories.
The pumpkin gives you this creamy, almost custard-like base that’s way more interesting than plain fruit. Plus, you can load it up with warm spices that actually complement each other instead of just dumping cinnamon on everything and hoping for the best.
And here’s the kicker – it’s actually easier to make than apple crisp because you don’t have to peel and slice a million apples. Just open a can and you’re halfway there.
My Learning Curve :
Before I share what actually works, let me save you from my disasters:
Attempt #1: I treated it exactly like apple crisp and just swapped pumpkin for apples. The result was basically pumpkin soup with oats floating on top. My husband took one bite and asked if I was feeling okay.
Attempt #2: I overcompensated and made the pumpkin base too thick and dense. It was like eating pumpkin cement with a crispy hat. Even the dog wouldn’t finish it.
Attempt #3: I went crazy with the spices and it tasted like I’d dumped an entire spice rack into a pumpkin. My 12-year-old said it “tastes like fall threw up.” Harsh but accurate.
But attempt #4? Pure magic. The perfect balance of creamy pumpkin custard base with a crispy, buttery topping that actually stays crispy.
Ingredients :
After all my trial and error, here’s what you need for one 9×13 pan of pure fall bliss:
For the pumpkin base:
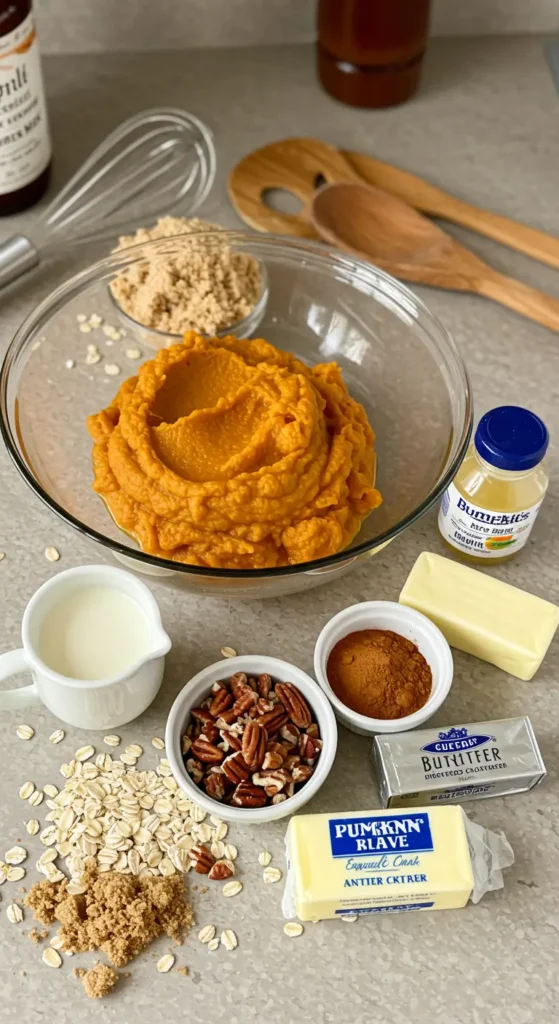
- 1 can (29 oz) pumpkin puree (the big can, not the little one)
- 1 can (12 oz) evaporated milk (not condensed milk – learned that the hard way)
- 3 large eggs
- 3/4 cup granulated sugar
- 1 teaspoon vanilla extract
- 1 teaspoon ground cinnamon
- 1/2 teaspoon ground nutmeg
- 1/4 teaspoon ground ginger
- 1/4 teaspoon ground cloves
- 1/2 teaspoon salt
For the crispy topping:
- 1 cup old-fashioned oats (not instant – they turn to mush)
- 1/2 cup all-purpose flour
- 1/2 cup packed brown sugar
- 1/4 cup granulated sugar
- 1/2 teaspoon cinnamon
- 1/4 teaspoon salt
- 1/2 cup cold butter, cubed
- 1/2 cup chopped pecans (optional but highly recommended)
Now, about that evaporated milk versus condensed milk situation. I grabbed the wrong can once and ended up with pumpkin candy instead of pumpkin crisp. Evaporated milk is the unsweetened stuff in the tall can. Condensed milk is the super sweet stuff that will ruin your day if you use it by mistake.
The Process :
Step 1: Prep like a pro
Preheat your oven to 425°F. Grease a 9×13 inch baking dish. I use butter because it adds flavor, but cooking spray works too if you’re trying to save calories elsewhere.
Step 2: Build the pumpkin base
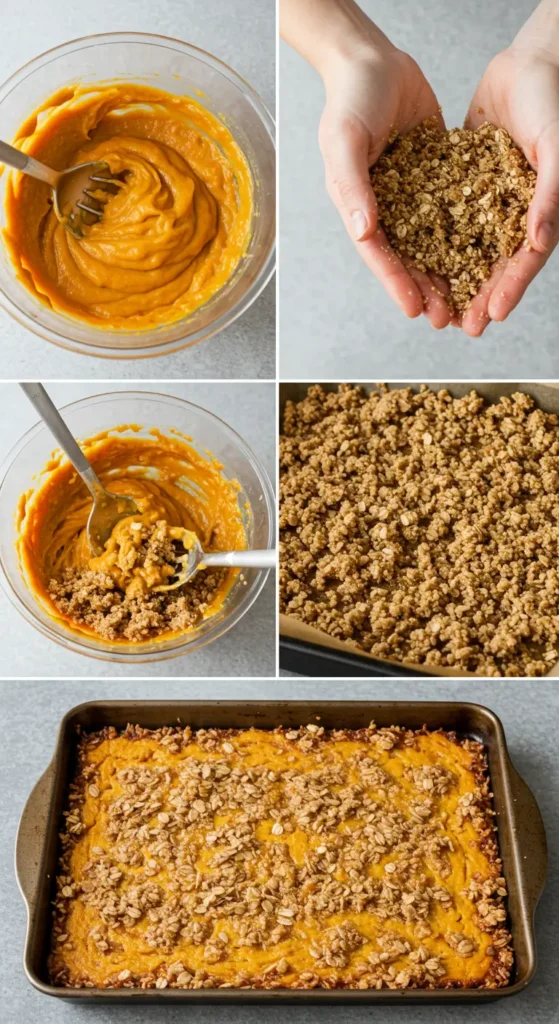
In a large bowl, whisk together pumpkin puree, evaporated milk, eggs, granulated sugar, and vanilla until smooth. Add all your spices and salt, and whisk until everything’s completely combined.
The mixture should be smooth and pourable, kind of like a thick smoothie. If it looks lumpy, keep whisking. Nobody wants chunks of mystery spice in their crisp.
Step 3: The topping magic
In another bowl, mix oats, flour, both sugars, cinnamon, and salt. Add the cold butter cubes and use your fingers (or a pastry cutter if you’re fancy) to work it in until the mixture looks like coarse crumbs with some bigger butter pieces.
This is where most people mess up – they over-mix the topping until it becomes paste. You want it crumbly and varied in size. Some big pieces, some small pieces. That’s what gives you the perfect texture contrast.
Stir in the pecans if you’re using them. My kids always pick them out, but they add this amazing nutty flavor that makes the whole thing taste more sophisticated.
Step 4: Assembly time
Pour the pumpkin mixture into your prepared baking dish and spread it evenly. It should be about an inch thick – if it’s much thinner, it’ll overcook and get rubbery.
Sprinkle the oat topping evenly over the pumpkin. Don’t pack it down or anything, just distribute it so every bite will have some crunch.
Step 5: The two-temperature trick
Here’s the secret that took me three attempts to figure out: start at high heat, then reduce.
Bake at 425°F for 15 minutes, then reduce the temperature to 350°F and bake for another 35-40 minutes. The high heat sets the pumpkin base, and the lower heat cooks it through without burning the topping.
It’s done when the pumpkin is set (doesn’t jiggle when you shake the pan) and the topping is golden brown.
Step 6: The cooling challenge
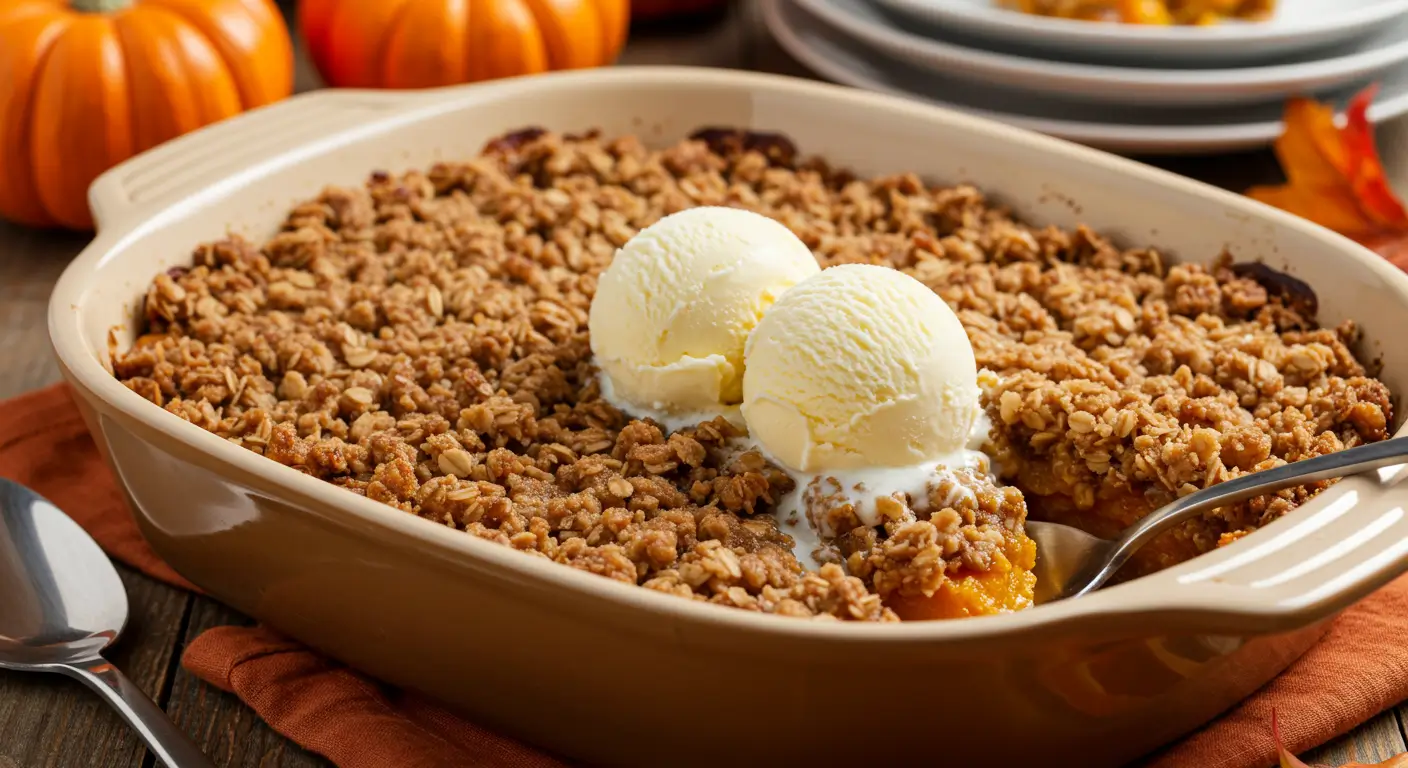
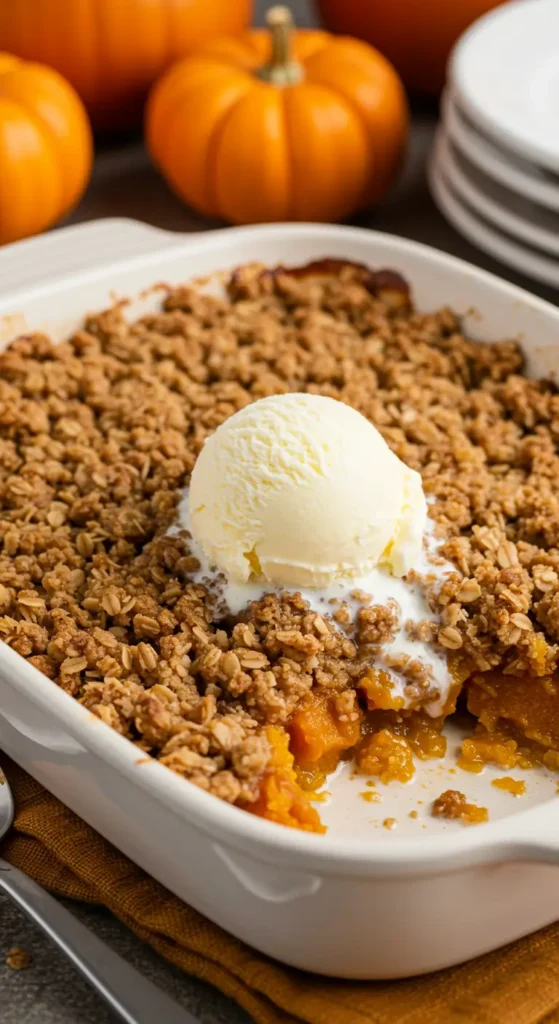
Let it cool for at least 30 minutes before serving. I know this is torture when your kitchen smells like fall paradise, but hot pumpkin crisp is basically molten lava and will burn your tongue off.
Serving Suggestions That Actually Matter :
This is amazing on its own, but here’s how my family likes to dress it up:
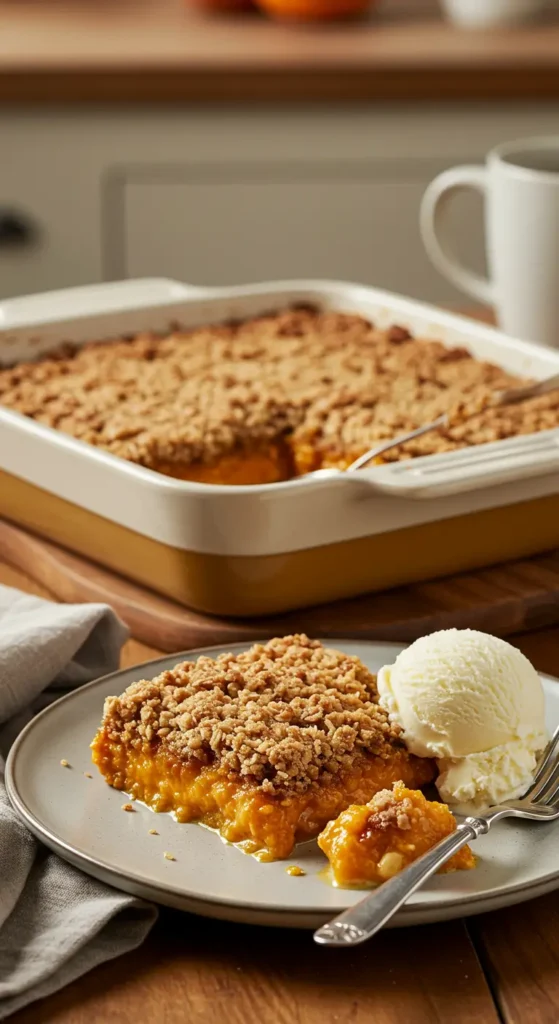
- Vanilla ice cream (obviously)
- Whipped cream with a sprinkle of cinnamon
- Caramel sauce (store-bought is fine, we’re not making everything from scratch)
- Just a cold glass of milk for the kids
I’ve also served it for breakfast with coffee, and nobody complained. It’s got pumpkin in it, so it’s basically a vegetable, right?
Storage and Leftover Situations :
This keeps covered in the fridge for about 5 days, though it never lasts that long in my house. You can eat it cold straight from the fridge (my teenage son’s preferred method), or reheat individual portions in the microwave for about 30 seconds.
If you want to get the topping crispy again, pop it under the broiler for a minute or two. Just watch it like a hawk because that line between perfectly crispy and completely burnt is thin.
Seasonal Variations That Work :
Traditional Thanksgiving: Add a handful of mini marshmallows to the topping in the last 10 minutes of baking.
Cranberry Orange: Mix dried cranberries into the pumpkin base and add orange zest to the topping.
Maple Pecan: Replace some of the granulated sugar with maple syrup and double the pecans.
Chocolate Chip: Because sometimes you need chocolate. Fold mini chocolate chips into the pumpkin base.
Why This Pumpkin Crisp Works When Others Don’t :
I’ve tried probably six different pumpkin crisp recipes, and most of them are either too sweet, too dense, or the topping gets soggy.
This one works because:
- The two-temperature baking method prevents overcooking
- The ratio of liquid to pumpkin creates the perfect custard-like texture
- The topping stays crispy because it’s not overworked
- The spice blend is balanced (not just cinnamon overload)
The Real Family Test :
My 7-year-old, who thinks most desserts are “too spicy” (everything is too spicy to him), actually asked for seconds. That’s when I knew this recipe was solid.
My husband, who usually needs ice cream with every dessert, ate this plain and said it was “better than restaurant dessert.” High praise from a man who once ordered dessert at Applebee’s and called it “fancy.”
Even my neighbor’s kids, who are notoriously picky, devoured their bowls when I brought some over. Their mom texted me later asking if I was trying to make her look bad with my “fancy desserts.” Mission accomplished.
The Thanksgiving Takeover :
So remember how this started as a last-minute apple crisp substitute? Well, it’s officially replaced apple crisp at our family Thanksgiving. My grandmother, who’s been the dessert queen for decades, actually asked me to bring this instead of her traditional apple crisp this year.
I’m not gonna lie – I felt pretty proud of myself. It’s not often you accidentally create something that becomes a new family tradition.
Cost Breakdown :
Making this costs about $6 total and serves 8-10 people generously. That’s like 60 cents per serving for a dessert that tastes like it came from a fancy bakery.
Compare that to buying dessert for 10 people, and you’re saving at least $30. Plus, you get to eat it warm from the oven, which you can’t get from a store.
Final Thoughts From an Accidental Pumpkin Crisp Expert :
This pumpkin crisp has taught me that sometimes the best discoveries happen when you’re just trying to solve a problem with whatever you have on hand.
It’s become one of those recipes that people ask me to bring to every fall gathering. And honestly, I’m okay with being known as “the pumpkin crisp lady.” There are worse reputations to have.
The best part? It actually tastes better the second day. The flavors meld together and the pumpkin base gets even creamier. So you can make it ahead for parties or holidays without any stress.
Give it a try, and don’t be surprised if it becomes your new fall tradition too. Sometimes the best recipes are the ones that sneak up on you when you’re not even trying.
Let me know how yours turns out! And if your family starts requesting it for every fall gathering like mine does, welcome to the club.
Happy fall baking! (May your topping stay crispy and your pumpkin be perfectly spiced) 🎃🥧
Pumpkin Crisp
Creamy pumpkin custard base topped with crispy oat streusel. A perfect fall dessert that combines the best of pumpkin pie and fruit crisp. Features warm spices and a golden, crunchy topping that stays crispy.
Ingredients
- 1 can (29 oz) pumpkin puree
- 1 can (12 oz) evaporated milk
- 3 large eggs
- 3/4 cup granulated sugar
- 1 teaspoon vanilla extract
- 1 teaspoon ground cinnamon
- 1/2 teaspoon ground nutmeg
- 1/4 teaspoon ground ginger
- 1/4 teaspoon ground cloves
- 1/2 teaspoon salt
- 1 cup old-fashioned oats
- 1/2 cup all-purpose flour
- 1/2 cup packed brown sugar
- 1/4 cup granulated sugar
- 1/2 teaspoon ground cinnamon
- 1/4 teaspoon salt
- 1/2 cup cold butter, cubed
- 1/2 cup chopped pecans (optional)
Instructions
- Step 1Preheat oven to 425°F (220°C). Grease a 9x13-inch baking dish.
- Step 2In a large bowl, whisk together pumpkin puree, evaporated milk, eggs, 3/4 cup granulated sugar, and vanilla until smooth.
- Step 3Add cinnamon, nutmeg, ginger, cloves, and salt to pumpkin mixture. Whisk until completely combined and smooth.
- Step 4Pour pumpkin mixture into prepared baking dish and spread evenly.
- Step 5For topping: In another bowl, mix oats, flour, brown sugar, 1/4 cup granulated sugar, cinnamon, and salt.
- Step 6Add cold butter cubes to oat mixture and use fingers or pastry cutter to work butter in until mixture resembles coarse crumbs with some larger pieces.
- Step 7Stir in chopped pecans if using. Sprinkle topping evenly over pumpkin base.
- Step 8Bake at 425°F for 15 minutes, then reduce temperature to 350°F (175°C) and bake 35-40 minutes more until pumpkin is set and topping is golden brown.
- Step 9Cool for at least 30 minutes before serving. Serve warm or at room temperature with ice cream or whipped cream.