
Peppermint cookie cups are one of those recipes that look way harder than they actually are. Like, people see them at holiday parties and think you spent hours being all Martha Stewart, but the truth? I made a batch last Sunday while binge-watching Netflix and barely paid attention.
These chocolate peppermint cookie cups are basically little edible bowls of Christmas magic. Crispy cookie on the outside, filled with whatever your heart desires (I’ll get to that), and they make your kitchen smell like a candy cane factory exploded. In a good way.
My mom saw these on Instagram and texted me at 7 AM asking how to make them. 7 AM! On a Saturday! So clearly they’re a hit.
Table of Contents :
Why I’m Obsessed With This Cookie Cups Recipe :
Okay, so here’s the thing about cookie cups—they’re ridiculously versatile. You can make them for cookie cups christmas parties, or honestly any time you want to impress people without actually trying that hard.
I’ve been making variations of this cookie cups recipe for like three years now, ever since my friend Jessica brought peppermint cheesecake cookie cups to a potluck and refused to share the recipe. So I reverse-engineered it out of spite. Mine are better. (Sorry, Jessica.)
The chocolate and peppermint combo is just chef’s kiss for winter. It reminds me of those peppermint hot chocolate cookie cups Starbucks tries to sell for eight dollars, except these cost like fifty cents each to make and taste a million times better.
The Magic of Cookie Cups Muffin Tin Method :
Using a cookie cups muffin tin is honestly the smartest baking hack I’ve learned in years. You literally just press cookie dough into the tin, bake, and boom—perfect little cups. No fancy equipment needed.
I tried making these in a regular pan once thinking I’d be clever and cut them into squares, and it was a disaster. Complete disaster. Stick with the muffin tin, trust me.
Pro tip: I use a mini muffin tin because the regular-sized ones make cups that are too big and unwieldy. Mini = bite-sized = less guilt when you eat seven of them. Math.
Can You Use Cookie Cups With Premade Dough?
So everyone asks me about cookie cups with premade dough, and honestly? Yes. Absolutely yes.
Last December I was making these at 11 PM for a holiday party the next morning (I’m excellent at time management, obviously), and I grabbed a tube of Pillsbury sugar cookie dough from the store because I’m not a hero. Worked perfectly.
But I think… no, I know homemade dough tastes better. The premade stuff works in a pinch, especially for cookie cups muffin tin premade dough situations when you’re desperate, but the homemade version has this richer chocolate flavor that’s worth the extra 10 minutes of effort.
Actually, you know what? If you’re doing cookie cups with premade dough, add some cocoa powder and crushed candy canes to it. Makes it taste less… store-bought-y.
What You Need for These Chocolate Peppermint Cookie Cups :
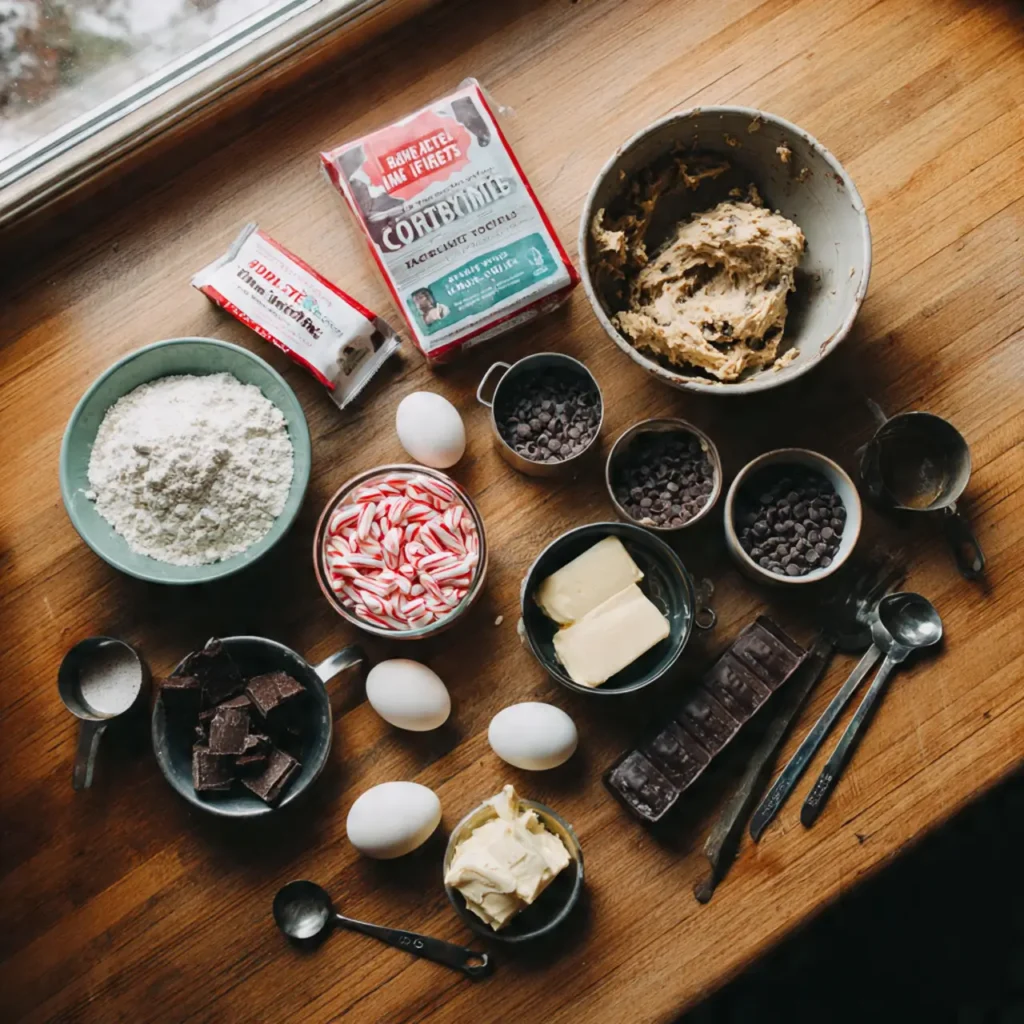
For the Cookie Cups:
- 1 cup unsalted butter, softened (leave it out for like an hour, or microwave for 10 seconds if you’re impatient like me)
- 1 cup granulated sugar
- 1/2 cup brown sugar (light or dark, doesn’t matter)
- 2 large eggs
- 2 teaspoons vanilla extract
- 1 teaspoon peppermint extract (don’t skip this or they’ll just be chocolate cookies)
- 2 cups all-purpose flour
- 3/4 cup unsweetened cocoa powder (I use Hershey’s)
- 1 teaspoon baking soda
- 1/2 teaspoon salt
- 1/2 cup mini chocolate chips (optional but highly recommended)
For the Filling:
- 8 oz cream cheese, softened (this is for the peppermint cheesecake cookie cups version)
- 1/4 cup powdered sugar
- 1/2 teaspoon peppermint extract
- 1/2 cup crushed candy canes or peppermint candies
- Whipped cream (store-bought is fine, I use Cool Whip because I’m classy)
Quick story: I forgot to soften the cream cheese once and tried to mix it hard from the fridge. My hand mixer literally gave up and stopped working. RIP to that mixer, 2018-2023. Let your cream cheese soften properly.
How to Make These Cookie Cups :
Step 1: Preheat your oven to 350°F. Spray a mini muffin tin with cooking spray or use those little paper liners. I prefer spray because less waste, but the liners make them prettier if you’re gifting these.
Step 2: In a big bowl, cream together the softened butter and both sugars until fluffy. This takes like 2-3 minutes with a hand mixer. Your arm will hurt if you do it by hand, so don’t.
Step 3: Beat in the eggs one at a time, then add vanilla and peppermint extract. The mixture will look kinda weird and separated at first, but keep mixing. It’ll come together.
Step 4: In another bowl (ugh, I know, more dishes), whisk together flour, cocoa powder, baking soda, and salt. Then gradually add this to the wet mixture. Mix until JUST combined. Overmixing makes tough cookies, and we don’t want that.
Step 5: Fold in the mini chocolate chips if using. I always use them because more chocolate is always the answer.
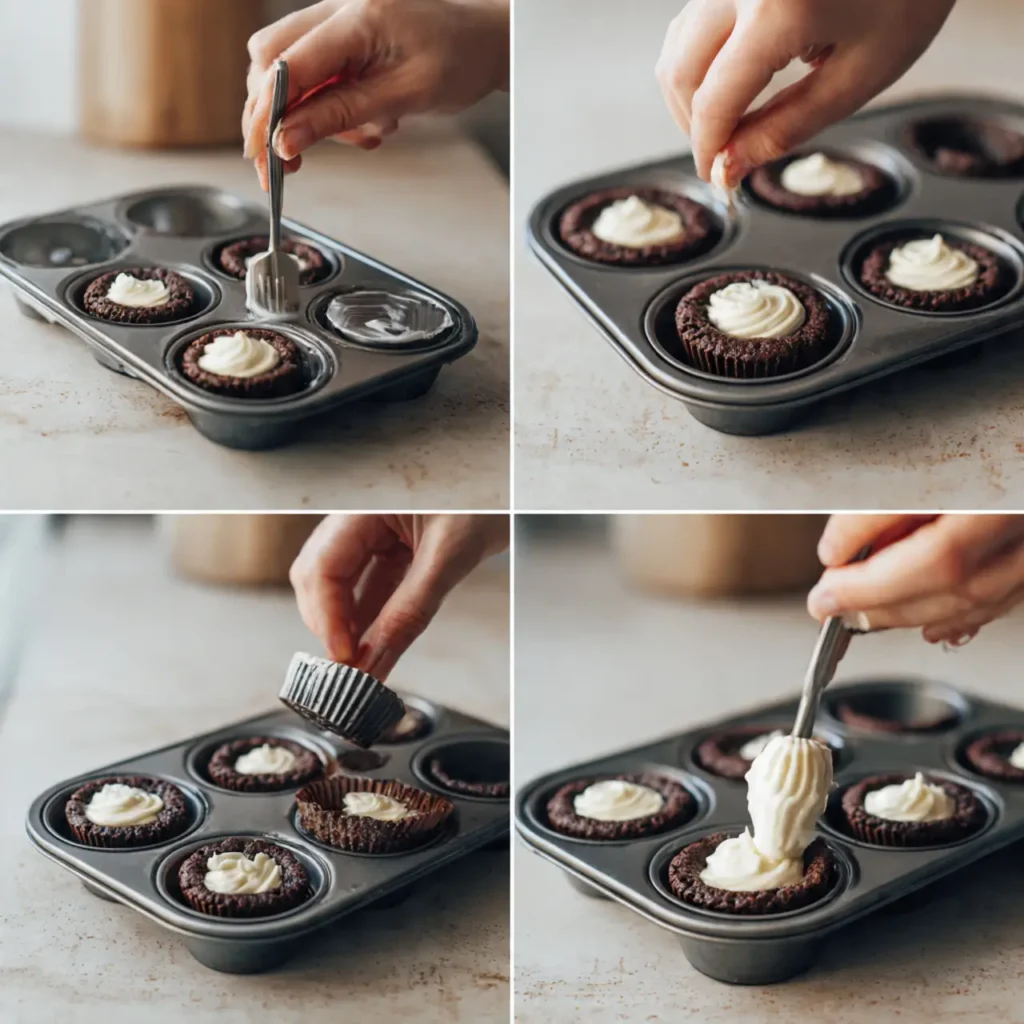
Step 6: Here’s where people mess up—take about a tablespoon of dough and roll it into a ball. Place it in the muffin tin cup and press it down with your thumb to create a little well in the center. Don’t flatten it completely! You want raised edges to hold the filling.
The key is—oh wait, I forgot to mention—make sure you leave the edges thicker than the bottom, or they’ll leak. Learned that the hard way when filling oozed everywhere and burned onto my muffin tin. Took forever to clean.
Step 7: Bake for 10-12 minutes. They’ll look slightly underbaked and that’s FINE. They continue cooking after you take them out. If you overbake, they’ll be hard and sad.
Step 8: As soon as they come out of the oven, use a small spoon or your thumb (careful, they’re hot!) to press down the centers again to make the cups deeper. They puff up during baking.
Step 9: Let them cool in the pan for 5 minutes, then carefully transfer to a wire rack. They’re delicate when warm, so be gentle or they’ll break and you’ll be sad.
Making the Peppermint Cheesecake Filling :
While the cookie cups cool (patience is not my strong suit, but you gotta wait), make the filling.
Beat the softened cream cheese with powdered sugar and peppermint extract until smooth and creamy. This takes like 2 minutes. Fold in most of the crushed candy canes, saving some for topping.
When the cookie cups are completely cool—and I mean COMPLETELY cool, not “eh, they’re probably fine” cool—spoon or pipe the filling into each cup. I use a plastic baggie with the corner cut off as a makeshift piping bag because I’m too lazy to wash actual piping bags.
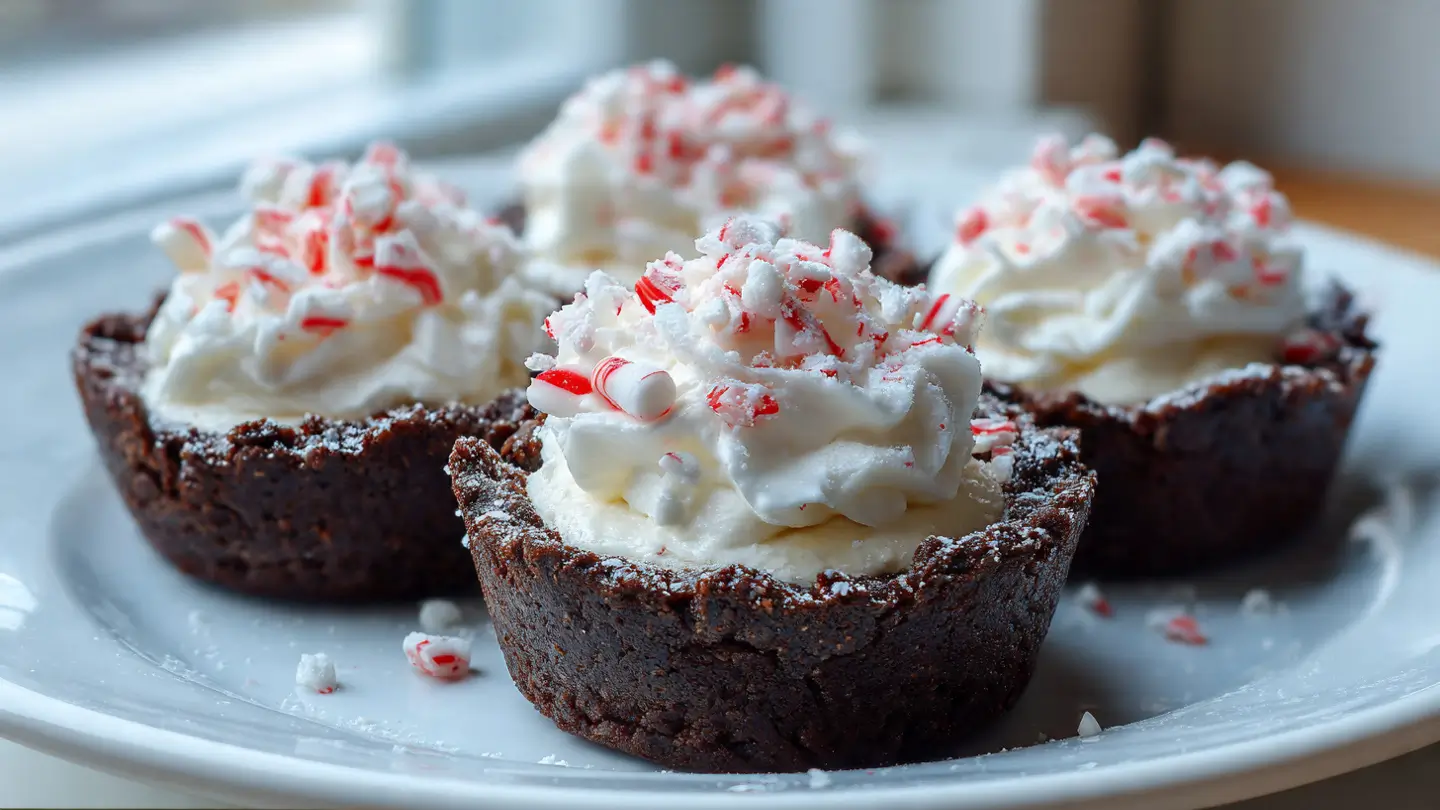
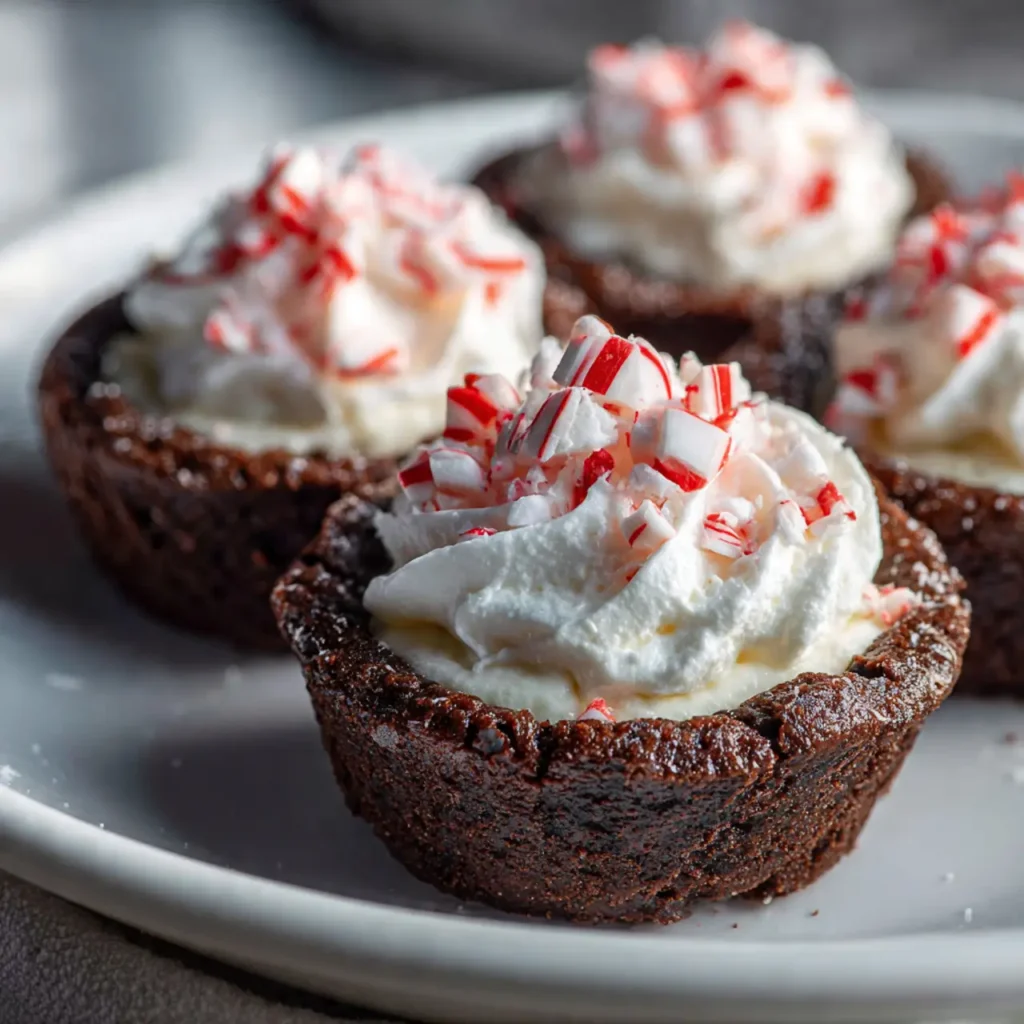
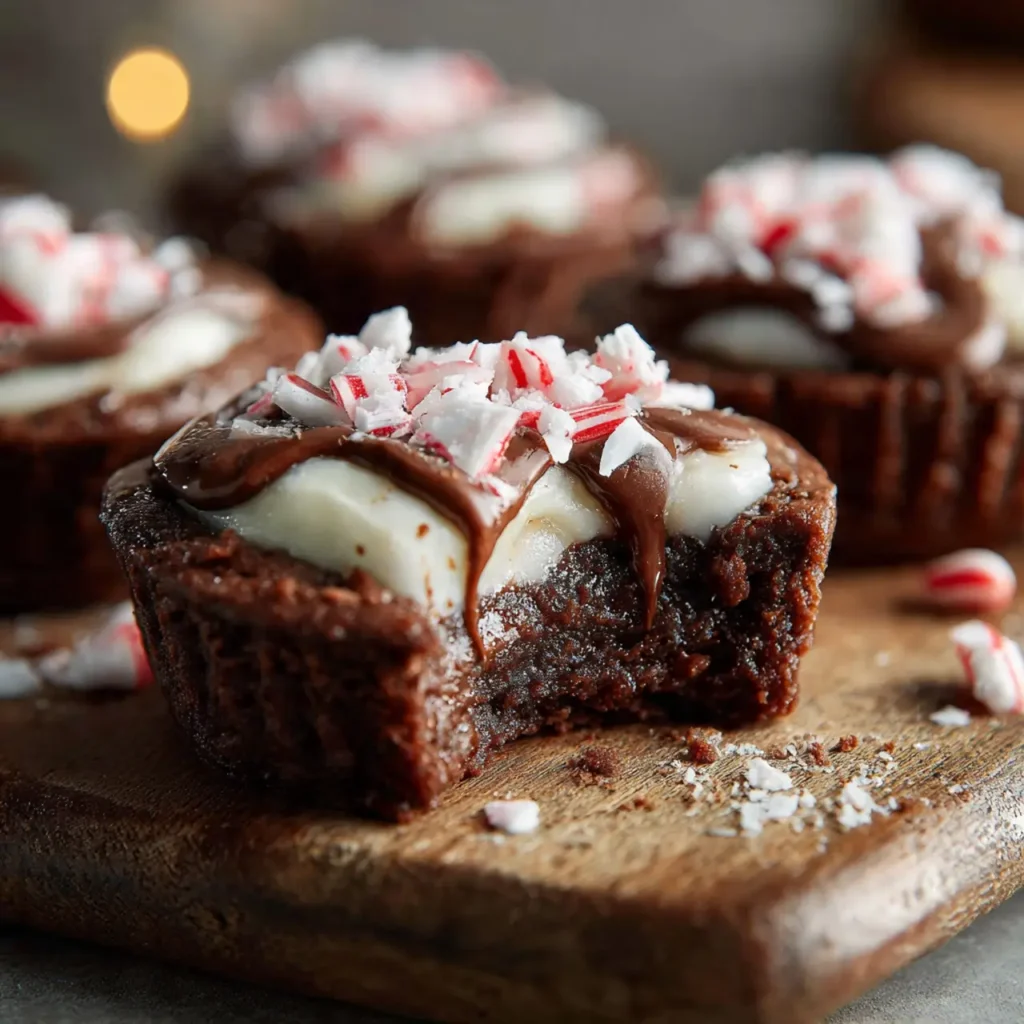
Top with a dollop of whipped cream and sprinkle with the remaining crushed candy canes. They look so pretty at this point that I always take photos before anyone eats them.
Other Filling Ideas :
Listen, the cheesecake filling is amazing, but sometimes I mix it up:
Peppermint Hot Chocolate Version: Fill with homemade or instant hot chocolate (cooled slightly), top with mini marshmallows and chocolate shavings. Game changer.
Simple Frosting Route: If you’re doing cookie cups with frosting because you don’t have cream cheese, just use chocolate or vanilla buttercream and crushed peppermints. Still delicious.
Pudding Situation: I’ve filled these with chocolate pudding mixed with peppermint extract. My kids went absolutely crazy for that version.
Ice Cream Bowl: Wait until right before serving and fill with peppermint ice cream. Then watch them melt a little and get all gooey. Heaven.
Tips for Cookie Cups Decorated Like a Pro :
Want your cookie cups decorated to look fancy? Here’s what works:
- Drizzle melted white chocolate over the top in zigzags
- Add a mini candy cane as a garnish (very Instagram-worthy)
- Dust with powdered sugar for that “snow” effect
- Use red and white sprinkles
- Pipe the filling in a swirl instead of just spooning it in
My sister-in-law does this thing where she adds a tiny piece of chocolate mint (like an Andes mint) on top and honestly it looks bakery-level professional.
Can You Make These Ahead?
YES. Thank God, yes.
Bake the cookie cups up to three days ahead and store them in an airtight container at room temperature. Don’t fill them until the day you’re serving though, or they get soggy. Nobody likes soggy cookies.
You can also freeze the unfilled cups for up to a month. Just thaw at room temperature and fill when ready.
Actually, the dough freezes great too. Roll it into balls, freeze them on a baking sheet, then transfer to a freezer bag. Bake from frozen, just add 1-2 extra minutes to the baking time.
Why These Work for Any Holiday (Not Just Christmas)
Even though these are perfect cookie cups christmas treats, I’ve adapted them for other holidays too.
For cookie cups halloween, I skip the peppermint, use orange food coloring in the filling, and top with candy corn. My kids love them. The candy corn thing is controversial, I know—people have strong opinions about candy corn—but whatever, they’re festive.
For Valentine’s Day, I use raspberry extract instead of peppermint and add pink food coloring. Same cookie base, different vibe.
The Cookie Cups Recipe Microwave Situation :
Okay, so some people have asked me about a cookie cups recipe microwave method, and I’ve tried it. Sort of works? The texture isn’t quite the same—they’re chewier and less crispy—but if you don’t have an oven access or you’re in a dorm room, it’s possible.
Basically press the dough into microwave-safe silicone muffin cups and microwave on high for about 45-60 seconds. Keep a close eye on them because microwaves are all different and they can go from raw to burnt in like 10 seconds.
But honestly? Just use an oven if you can. So much better.
My Honest Take on These Peppermint Cookie Cups :
These aren’t perfect. The edges sometimes crack a little when you remove them from the tin (who cares, they still taste amazing). The filling occasionally slides off if you make the cups too shallow (just scoop it back on). And yes, they’re a bit messy to eat.
But the flavor? Incredible. The combination of rich chocolate cookie with cool peppermint filling is exactly what the holidays should taste like. And when people see them, they automatically assume you’re some kind of baking wizard, which is fun.
I made these for a cookie exchange last year and three different people asked for the recipe. One person tried to convince me I should sell them. (I’m not starting a cookie business, Linda, but thanks for the vote of confidence.)
Make a batch this weekend. Let me know if you try any of the filling variations, because I’m always looking for new ideas. And seriously, if you have a trick for getting them out of the muffin tin without breaking, please share because I still struggle with that sometimes.
Happy baking, and may your cookie cups actually look like cups and not weird cookie blobs! 🍪🎄
Chocolate Peppermint Cookie Cups Recipe
Chocolate peppermint cookie cups made in a muffin tin with creamy cheesecake filling and crushed candy canes. Easy holiday cookie cups recipe perfect for Christmas parties and cookie exchanges.
Ingredients
- 1 cup unsalted butter, softened
- 1 cup granulated sugar
- 1/2 cup brown sugar
- 2 large eggs
- 2 teaspoons vanilla extract
- 1 teaspoon peppermint extract
- 2 cups all-purpose flour
- 3/4 cup unsweetened cocoa powder
- 1 teaspoon baking soda
- 1/2 teaspoon salt
- 1/2 cup mini chocolate chips (optional)
- 8 oz cream cheese, softened
- 1/4 cup powdered sugar
- 1/2 teaspoon peppermint extract (for filling)
- 1/2 cup crushed candy canes or peppermint candies
- Whipped cream for topping
Instructions
- Step 1Preheat oven to 350°F. Spray mini muffin tin with cooking spray or line with paper liners.
- Step 2In a large bowl, cream together softened butter, granulated sugar, and brown sugar until light and fluffy, about 2-3 minutes.
- Step 3Beat in eggs one at a time, then add vanilla extract and peppermint extract. Mix until well combined.
- Step 4In a separate bowl, whisk together flour, cocoa powder, baking soda, and salt.
- Step 5Gradually add dry ingredients to wet mixture, mixing until just combined. Do not overmix. Fold in mini chocolate chips if using.
- Step 6Roll about 1 tablespoon of dough into a ball. Place in mini muffin tin cup and press down with thumb to create a well in the center. Leave edges thicker than bottom to hold filling.
- Step 7Bake for 10-12 minutes until edges are set but centers still look slightly underbaked. They will continue cooking after removal.
- Step 8Immediately after removing from oven, use a small spoon or your thumb to press down centers again to deepen the cups. Let cool in pan for 5 minutes, then carefully transfer to wire rack to cool completely.
- Step 9Beat softened cream cheese with powdered sugar and 1/2 teaspoon peppermint extract until smooth and creamy, about 2 minutes. Fold in most of the crushed candy canes, reserving some for topping.
- Step 10Once cookie cups are completely cool, spoon or pipe cheesecake filling into each cup. Top with dollop of whipped cream and sprinkle with reserved crushed candy canes. Serve immediately or refrigerate until ready to serve.