
So I have this weird obsession with Fig Newtons. Like, embarrassingly weird. I can eat an entire sleeve while watching Netflix and not even realize it until I’m staring at an empty package wondering where my life went wrong.
But store-bought Oatmeal Fig Bars are expensive, and half the time they’re either too dry or weirdly artificial tasting. So last fall I decided to try making my own, thinking “how hard can it be?”
Famous last words.
The first batch was a complete disaster. I’m talking crumbly mess that looked like I’d tried to make granola bars but forgot how granola bars work. My husband took one bite and diplomatically said they were “interesting.” Translation: they sucked.
But after about six attempts (okay, maybe eight), I finally figured out the secret to fig bars that actually hold together and taste like something you’d actually want to eat.
Table of Contents
Why Homemade Oatmeal Fig Bars Are Worth the Effort :
First off, you control the sugar. Store-bought fig bars are basically sugar delivery systems with a hint of fig flavor. These actually taste like figs – sweet, jammy, and complex instead of just generically fruity.
Also, the oatmeal crust is so much better when it’s homemade. It’s got this nutty, buttery flavor and perfect chewy texture that those commercial ones can’t touch. Plus you can make them as thick or thin as you want, which is dangerous knowledge.
My kids love these, which shocked me because they usually turn their noses up at anything that isn’t covered in chocolate. But apparently fig bars hit some kind of sweet spot between cookie and granola bar that appeals to their weird little taste buds.
The Fig Filling (This is Where the Magic Happens) :
What you need for the filling:
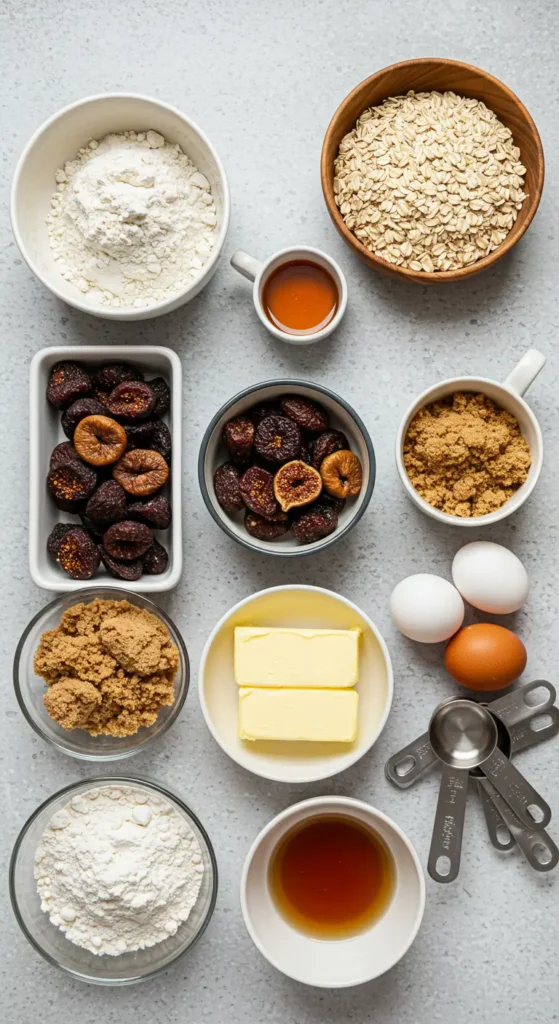
- 2 cups dried figs, stems removed and chopped
- 1/2 cup water
- 1/4 cup brown sugar
- 2 tablespoons lemon juice
- 1/2 teaspoon vanilla extract
- Pinch of salt
Here’s the thing about dried figs – they’re not all created equal. I tried making this with those hard, sad figs from the baking aisle once, and it was like trying to make jam out of tiny rocks. Spend a little extra and get good quality figs from the produce section or a health food store.
The lemon juice is crucial. Figs can be almost too sweet on their own, and the acidity balances everything out. I learned this from my grandmother, who made actual fig preserves and knew what she was talking about.
Making the Fig Filling (Don’t Skip This Step) :
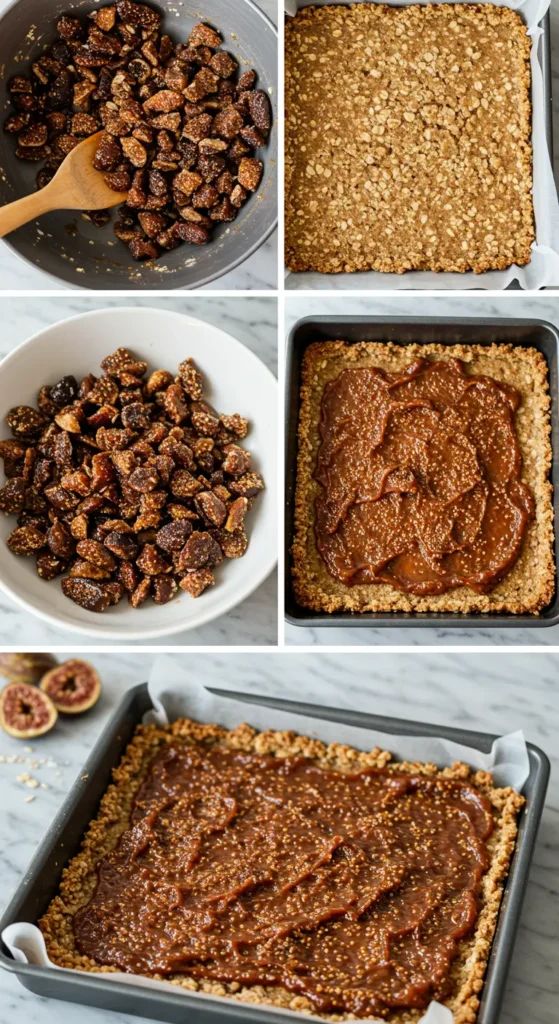
Step 1: Chop your figs into small pieces. They don’t need to be perfect – just roughly the same size so they cook evenly.
Step 2: Put the chopped figs, water, and brown sugar in a small saucepan over medium heat. Bring it to a simmer.
Step 3: Cook, stirring occasionally, for about 15-20 minutes until the figs are soft and the mixture looks jammy. You might need to add a splash more water if it gets too dry.
Step 4: Stir in the lemon juice, vanilla, and salt. Let it cool completely before using.
The filling should be thick enough to spread but not so thick that it tears your crust. If it’s too thick, add a tablespoon of water. Too thin? Cook it a few minutes longer.
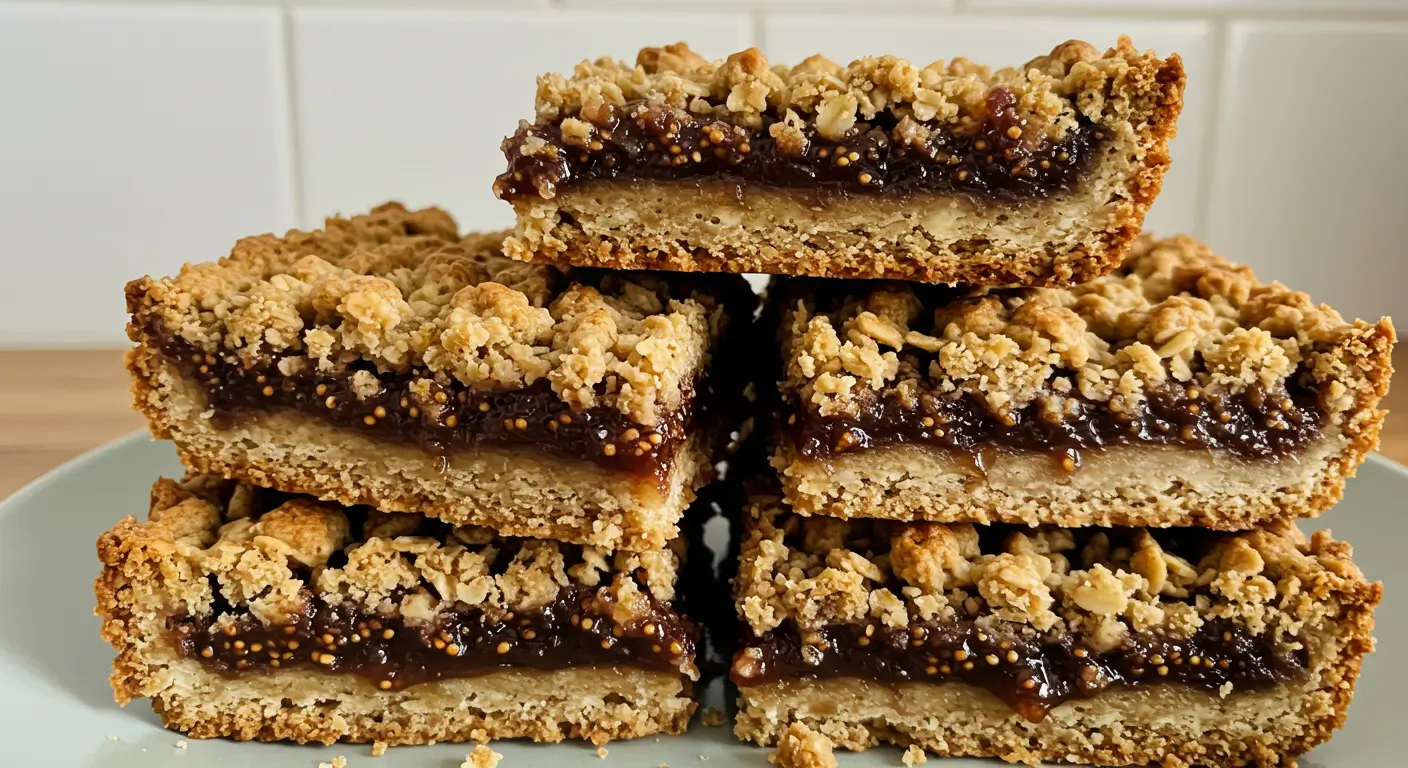
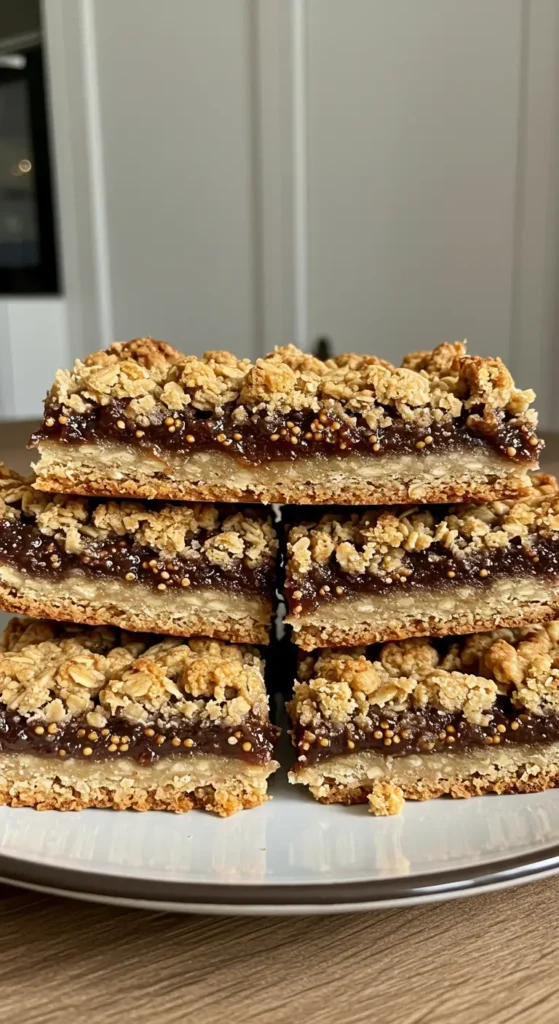
The Oatmeal Crust (The Foundation of Everything) :
For the crust and topping:
- 1 1/2 cups old-fashioned oats (not quick oats – they turn to mush)
- 1 1/4 cups all-purpose flour
- 1/2 cup brown sugar, packed
- 1/2 teaspoon salt
- 1/2 teaspoon cinnamon
- 1/2 cup cold butter, cubed
- 1/4 cup honey or maple syrup
- 1 large egg, beaten
The cold butter is important here. I tried using melted butter once because I was impatient, and the crust didn’t hold together properly. You want to work the cold butter into the dry ingredients until it looks like coarse crumbs with some pea-sized pieces.
And please use old-fashioned oats. I made the mistake of using quick oats once and the texture was all wrong – too soft and mushy instead of that nice chewy bite you want.
Putting It All Together (The Assembly Line) :
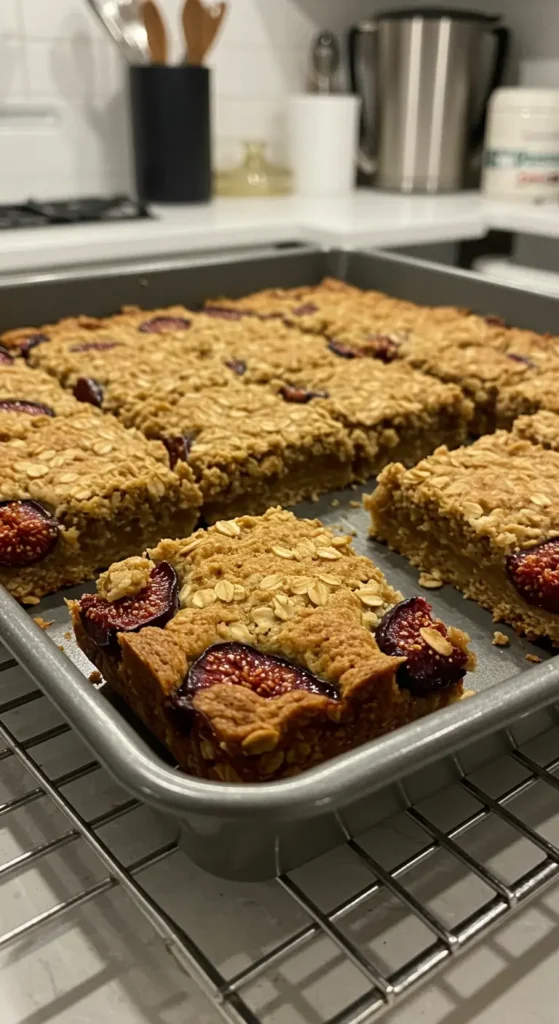
Step 1: Preheat your oven to 350°F. Line an 8×8 inch pan with parchment paper, leaving some overhang for easy removal. Don’t skip the parchment – these can stick like crazy.
Step 2: Mix the oats, flour, brown sugar, salt, and cinnamon in a large bowl.
Step 3: Cut in the cold butter using a pastry cutter or your fingers until the mixture looks like coarse crumbs. Some bigger pieces are fine – they add texture.
Step 4: Stir in the honey and beaten egg until everything just comes together. Don’t overmix.
Step 5: Press about 2/3 of the oat mixture into the bottom of your prepared pan. Really press it down – you want a solid base.
Step 6: Spread the cooled fig filling evenly over the crust. Get it all the way to the edges.
Step 7: Sprinkle the remaining oat mixture over the top and gently press it down.
Step 8: Bake for 30-35 minutes until the top is golden brown and set.
Step 9: This is crucial – let it cool COMPLETELY in the pan before cutting. I know it’s torture, but warm fig bars fall apart. Ask me how I know.
Things I Learned Through Multiple Failures :
Attempt #1: Didn’t let the fig filling cool before assembling. It soaked into the bottom crust and created a soggy mess.
Attempt #2: Used quick oats because that’s what I had. The texture was weird and mushy.
Attempt #3: Tried to cut them while they were still warm because I have zero patience. They completely fell apart and I ended up eating fig bar crumbles with a spoon.
Attempt #4: Made the filling too thick and it was like trying to spread peanut butter over delicate crust. Tore everything up.
But once I got the technique down, these became foolproof.
Pro Tips From My Kitchen Disasters :
If your fig filling seems too chunky, you can pulse it a few times in a food processor to break it down more. Just don’t turn it into complete puree – you want some texture.
These bars are way easier to cut if you chill them for about 30 minutes after they’re completely cool. Something about the cold makes them hold together better.
Use a sharp knife and clean it between cuts. Fig filling is sticky and will gum up your knife if you don’t.
Want them extra special? Drizzle a simple glaze on top after they’re cool. Just powdered sugar, a little milk, and vanilla. Not necessary, but it makes them look bakery-fancy.
When These Really Shine :
These are perfect for lunchboxes because they’re not too crumbly and they’re actually somewhat nutritious (oats! fruit! I’m calling it health food).
They’re also great for potlucks because they travel well and people always get excited about homemade bars. Plus, they’re different enough from the usual brownies and cookies that they stand out.
I like to make them when I’m feeling nostalgic for childhood snacks but want something that doesn’t taste like chemicals and preservatives.
Storage (If They Last That Long) :
Store them in an airtight container at room temperature for up to a week. They actually get better after a day or two – the flavors meld and the texture settles into that perfect chewy consistency.
You can freeze them for up to 3 months. Just wrap them individually or layer them between parchment paper. They thaw perfectly at room temperature.
The Honest Assessment :
Look, these aren’t going to fool anyone into thinking they’re actual Fig Newtons. They’re better. They taste like real food instead of processed snack food, and they have that homemade texture that you just can’t get from a package.
Are they more work than opening a box of store-bought bars? Obviously. But they’re also way more satisfying to make and eat, and you can pronounce all the ingredients.
Variations (Because I Can’t Help Myself) :
Sometimes I add chopped walnuts to the oat mixture for crunch. My kids hate this, but I think it’s delicious.
I’ve also tried different dried fruits – dates work really well, and so do dried apricots if you can’t find good figs.
Once I added a little orange zest to the fig filling and it was amazing. Citrus and figs are best friends.
Final Thoughts :
These bars have become my go-to recipe for when I want something sweet but not too sweet, healthy but not too healthy, and homemade but not too complicated. They hit that perfect middle ground that makes everyone happy.
Plus, there’s something deeply satisfying about making your own version of a classic snack. It’s like reclaiming fig bars from corporate America, one batch at a time.
Give them a try and let me know what you think! I’m always curious to hear how other people’s versions turn out, and if you come up with any genius variations, I want to hear about them.
Happy baking! (And may your fig bars actually hold together) 🥧✨
Homemade Oatmeal Fig Bars
Chewy homemade oatmeal fig bars with sweet fig filling and nutty oat crust. Better than store-bought with real fig flavor and wholesome oats.
Ingredients
- 2 cups dried figs, stems removed and chopped
- 1/2 cup water
- 1/4 cup brown sugar
- 2 tablespoons lemon juice
- 1/2 teaspoon vanilla extract
- Pinch of salt
- 1 1/2 cups old-fashioned oats
- 1 1/4 cups all-purpose flour
- 1/2 cup brown sugar, packed
- 1/2 teaspoon salt
- 1/2 teaspoon cinnamon
- 1/2 cup cold butter, cubed
- 1/4 cup honey
- 1 large egg, beaten
Instructions
- Step 1Make fig filling by simmering chopped figs, water, and brown sugar for 15-20 minutes until jammy.
- Step 2Stir in lemon juice, vanilla, and salt. Cool completely.
- Step 3Preheat oven to 350°F. Line 8x8 inch pan with parchment paper.
- Step 4Mix oats, flour, brown sugar, salt, and cinnamon in large bowl.
- Step 5Cut in cold butter until mixture resembles coarse crumbs.
- Step 6Stir in honey and beaten egg until mixture just comes together.
- Step 7Press 2/3 of oat mixture firmly into prepared pan bottom.
- Step 8Spread cooled fig filling evenly over crust to edges.
- Step 9Sprinkle remaining oat mixture over fig filling and gently press down.
- Step 10Bake 30-35 minutes until top is golden brown.
- Step 11Cool completely in pan before cutting into bars.