
Okay, so here’s the thing about fried pickles—I was completely skeptical the first time someone suggested I try them. Like, pickles? Deep fried? It sounded absolutely ridiculous. But then I went to this little dive bar in Nashville (back in 2019, pre-everything), and my friend basically forced one into my hand. Game changer. Seriously.
Now I make these at least twice a month because my husband won’t stop asking for them. And honestly? They’re stupidly easy once you figure out the coating situation. Took me three tries though. The first batch was a soggy disaster, the second time I somehow made them too thick and they were basically fried dough balls with a hint of pickle somewhere inside, but the third time… chef’s kiss.
Table of Contents :
Why Fried Pickles Are Actually Amazing :
Look, I get it if you’re skeptical. I was too. But there’s something about the crispy coating mixed with that tangy, slightly salty pickle that just works. It’s like french fries met a pickle and had the world’s best snack baby.
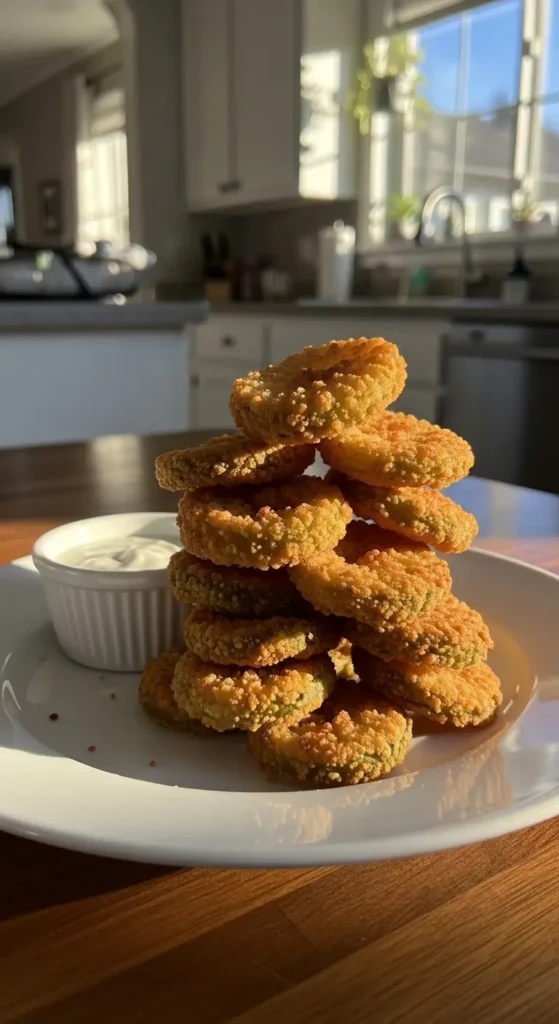
My neighbor Sarah (who’s from Georgia and knows her Southern food) says the secret is getting them REALLY crispy. Not kinda crispy. Like, crunch-in-your-ear crispy. And she’s right. Nobody wants a sad, limp fried pickle. That’s just depressing.
What You’ll Need for Fried Pickles :
Here’s where I’m gonna be honest with you—the ingredients are basic. Like, embarrassingly basic. You probably have most of this stuff already.
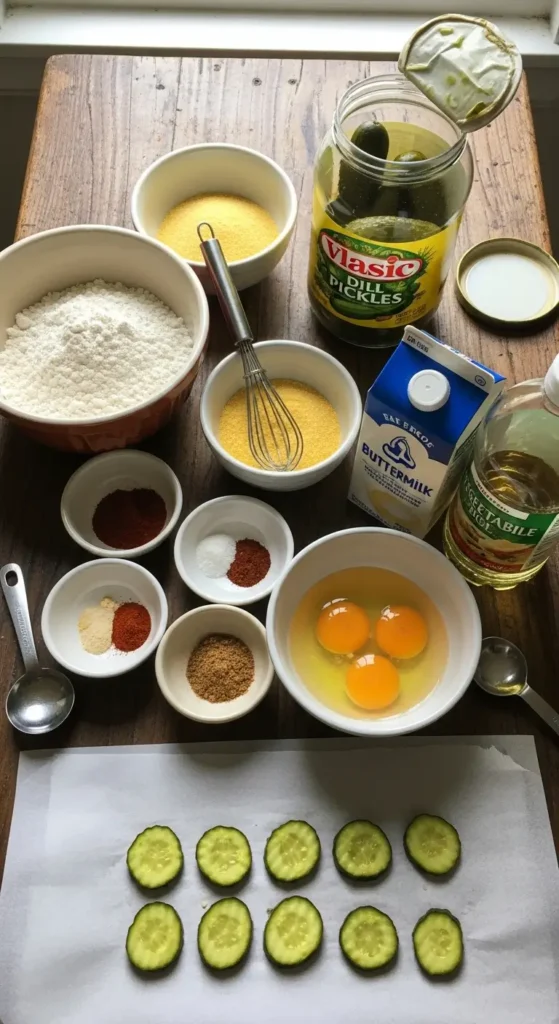
For the pickles:
- 1 jar of dill pickle chips (about 16 oz—I use Vlasic because they’re consistently good, but use whatever you like)
- Paper towels (you’ll need a LOT, trust me)
For the coating:
- 1 cup all-purpose flour
- 1/2 cup cornmeal (this is the secret to extra crunch—don’t skip it)
- 1 teaspoon garlic powder
- 1 teaspoon paprika (smoked if you’re fancy, regular if you’re normal like me)
- 1/2 teaspoon cayenne pepper (I use a full teaspoon because I like heat, but start with less if you’re feeding kids)
- Salt and black pepper to taste
For the wet mixture:
- 1 cup buttermilk (or regular milk mixed with a tablespoon of lemon juice—learned that trick when I ran out of buttermilk at 8 PM)
- 1 egg
- 1 tablespoon hot sauce (optional, but why wouldn’t you?)
For frying:
- Vegetable oil for frying (enough to fill your pan about 2 inches deep)
For serving:
- Ranch dressing (I know, so predictable, but it’s PERFECT)
- Or try Comeback sauce if you want to get all Southern about it
Oh, and another thing—don’t use those whole pickles thinking you’ll slice them yourself. Just don’t. Buy the pre-sliced chips. Life’s too short and those things are slippery when you’re trying to cut them.
How to Make Fried Pickles :
Step 1: Dry Those Pickles
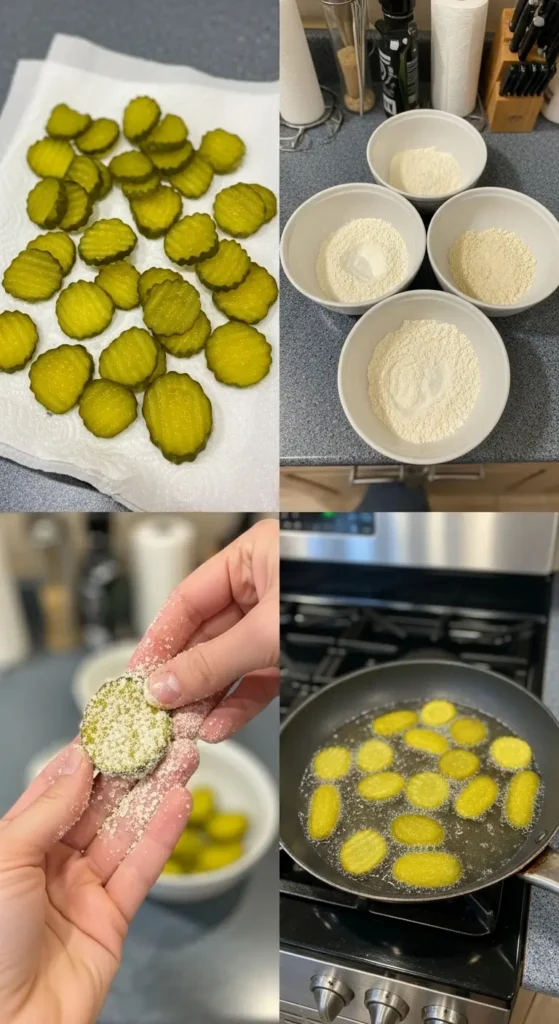
This is literally the most important step and the one I completely ignored the first time. Take your pickle chips out of the jar and lay them on paper towels. Like, a whole layer of paper towels. Then put more paper towels on top. Press down. Get as much moisture out as possible.
I usually let them sit for about 10-15 minutes while I set up everything else. Wet pickles = soggy coating = disappointment. Been there, made that mistake, never again.
Step 2: Set Up Your Breading Station
Okay, so you need three shallow bowls or plates. I use pie plates because they’re wide and shallow and I can actually fit the pickles in them without making a mess. (Still make a mess anyway, but whatever.)
Bowl 1: Just flour. About 1/2 cup. Season it with a little salt and pepper.
Bowl 2: Whisk together your buttermilk, egg, and hot sauce if you’re using it. It’ll look kinda yellow and weird. That’s normal.
Bowl 3: Mix your remaining flour (1/2 cup), cornmeal, garlic powder, paprika, cayenne, salt, and pepper. This is your magic crispy coating.
Step 3: Bread the Fried Pickles
Now here’s where it gets messy. I’ve learned to use one hand for wet and one hand for dry, but I still end up with breading all over both hands every single time.
Take a dried pickle chip and do this:
- Dip it in the plain flour (Bowl 1)—just a light coating
- Dip it in the buttermilk mixture (Bowl 2)—let the excess drip off
- Press it into the seasoned flour-cornmeal mixture (Bowl 3)—really press it in so it sticks
Place your breaded pickles on a plate or baking sheet. Don’t stack them or they’ll stick together. (Learned this the hard way at a party. Had to serve pickle clumps. Not my finest moment.)
Step 4: Heat Your Oil
Fill a deep skillet or pot with about 2 inches of vegetable oil. Heat it over medium-high heat until it reaches 350°F. I used to guess at this temperature and wonder why my fried pickles were either burnt or greasy. Get a thermometer. Seriously. They’re like $10 and totally worth it.
If you don’t have a thermometer, drop a tiny bit of the breading mixture into the oil. If it sizzles immediately and floats, you’re good to go.
Step 5: Fry the Pickles
Don’t overcrowd the pan. I know you want to cook them all at once. I get it. But overcrowding drops the oil temperature and you end up with greasy, sad fried pickles instead of crispy golden ones.
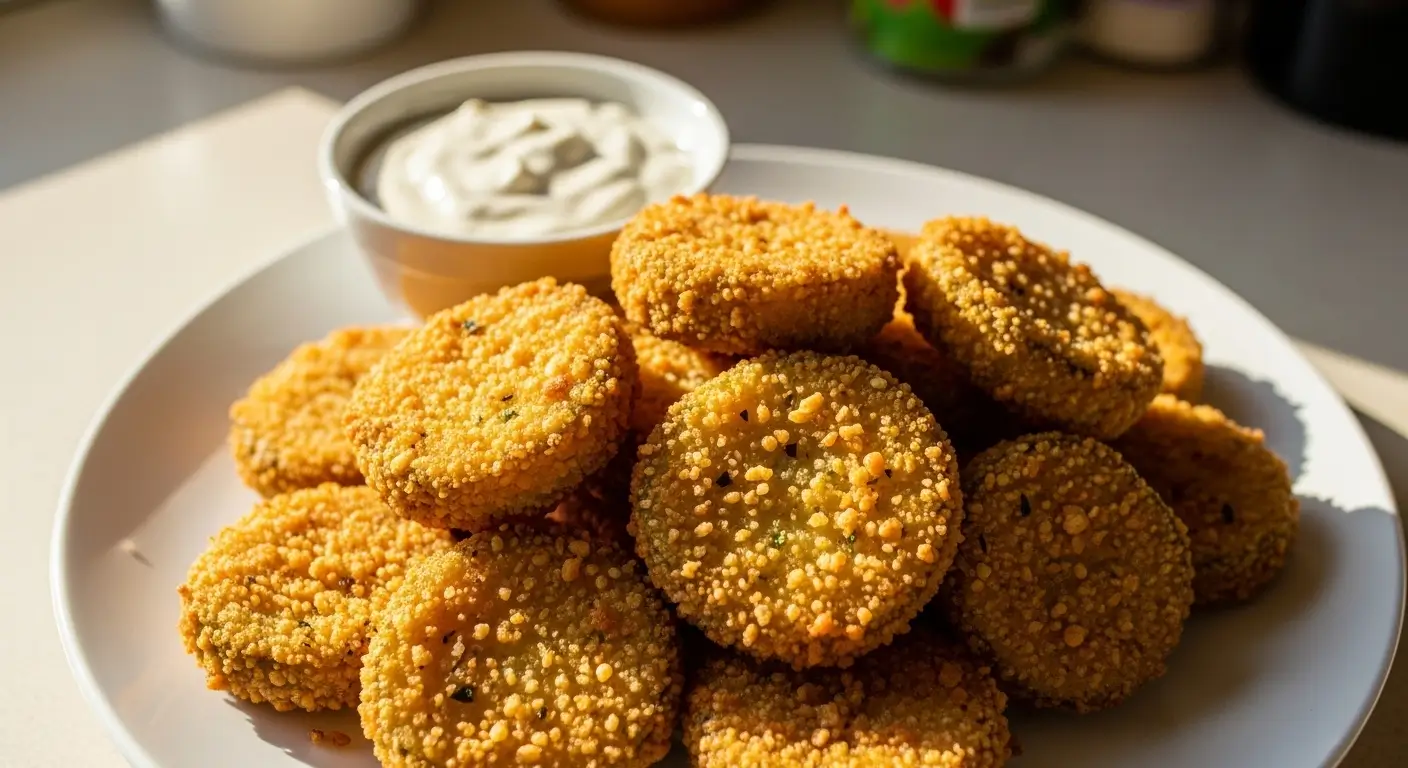
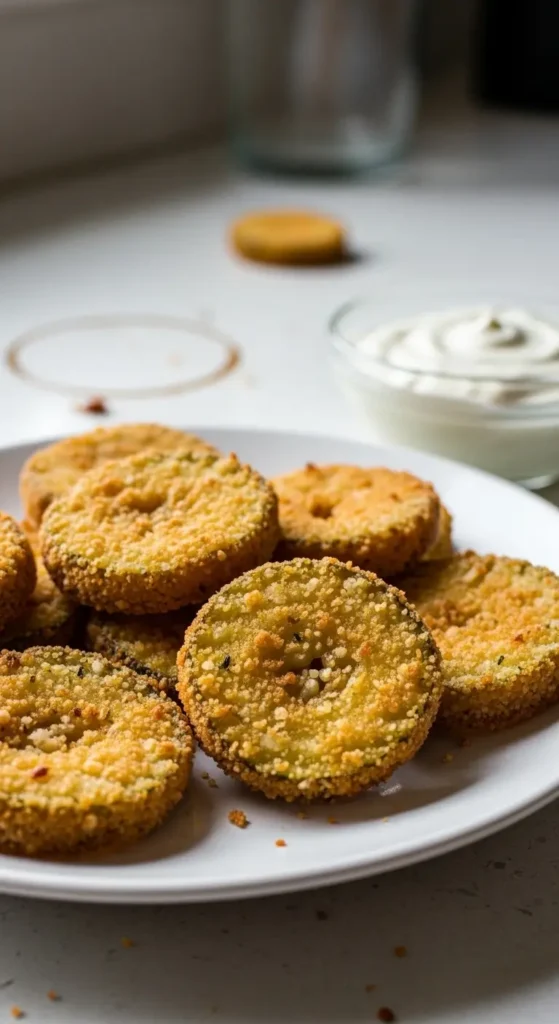
Fry about 5-6 pickle chips at a time for 2-3 minutes, flipping them halfway through. They should be golden brown and crispy. Like, really golden. Not pale. Golden.
Use a slotted spoon to transfer them to a paper towel-lined plate. Immediately sprinkle with a little extra salt while they’re hot. This is key for maximum flavor.
Step 6: Try Not to Eat Them All Before Serving
This is honestly the hardest step. They smell SO GOOD when they’re fresh out of the oil. I always “test” at least three or four before they make it to the serving plate. Quality control, you know?
My Best Tips for Perfect Fried Pickles :
Temperature is everything: If your oil is too hot, they’ll burn on the outside and be raw-tasting on the inside. Too cool and they’ll be greasy. Keep it at 350°F.
Double-dip if you want extra crispy: Sometimes I’ll do the whole flour-buttermilk-coating process twice for extra thick, extra crispy fried pickles. It’s overkill but it’s SO good.
Make a big batch: These don’t really keep well (they get soggy in the fridge), so only make what you’ll eat. But honestly, make more than you think you need because people will devour them.
Air fryer option: I haven’t tried this myself, but my friend swears you can make these in an air fryer at 400°F for about 8-10 minutes. Spray them with cooking spray first. Not as good as deep-fried, but healthier I guess?
Experiment with pickles: I’ve tried this with bread and butter pickles (too sweet for my taste), spears (too thick, didn’t cook right), and even jalapeño slices (amazing but SPICY). Stick with dill chips for the classic version.
What to Serve with Fried Pickles :
Ranch dressing is the obvious choice and honestly it’s perfect. I make a quick version by mixing mayo, sour cream, a little buttermilk, garlic powder, onion powder, dill, and a squeeze of lemon juice. Way better than bottled stuff.
But I’ve also served these with:
- Comeback sauce (mayo, ketchup, hot sauce, Worcestershire—it’s a Southern thing)
- Spicy mayo (just mayo and sriracha)
- Blue cheese dressing (my husband’s favorite)
- Honey mustard (my 8-year-old’s choice, weirdly works)
Why These Fried Pickles Work Every Time :
The cornmeal in the coating is what makes these different from other fried pickle recipes you’ll find online. It adds this extra crunch that all-flour coatings just can’t match. I stumbled onto this by accident when I ran out of flour halfway through coating them and grabbed cornmeal from my pantry. Best mistake ever.
The buttermilk helps the coating stick and adds a slight tanginess that complements the pickles. And drying the pickles beforehand—I can’t stress this enough—is what prevents that dreaded soggy coating situation.
Final Thoughts :
Are these the fanciest appetizer you’ll ever make? Nope. Will people lose their minds over them anyway? Absolutely. I brought these to a potluck last month and three different people asked for the recipe. One person literally followed me around asking how I got them so crispy. (The answer is cornmeal and properly heated oil, but I let her think I had some special secret.)
If you’ve never tried fried pickles before, start here. This recipe is foolproof as long as you dry your pickles and watch your oil temperature. And if you mess up the first batch like I did, just try again. The second batch will be better. The third batch will be perfect.
Let me know how yours turn out! And seriously, double the recipe. You’ll thank me later. 😊
Crispy Fried Pickles Recipe – Easy Southern Appetizer
Learn how to make crispy fried pickles with this easy Southern appetizer recipe. Perfect golden coating, tangy dill pickles, and the secret to extra crunch every time. Ready in 30 minutes!
Ingredients
- 1 jar (16 oz) dill pickle chips
- 1 cup all-purpose flour, divided
- 1/2 cup cornmeal
- 1 teaspoon garlic powder
- 1 teaspoon paprika
- 1/2 teaspoon cayenne pepper
- Salt and black pepper to taste
- 1 cup buttermilk
- 1 large egg
- 1 tablespoon hot sauce (optional)
- Vegetable oil for frying
- Ranch dressing for serving
Instructions
- Step 1Remove pickle chips from jar and lay them on paper towels. Cover with more paper towels and press to remove as much moisture as possible. Let sit for 10-15 minutes.
- Step 2Prepare three shallow bowls. Bowl 1: 1/2 cup flour with salt and pepper. Bowl 2: whisk together buttermilk, egg, and hot sauce. Bowl 3: mix remaining 1/2 cup flour, cornmeal, garlic powder, paprika, cayenne, salt, and pepper.
- Step 3Take each dried pickle chip and coat in plain flour (Bowl 1), then dip in buttermilk mixture (Bowl 2), then press into seasoned cornmeal coating (Bowl 3). Place breaded pickles on a plate without stacking.
- Step 4Fill a deep skillet with 2 inches of vegetable oil. Heat over medium-high heat to 350°F. Use a thermometer to monitor temperature.
- Step 5Working in batches of 5-6 pickle chips, fry for 2-3 minutes, flipping halfway through, until golden brown and crispy. Don't overcrowd the pan.
- Step 6Transfer fried pickles to a paper towel-lined plate using a slotted spoon. Immediately sprinkle with salt while hot.
- Step 7Serve hot with ranch dressing or your favorite dipping sauce.