
So my dog luna has been destroying every store-bought chew stick within like five minutes, and I’m tired of spending $20 a week on treats that don’t last. Plus, half of them have ingredients I can’t even pronounce. I decided to make my own dog chew sticks at home, and honestly? Best decision ever.
First attempt was… well, let’s just say they came out more like dog crackers than chew sticks. Too thin, too brittle, and Bella ate them in seconds. But after tweaking the recipe (okay, like four times), I finally got these chew sticks that actually last more than two minutes and she’s obsessed with them.
Table of Contents :
Why These Dog Chew Sticks Are Amazing :
Look, I’m gonna be honest—I was skeptical about making homemade dog treats that would actually work as chew sticks. But these turned out perfect. They’re hard enough to keep Bella busy for a good 15-20 minutes, which is a miracle in my house.
The blueberries are packed with antioxidants (my vet told me this during Bella’s last checkup and I felt so smart knowing that), and the peanut butter makes them irresistible. She literally does this little happy dance when I pull the container out. It’s ridiculous and adorable at the same time.
And the best part? I know exactly what’s in them. No weird preservatives, no mystery meat meal, just real ingredients I can actually identify.
What You Need for Dog Chew Sticks :
Alright, here’s your shopping list. Most of this is probably already in your pantry, which is nice because I hate making special trips just for one thing.
The Main Stuff:
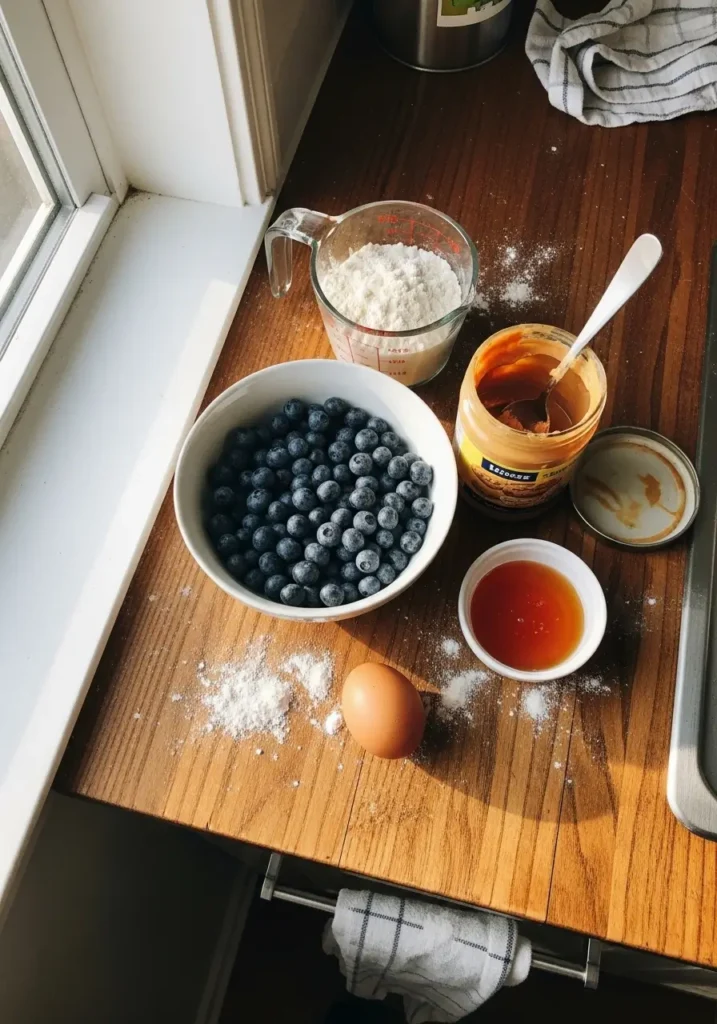
- 2 cups whole wheat flour (or oat flour if your dog has wheat sensitivities—learned that one from my neighbor whose lab has allergies)
- 1/2 cup fresh or frozen blueberries (I use frozen because they’re cheaper and honestly work just as well)
- 1/2 cup natural peanut butter (make SURE it’s xylitol-free! Check the label every single time)
- 1 egg (room temperature is better but I usually forget and use it cold anyway)
- 1/4 cup water (you might need more or less—depends on how humid it is or something)
- 1 tablespoon honey (optional, but it helps them stick together)
That’s it. Simple stuff.
Shopping note: I get my peanut butter from Costco because it’s cheap and I go through it fast making these constantly. For blueberries, I just grab whatever’s on sale at Target. Don’t overthink it.
Making These Dog Chew Sticks :
Step 1: Prep Your Oven and Stuff
Preheat your oven to 325°F. I always—ALWAYS—forget to do this first and then stand around awkwardly waiting for it to heat up while my dough sits there getting warm and weird. Learn from my mistakes.
Line a baking sheet with parchment paper. You could skip this, but then you’ll be scraping stuck-on dog treats off your pan for like half an hour. Not worth it.
Step 2: Blueberry Mashing Time
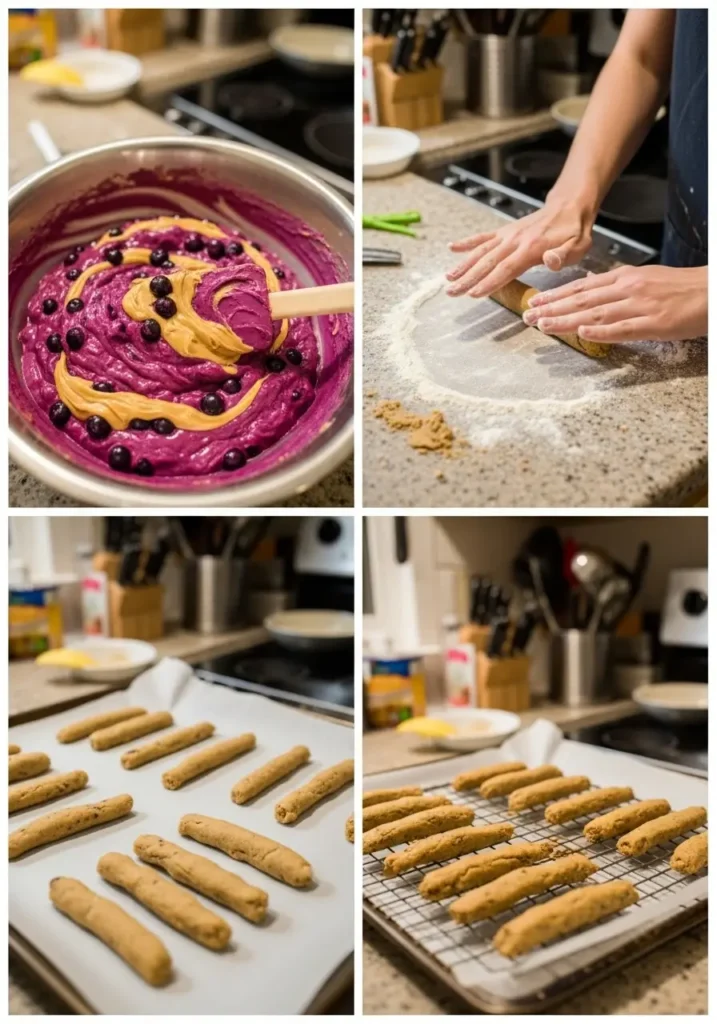
Grab a fork and mash your blueberries in a small bowl. They don’t need to be perfectly smooth—just break them up so you don’t have whole blueberries everywhere.
If you’re using frozen blueberries (like I usually do), let them thaw for like 10 minutes first. I tried using them frozen once and it was a disaster. They didn’t incorporate into the dough at all and I had purple chunks everywhere.
Step 3: Mix the Wet Ingredients
In a big bowl—and I mean big, because this gets messy—combine your peanut butter, egg, mashed blueberries, and honey if you’re using it.
Mix it all together with a spoon. It’ll look purple and kinda weird. That’s normal. Don’t panic like I did the first time thinking I messed something up.
The mixture will be thick and sticky. If your peanut butter is the natural kind that separates (which, ugh, annoying but healthier), make sure you stir it well first.
Step 4: Add Flour and Water
Start adding your flour, about a cup at a time. After the first cup, add your water. Then add the rest of the flour gradually.
Here’s where it gets real: you want a dough that’s firm and can be shaped, not crumbly and not sticky. It should feel like… I don’t know, firm play-doh? That’s the best way I can describe it.
If it’s too dry and cracking, add water a teaspoon at a time. If it’s too wet and sticking to everything, add more flour. Every time I make these, the dough feels slightly different and I’ve just learned to go with the flow.
Step 5: Shape Your Dog Chew Sticks
Flour your counter or a big cutting board. Dump the dough out and knead it a few times—like maybe 10 times total. You’re not making fancy bread, just getting it smooth.
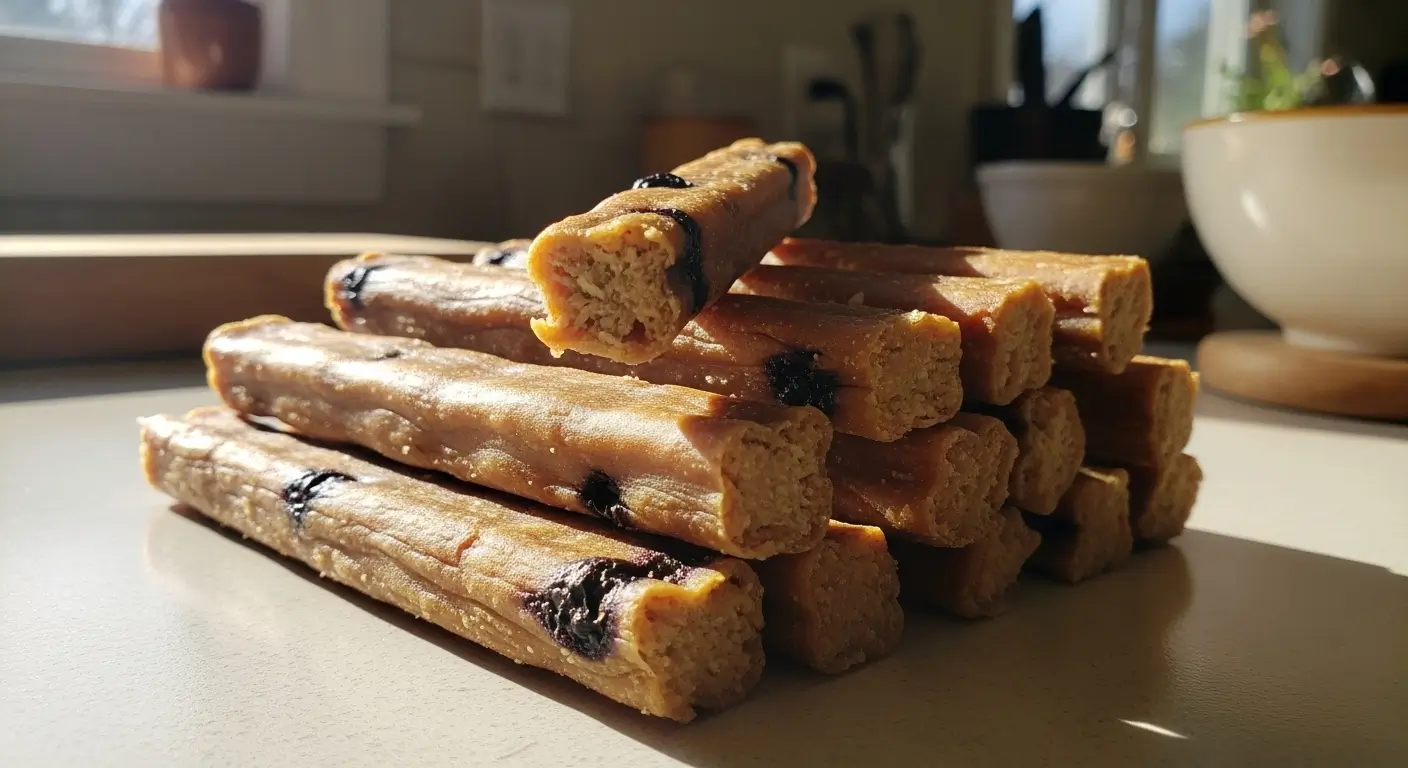
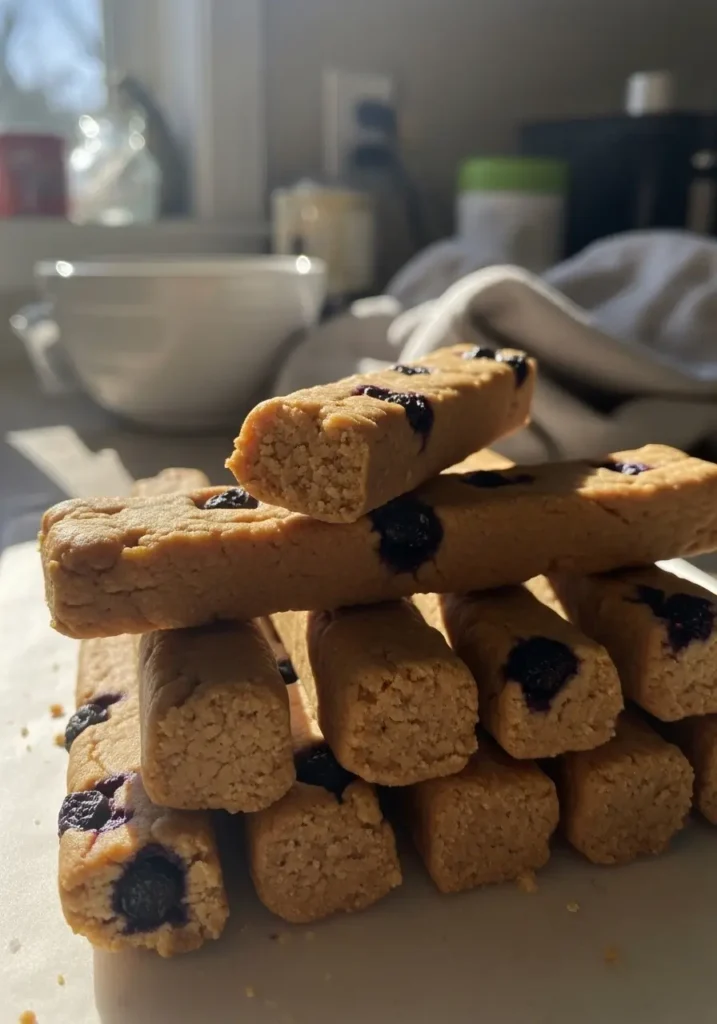
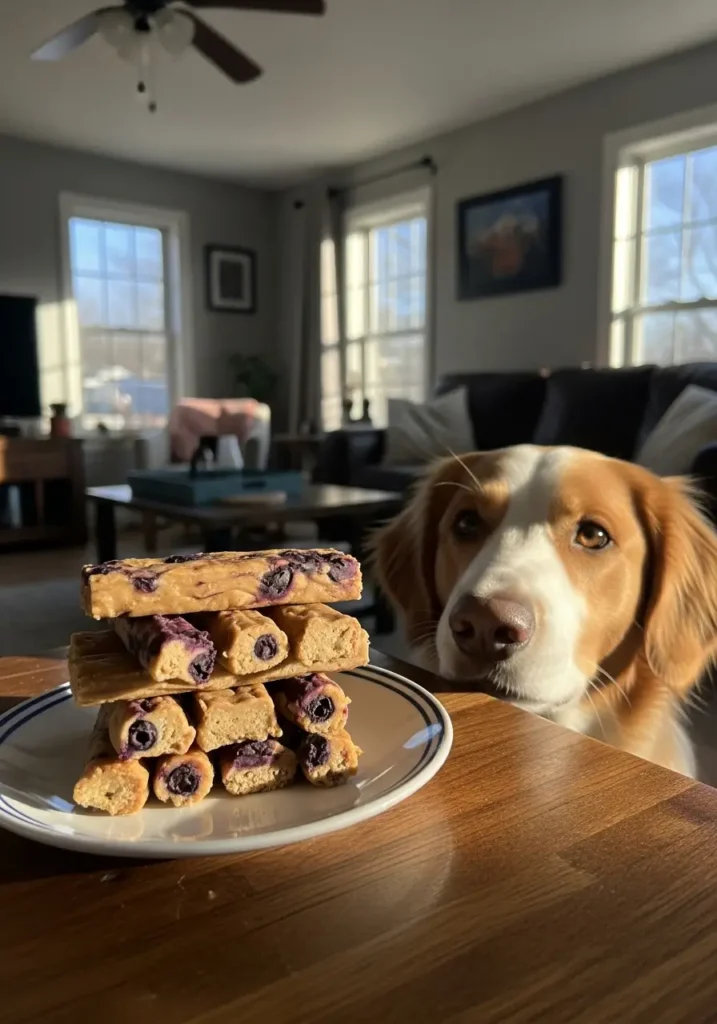
Now here’s the fun part: shaping the chew sticks. I pinch off pieces about the size of a golf ball and roll them into logs about 4-5 inches long and about as thick as my thumb. Maybe a little thicker.
Pro tip from someone who’s made these probably 50 times now: thicker is better for chew sticks. My first batch was too thin and they were gone way too fast. These need to be substantial to actually work as chew sticks.
Step 6: First Bake
Place your shaped chew sticks on the baking sheet. They don’t spread or anything, so you can put them fairly close together.
Bake for 30 minutes. Yes, 30 minutes. Set a timer because I’ve forgotten and burned them before. The house smelled like burnt blueberries for days.
Step 7: Flip and Bake Again
After 30 minutes, take them out and flip each chew stick over. This is important—it helps them dry out evenly and get that nice hard texture.
Bake for another 30 minutes. Yeah, I know, an hour total seems like forever. But this is what makes them actually chewy and long-lasting instead of just soft treats.
They should be hard when you take them out. Like, really hard. If they’re still soft in the middle, give them another 10-15 minutes.
Step 8: The Crucial Cooling Step
Here’s what nobody tells you about homemade dog chew sticks: they get harder as they cool. So even if they seem slightly soft when you take them out, they’ll firm up.
Let them cool completely on the baking sheet. This takes like an hour or two. I usually make these in the evening and let them sit overnight.
Turn off your oven but leave the chew sticks inside with the door slightly open. This helps them dry out even more. I discovered this by accident when I forgot about them one night, and they came out perfect the next morning.
Storage and How Long These Last :
These dog chew sticks last about 3 weeks in an airtight container on the counter. I use an old plastic container that I labeled “BELLA’S CHEWS” so my husband doesn’t accidentally think they’re some weird granola bars.
You can also freeze them! I make double batches now and freeze half. They last like 2-3 months in the freezer. Just let them thaw for like 30 minutes before giving them to your dog.
My Honest Take on These Dog Chew Sticks :
Bella is completely obsessed. She hears me opening the container and comes running from wherever she is in the house. It’s actually become a problem because now she expects them daily.
They’re not hard to make once you get the hang of the dough consistency and the baking time. The first batch took me forever because I kept questioning everything. Now I can make these in about 20 minutes of active time, then just wait for them to bake.
Are they perfect? No. Sometimes they come out harder than other times depending on how long I bake them or how thick I made them. Sometimes they’re a bit lopsided because my shaping skills are questionable. But does Bella care? Absolutely not.
The blueberry and peanut butter combo is amazing. Even my friend’s picky poodle likes these, and that dog refuses most treats.
Things I’ve Learned Making These :
- Don’t make them too thin. Seriously. Thick is better for actual chewing.
- The longer bake time is crucial. Don’t skip the second 30 minutes.
- Always check your peanut butter for xylitol. Every. Single. Time.
- If they’re still soft after cooling, you can pop them back in a 200°F oven for another 30 minutes to dry them out more.
- Smaller dogs need thinner chew sticks. My friend makes these for her Yorkie and makes them pencil-thin.
Oh, and another thing—these smell SO GOOD while baking. Like, weirdly good. My neighbor asked what I was baking for us and I had to tell her it was dog treats. She was disappointed.
Wait, I almost forgot—you can add other stuff to these too. I’ve tried adding a tablespoon of ground flaxseed for omega-3s. Worked fine. Also tried adding shredded coconut once because I had it sitting around. Bella didn’t care either way.
Quick Troubleshooting Tips :
If your chew sticks are crumbling, you probably need more water in your dough. If they’re too soft and not lasting, bake them longer. If your dog isn’t interested (unlikely, but possible), try adding a bit more peanut butter next time.
Actually, you know what? If you make these and they don’t turn out perfect the first time, don’t give up. My first batch was honestly terrible. Too soft, too small, gone in seconds. Now I’ve got this down to a science.
These are way cheaper than buying those fancy dental chews that cost like $15 for a package of five. I can make probably 20-25 chew sticks for less than $5. The math just makes sense.
Anyway, if you’ve got a dog who destroys regular chew sticks in record time, give these a try. Even if you mess up (which I did multiple times), they’ll probably still eat them. Dogs aren’t exactly food critics.
Let me know if your dog loves these! Or if you have tips for making them even better—I’m always experimenting with these 🙂
Happy baking! (and may your dog actually be entertained for more than five minutes) 🐕💙
Healthy Dog Chew Sticks – Blueberry & Peanut Butter Treats
Healthy homemade dog chew sticks made with blueberries and peanut butter. These long-lasting treats use natural ingredients and keep dogs busy for 15-20 minutes. Budget-friendly alternative to store-bought chews.
Ingredients
- 2 cups whole wheat flour
- 1/2 cup fresh or frozen blueberries
- 1/2 cup natural peanut butter (xylitol-free)
- 1 egg
- 1/4 cup water
- 1 tablespoon honey (optional)
Instructions
- Step 1Preheat oven to 325°F (165°C). Line a baking sheet with parchment paper.
- Step 2Mash blueberries in a small bowl with a fork until broken up. If using frozen blueberries, thaw for 10 minutes first.
- Step 3In a large bowl, combine peanut butter, egg, mashed blueberries, and honey (if using). Mix with a spoon until well combined.
- Step 4Add 1 cup of flour and mix. Add water, then gradually add remaining flour until dough is firm but not crumbly or sticky.
- Step 5Turn dough onto a floured surface and knead about 10 times until smooth.
- Step 6Pinch off golf ball-sized pieces of dough. Roll each piece into a stick shape about 4-5 inches long and thumb-thick.
- Step 7Place shaped chew sticks on prepared baking sheet. Bake for 30 minutes.
- Step 8Remove from oven, flip each chew stick over, and bake for another 30 minutes until hard.
- Step 9Turn off oven and leave chew sticks inside with door slightly open to dry out. Let cool completely for 1-2 hours before serving. They will harden as they cool.