
Look, I’m gonna be honest. Christmas Bars are the reason I survive the holiday season without losing my mind.
Why? Because they’re easy. Like ridiculously easy. And they look impressive enough that people think you spent hours in the kitchen when really you just threw some stuff in a pan, baked it, and called it a day.
I think I first made these… actually, I can’t remember. Maybe three years ago? My sister brought something similar to a holiday potluck and I was like “I need this recipe immediately.” She sent me some vague instructions that made zero sense, so I winged it. And honestly? My version turned out better. (Sorry, sis.)
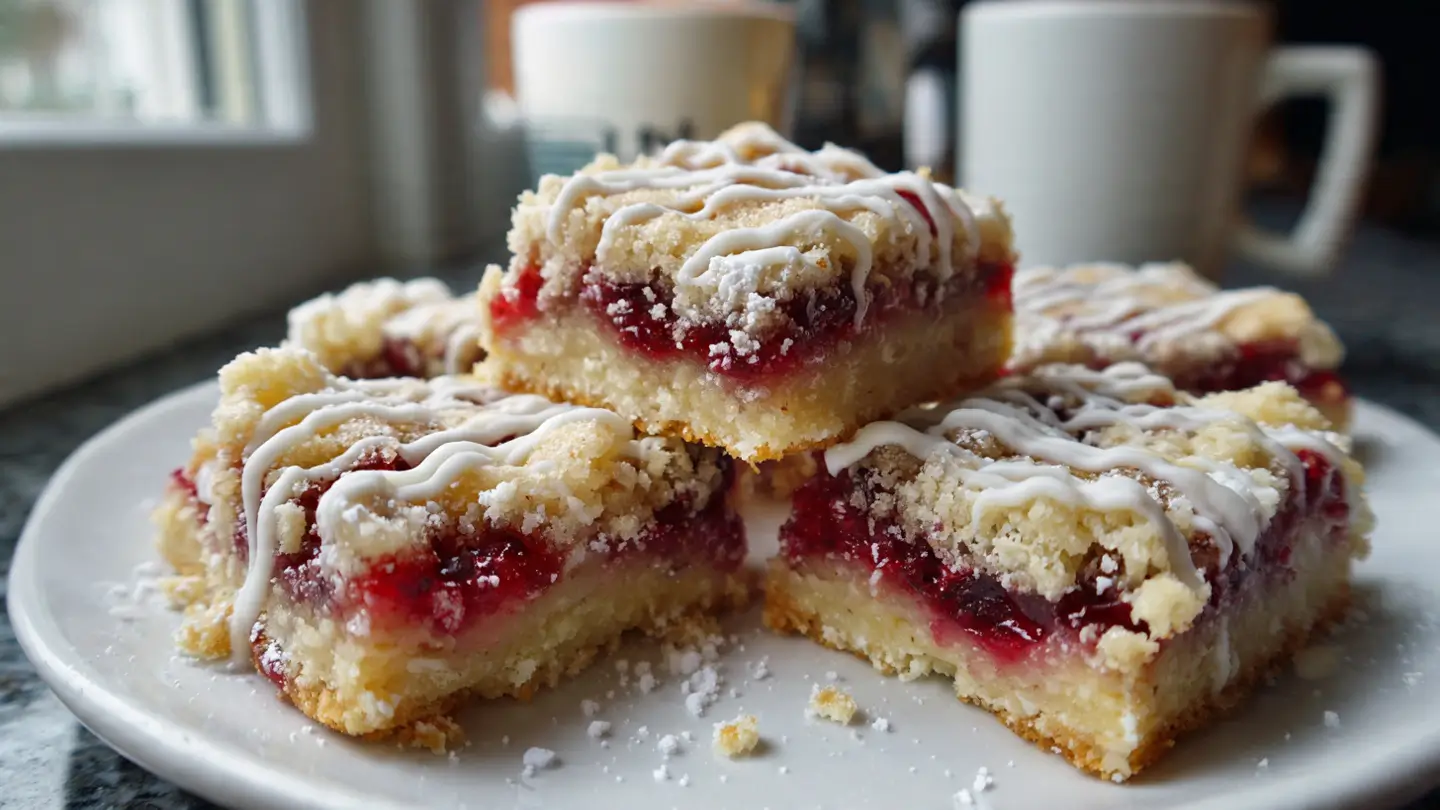
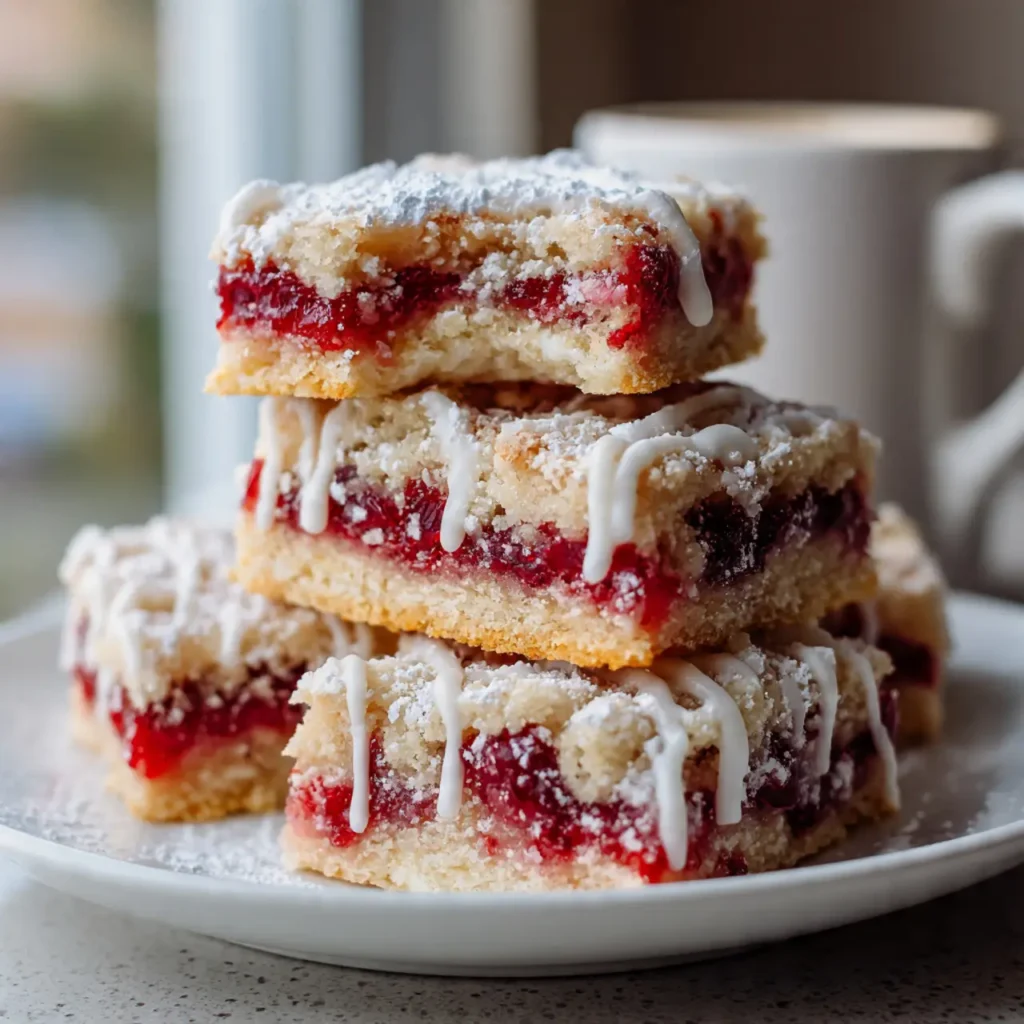
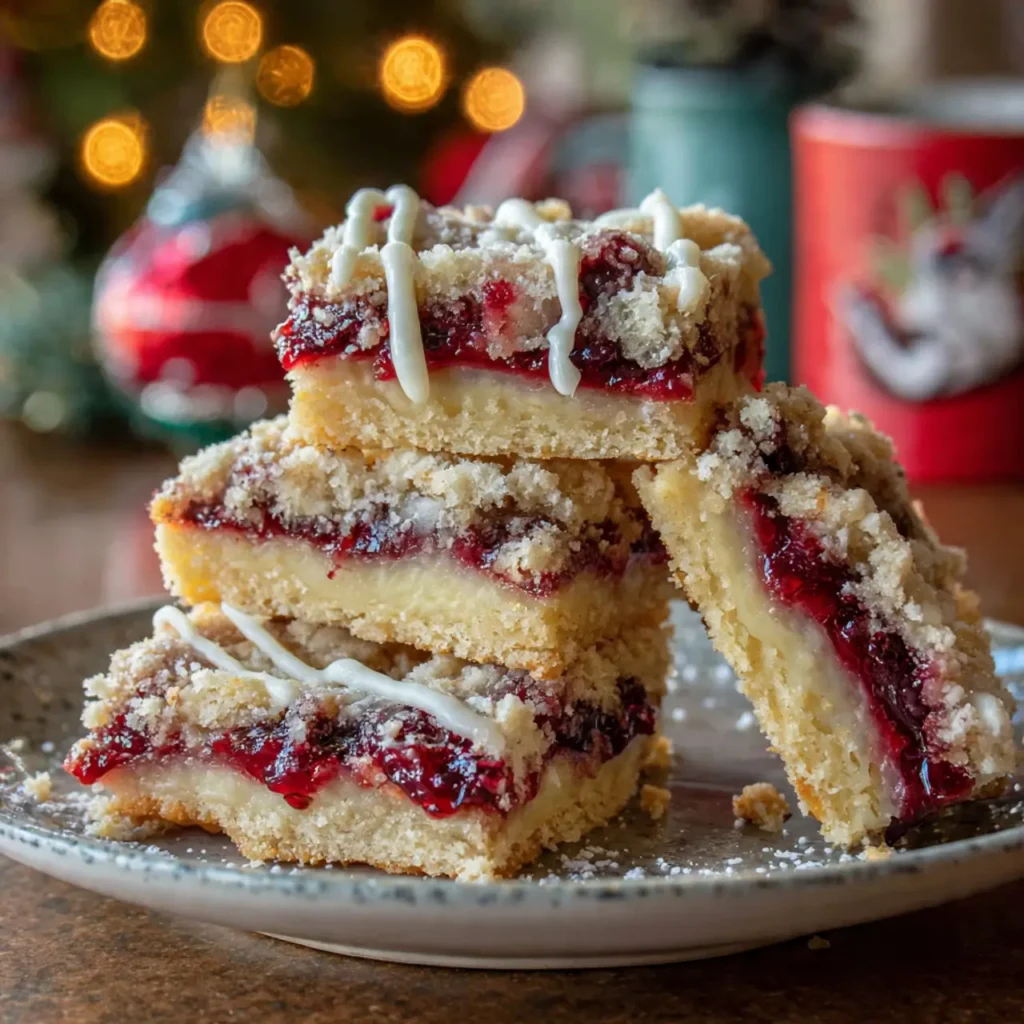
These Christmas Bars are basically a buttery shortbread base, a layer of sweet cranberry-orange filling, and a crumbly topping with white chocolate drizzle. Festive. Delicious. And you don’t need a stand mixer or any fancy equipment.
Just a pan, a bowl, and the willingness to lick the spoon when no one’s looking.
Table of Contents :
Why These Christmas Bars Work for Busy People :
Here’s the thing about holiday baking: most recipes are way too complicated. Who has time to roll out cookies and decorate them individually when you’re also wrapping presents, answering work emails, and trying to remember if you bought enough wrapping paper?
Not me.
Christmas Bars solve this. You make one batch, cut it into squares, and you’ve got like 16-20 servings ready to go. Done. They travel well, they freeze beautifully, and they actually taste homemade because, well, they are.
The first time I made them, I accidentally left them in the oven too long because I got distracted by a phone call. The edges got a little too brown. But you know what? Still tasted amazing. Just trimmed the edges and no one noticed.
And my 8-year-old, who usually turns his nose up at “fancy” desserts, ate three squares in one sitting. That’s when I knew I’d nailed it.
Ingredients for Easy Christmas Bars :

Okay, shopping list. Nothing crazy here, I promise.
For the base and crumble topping:
- 2 cups (250 g) all-purpose flour
- 1/2 cup (100 g) granulated sugar
- 1/4 teaspoon salt
- 1 cup (230 g) cold unsalted butter, cut into cubes
- 1 teaspoon vanilla extract
- 1/2 teaspoon almond extract (optional, but so good)
For the filling:
- 1 1/2 cups (180 g) fresh or frozen cranberries
- 1/2 cup (100 g) granulated sugar
- Zest of 1 orange
- 2 tablespoons orange juice
- 1 tablespoon cornstarch
- 1/4 teaspoon ground cinnamon
For the topping and decoration:
- 1/2 cup (90 g) white chocolate chips
- 1/4 cup sliced almonds (optional, for crunch)
- Powdered sugar for dusting
Random ingredient notes:
- If you can’t find fresh cranberries (they’re seasonal), frozen works just as well. Don’t thaw them first.
- I once used lemon zest instead of orange because that’s what I had. Different vibe, but still really good.
- Don’t skip the almond extract if you have it. It adds this subtle, almost Christmassy flavor that’s hard to describe but totally worth it.
- For the white chocolate, I just use whatever brand is on sale. Ghirardelli is great if you’re feeling fancy, but honestly, store brand works fine.
How to Make Christmas Bars Step by Step :
1. Make the cranberry filling first
This is important—you want it to cool while you’re prepping everything else.
- In a small saucepan, combine cranberries, sugar, orange zest, orange juice, cornstarch, and cinnamon.
- Cook over medium heat, stirring occasionally, until the cranberries start to pop and the mixture thickens. Takes about 8-10 minutes.
- It’ll look kinda soupy at first, then suddenly it’ll gel up. When it coats the back of a spoon, it’s ready.
- Take it off the heat and let it cool completely.
The key is—oh wait, I forgot to mention—don’t skip the cornstarch. I tried making this without it once because I thought “how thick can it really get?” and ended up with cranberry soup all over my crust. Learned that the hard way.
2. Preheat and prep
- Preheat your oven to 350°F (175°C).
- Line a 9×9-inch baking pan with parchment paper. Leave some overhang on the sides so you can lift the bars out easily later. (Trust me on this one.)
3. Make the base and crumble
This is where it gets fun because it’s basically the same mixture for both the bottom crust and the crumbly topping. Efficient, right?
- In a large bowl, whisk together flour, sugar, and salt.
- Add the cold butter cubes.
- Use a pastry cutter, fork, or your hands to work the butter into the flour until it looks like coarse crumbs. Some pea-sized chunks of butter are fine—actually, they’re good. They make it flakier.
- Add vanilla extract (and almond extract if using). Mix until it starts to clump together.
You’ll end up with this crumbly, sandy mixture that smells like heaven.
Now here’s what you do:
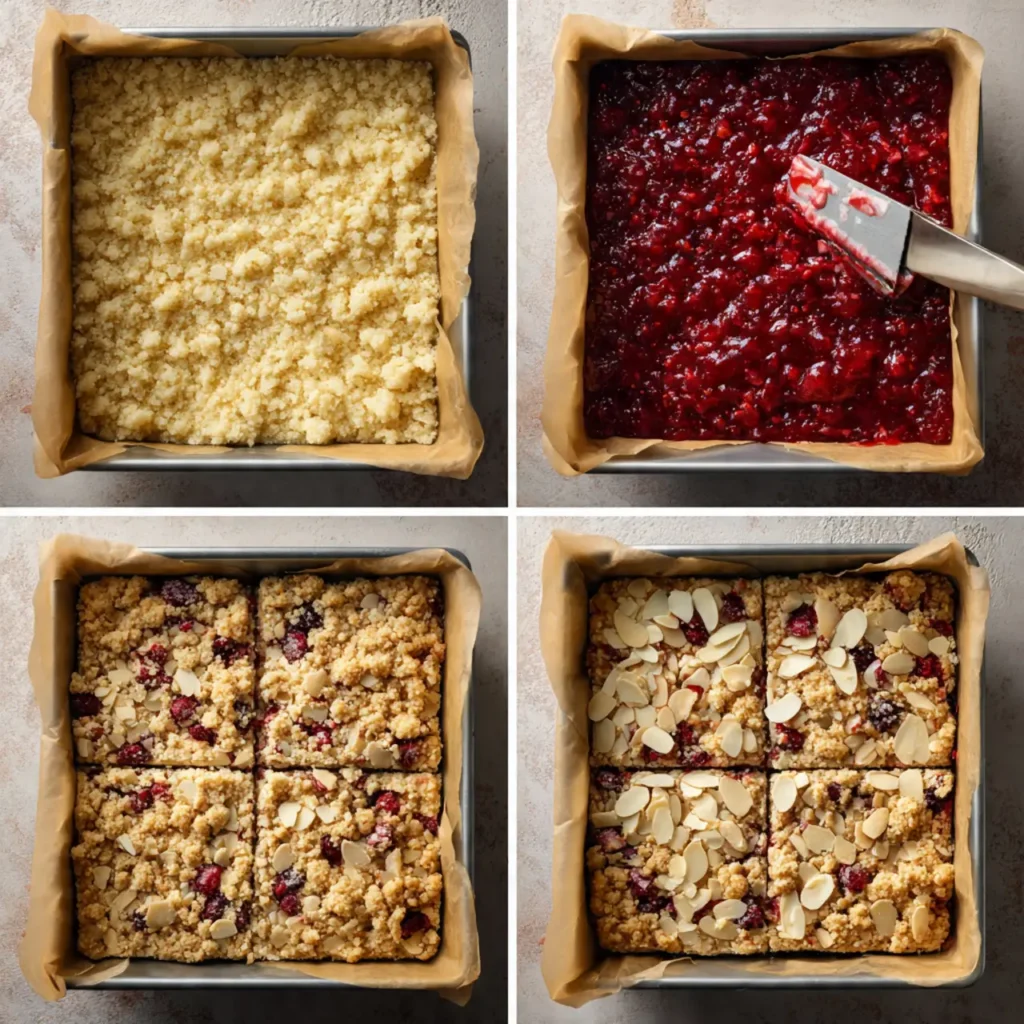
- Take about 2/3 of the mixture and press it firmly into the bottom of your prepared pan.
- Really press it down. Use the bottom of a measuring cup if your hands aren’t cutting it.
- Set the remaining 1/3 aside in the fridge. You’ll use it for the topping.
4. Bake the crust
Bake the crust by itself for about 15 minutes, just until it’s starting to turn lightly golden at the edges.
Why pre-bake? Because otherwise the bottom stays soggy. And soggy Christmas Bars are sad Christmas Bars.
While it’s baking, check on your cranberry filling. If it’s not cool yet, stick it in the fridge for a few minutes.
5. Add the filling and crumble topping
Once the crust comes out:
- Spread the cooled cranberry filling evenly over the warm crust.
- Take the reserved crumble mixture out of the fridge and sprinkle it all over the top. Don’t pack it down—just let it sit there in clumps.
- If you’re using sliced almonds, scatter them on top now.
It’ll look messy and uneven. That’s the point. Rustic charm and all that.
6. Bake again
Pop it back in the oven for another 25-30 minutes, until the top is golden brown and the filling is bubbling around the edges.
Set a timer. Then inevitably forget about it for an extra 2 minutes and panic. (Or maybe that’s just me?)
When it’s done, take it out and let it cool completely in the pan. This is important. If you try to cut them while they’re warm, they’ll fall apart and you’ll be sad.
Wait at least an hour. I know. It’s torture.
7. Add the white chocolate drizzle
Once the bars are cool:
- Melt the white chocolate chips in the microwave (30-second bursts, stirring between each one) or in a double boiler.
- Drizzle it over the top using a spoon or a fork. Get creative. Zigzag it. Make it look festive.
- Let the chocolate set for about 10 minutes.
Then lift the whole thing out of the pan using the parchment paper overhang (see, told you it was a good idea), and cut into squares.
Dust with powdered sugar if you want to look extra fancy.
Done.
Tips and Tricks from Someone Who’s Made These Way Too Many Times :
- Cold butter is your friend. If your butter is too soft, the crust won’t be crumbly and flaky. It’ll be dense and weird.
- Don’t overmix the crumble. You want chunks, not dough.
- Let it cool completely before cutting. I cannot stress this enough. Warm bars = crumbly mess. Cool bars = clean slices.
- Freeze extras. These freeze beautifully. Just wrap them individually in plastic wrap and toss them in a freezer bag. Pull one out whenever you need a quick dessert or last-minute holiday treat.
- Switch up the filling. I’ve made these with raspberry jam, apricot preserves, and even Nutella (which, okay, isn’t very Christmassy but was delicious). Cranberry-orange is my favorite, though.
Actually, you know what? My mom once suggested adding a layer of cream cheese between the crust and the cranberry filling. I haven’t tried it yet but it sounds amazing. Has anyone done this? Let me know because I’m genuinely curious.
Serving These Christmas Bars :
These are ridiculously versatile:
- Serve them at holiday parties
- Pack them in tins as gifts
- Bring them to cookie exchanges (and watch them disappear first)
- Eat them for breakfast with coffee (no judgment here)
- Pair them with vanilla ice cream for a fancy dessert
They taste even better the next day after the flavors have had time to hang out together. Something about the cranberry filling soaking slightly into the crust. It’s magic.
And they look so festive with the red filling and white chocolate drizzle that people always assume you spent way more effort than you actually did.
Last Christmas, I brought these to a party and three different people asked for the recipe. One person said, “These taste like something from a bakery!” and I was so proud. Honestly got a little teary-eyed. (Okay, maybe that’s an exaggeration. But I was really happy.)
People keep asking for this recipe, so I guess I did something right. These Christmas Bars are honestly one of my go-to holiday desserts now because they’re easy, they taste amazing, and they make me look like I have my life together even when I absolutely don’t.
If I can make these while simultaneously wrapping presents, answering emails, and keeping a small human from eating raw cookie dough, anyone can.
Seriously, try these and let me know what you think. And if you come up with any fun variations, tell me in the comments!
Happy baking! 🎄
Easy Christmas Bars – Festive Holiday Dessert Everyone Loves
Easy Christmas Bars with a buttery shortbread base, sweet cranberry-orange filling, crumbly topping, and white chocolate drizzle. Perfect festive holiday dessert that's simple to make and always a crowd-pleaser at parties and cookie exchanges.
Ingredients
- 2 cups (250 g) all-purpose flour
- 1/2 cup (100 g) granulated sugar (for base and topping)
- 1/4 teaspoon salt
- 1 cup (230 g) cold unsalted butter, cut into cubes
- 1 teaspoon vanilla extract
- 1/2 teaspoon almond extract (optional)
- 1 1/2 cups (180 g) fresh or frozen cranberries
- 1/2 cup (100 g) granulated sugar (for filling)
- Zest of 1 orange
- 2 tablespoons orange juice
- 1 tablespoon cornstarch
- 1/4 teaspoon ground cinnamon
- 1/2 cup (90 g) white chocolate chips
- 1/4 cup sliced almonds (optional)
- Powdered sugar for dusting
Instructions
- Step 1In a small saucepan, combine the cranberries, 1/2 cup sugar, orange zest, orange juice, cornstarch, and ground cinnamon. Cook over medium heat, stirring occasionally, for about 8-10 minutes until the cranberries pop and the mixture thickens enough to coat the back of a spoon. Remove from heat and let it cool completely while you prepare the crust.
- Step 2Preheat your oven to 350°F (175°C). Line a 9x9-inch square baking pan with parchment paper, leaving some overhang on the sides for easy removal later.
- Step 3In a large bowl, whisk together the flour, 1/2 cup sugar, and salt. Add the cold butter cubes and use a pastry cutter, fork, or your hands to work the butter into the flour until the mixture resembles coarse crumbs with some pea-sized pieces of butter remaining. Add the vanilla extract and almond extract (if using) and mix until the mixture starts to clump together.
- Step 4Take about 2/3 of the crumble mixture and press it firmly and evenly into the bottom of the prepared baking pan, using your hands or the bottom of a measuring cup to pack it down well. Place the remaining 1/3 of the mixture in the refrigerator to keep it cold for the topping.
- Step 5Bake the crust for about 15 minutes, just until the edges are starting to turn lightly golden. Remove from the oven but keep the oven on.
- Step 6Spread the cooled cranberry filling evenly over the warm pre-baked crust. Take the reserved crumble mixture from the refrigerator and sprinkle it evenly over the cranberry filling in clumps, without packing it down. If using sliced almonds, scatter them on top.
- Step 7Return the pan to the oven and bake for another 25-30 minutes, until the crumble topping is golden brown and the cranberry filling is bubbling around the edges. Remove from the oven and let the bars cool completely in the pan, at least 1 hour or until fully set.
- Step 8Once the bars are completely cool, melt the white chocolate chips in the microwave in 30-second intervals, stirring between each burst, or use a double boiler. Drizzle the melted white chocolate over the top of the bars in a decorative pattern using a spoon or fork. Let the chocolate set for about 10 minutes.
- Step 9Use the parchment paper overhang to lift the entire slab of bars out of the pan. Transfer to a cutting board and cut into 16-20 squares using a sharp knife. Dust with powdered sugar before serving if desired. Store in an airtight container at room temperature for up to 5 days, or freeze individually wrapped bars for up to 3 months.