
Apple Cinnamon Crumble Parfait :
So… I was supposed to make regular apple crumble for book club last month, but somehow ended up creating this Apple Cinnamon Crumble Parfait thing instead. Complete accident, but honestly? It’s way better than the original plan.
Here’s what happened: I had the crumble all ready to go, and then my sister calls me RIGHT as I’m about to put it in the oven. We end up talking for like an hour about her drama with her landlord (don’t ask), and by the time I hang up, I’m looking at this bowl of apple filling and thinking… what if I just layered this with some whipped cream instead?
My husband thought I’d lost my mind. “You’re making parfait now?” he said, watching me dig through our cabinet for tall glasses. But you know what? Sometimes the best recipes come from complete kitchen chaos.
And my 12-year-old who normally picks all the fruit out of everything? She ate THREE of these. Victory.
Table of Contents :

The Backstory :
I think this whole thing started because I got tired of soggy apple crumble. You know what I’m talking about – when the bottom gets all mushy and weird? Plus, I kept burning the top because our oven runs hot, and I always forget to check it until the smoke alarm starts going off.
Last time that happened, my neighbor Mike came over to make sure the house wasn’t actually on fire. Embarrassing.
So this parfait version solves all those problems. No baking required (well, mostly), and it looks way fancier than it actually is. Like, people think I spent hours on this when really I just threw some stuff in glasses and hoped for the best.
Actually, you know what? Let me be completely honest here. The first time I made this, I used Cool Whip because I didn’t have heavy cream, and it was still amazing. Don’t judge me. Sometimes you work with what you’ve got.
What You’ll Need :
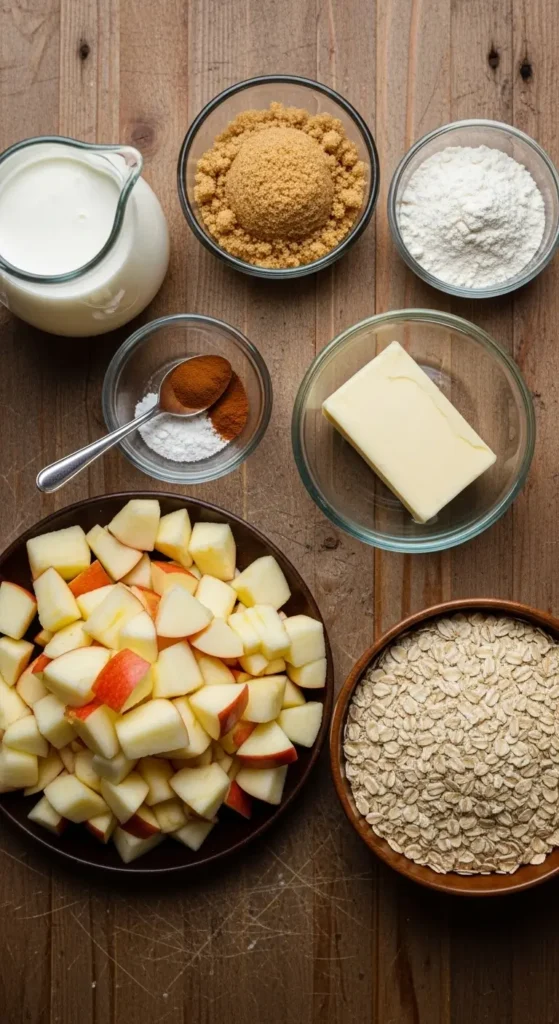
For the Apple Filling:
- 5-6 medium apples (I use Honeycrisp because they don’t get mushy)
- 1/3 cup brown sugar
- 2 tablespoons butter
- 1 teaspoon cinnamon
- 1/4 teaspoon nutmeg
- Pinch of salt
- 1 tablespoon lemon juice (trust me on this)
For the Crumble Topping:
- 1 cup old-fashioned oats
- 1/2 cup flour
- 1/3 cup brown sugar
- 4 tablespoons cold butter, diced
- 1/2 teaspoon cinnamon
- Pinch of salt
For the Cream Layer:
- 1 1/2 cups heavy cream
- 3 tablespoons powdered sugar
- 1 teaspoon vanilla extract
Now, about those apples. Do NOT use Red Delicious. I don’t care how pretty they look in the store. They turn into apple sauce the second you cook them, and not in a good way. I learned this the hard way when I was trying to be healthy and bought a whole bag of them. Disaster.
Honeycrisp or Granny Smith work best. Sometimes I mix both if I’m feeling fancy. Oh, and make sure you get the lemon juice – it keeps the apples from turning brown while you’re prepping everything else. Found this out after serving brown, sad-looking apples to my mother-in-law. She was polite about it, but I could tell.
The Process :
Step 1: Make the Apple Filling
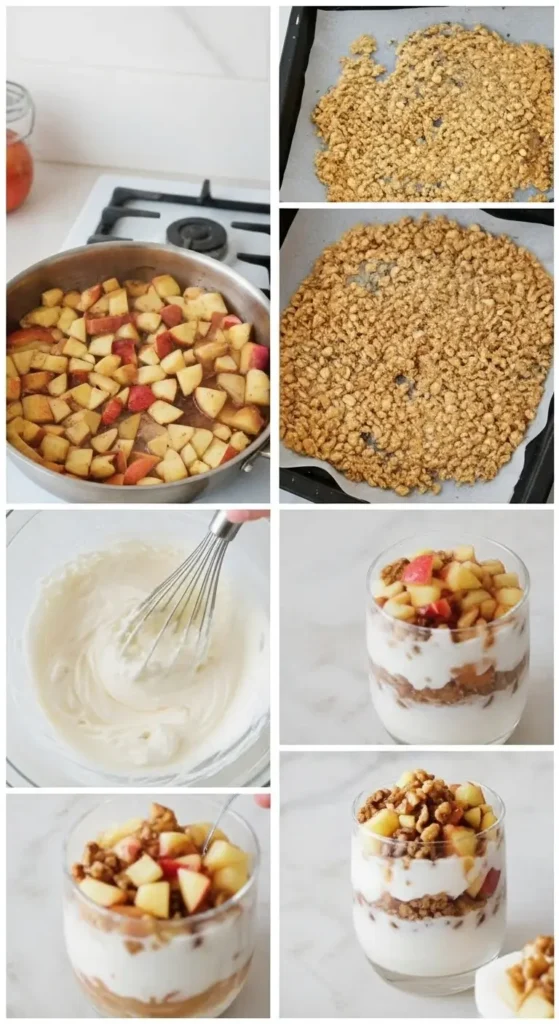
Peel and dice your apples. I used to leave the peels on because I’m lazy, but they get weird and chewy in the parfait. Just peel them. It’s worth the extra five minutes.
Heat butter in a large skillet over medium heat. Add the apples, brown sugar, cinnamon, nutmeg, and salt. Cook for about 8-10 minutes until they’re tender but not mushy.
Here’s the thing – you want them to still have some bite. The first time I made this, I cooked them until they were basically applesauce because I got distracted watching TikToks. Still tasted good, but the texture was all wrong.
Stir in the lemon juice and let it cool completely. This is important! Hot apples will melt your whipped cream, and then you’ll have soup instead of parfait. Been there.
Step 2: Make the Crumble
Preheat your oven to 350°F. Mix oats, flour, brown sugar, cinnamon, and salt in a bowl. Cut in the cold butter until it looks like coarse crumbs.
Spread this on a baking sheet and bake for 15-20 minutes until golden brown, stirring halfway through. Set timer! I cannot stress this enough. I’ve burned more crumble topping than I care to admit because I “thought I’d remember” to check it.
Let it cool completely. It’ll get crispy as it cools, which is exactly what you want.
Step 3: Whip the Cream
Beat heavy cream, powdered sugar, and vanilla until soft peaks form. Don’t overbeat it or you’ll have butter. Also don’t underbeat it or it’ll be runny. There’s like a 30-second window where it’s perfect, and you’ll know it when you see it.
If you mess this up (happens to everyone), just start over. I tried to “fix” overbeaten cream once by adding more liquid cream. Spoiler alert: it doesn’t work.
Step 4: Assembly Time
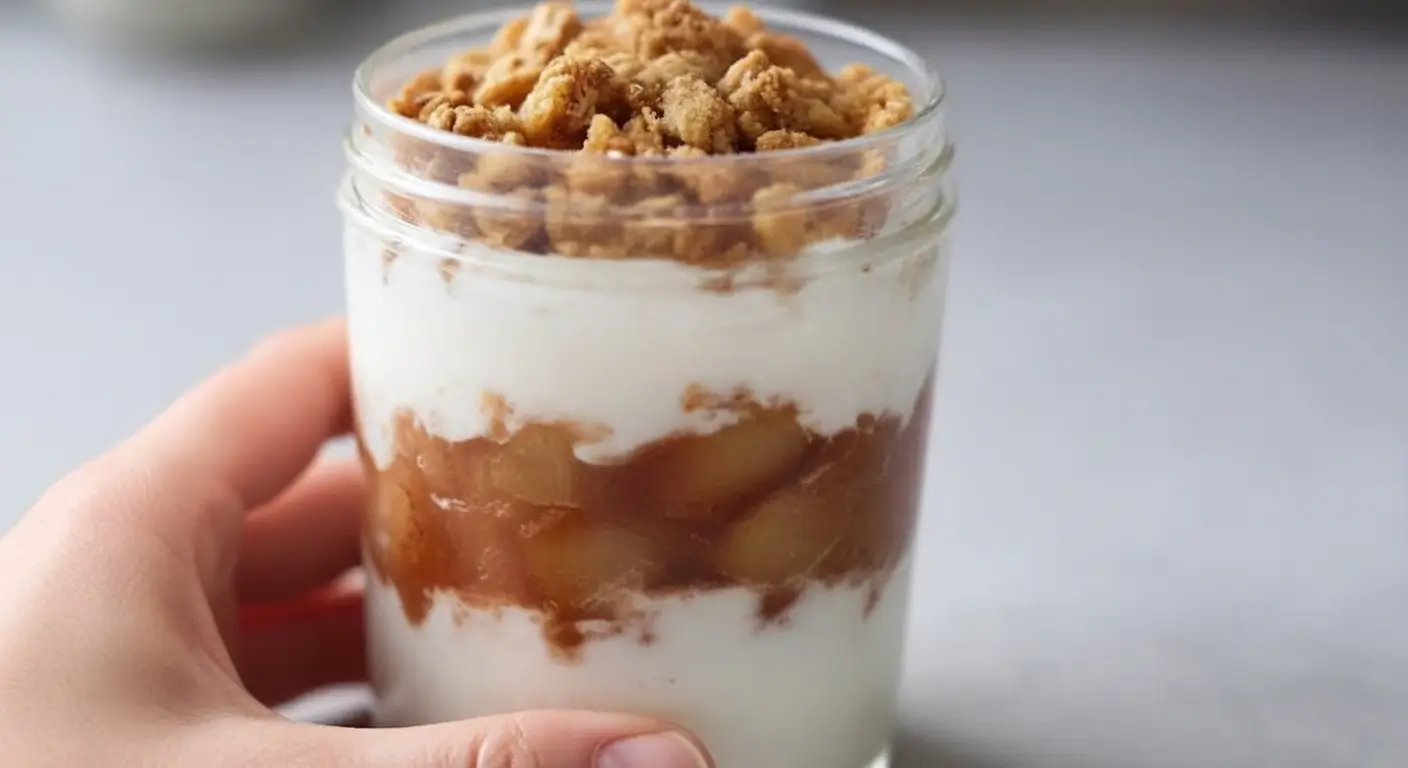
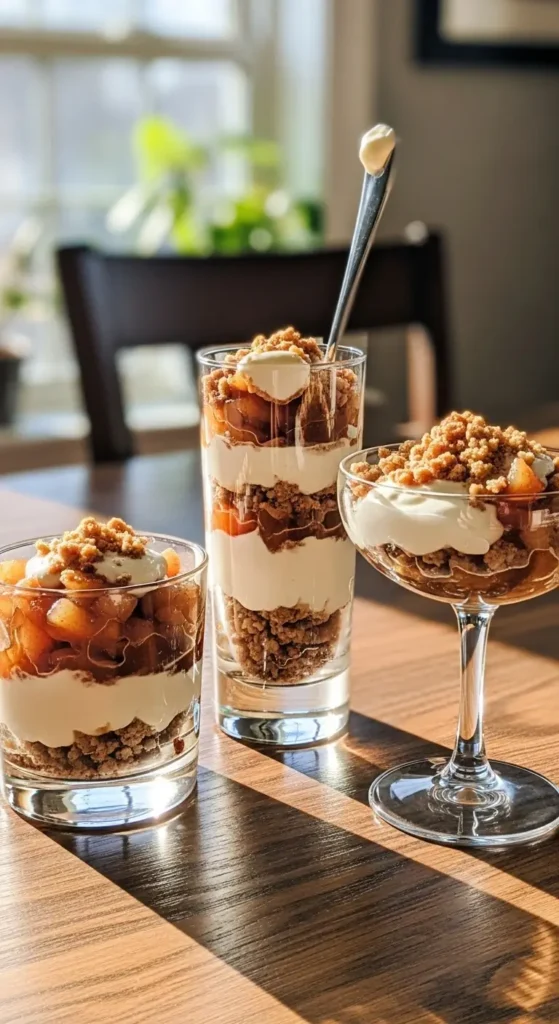
This is the fun part. Get your glasses or bowls – I use these wide mason jars I got from Target, but anything tall-ish works.
Start with a layer of apples at the bottom, then crumble, then whipped cream. Repeat until you run out of stuff or reach the top of your glass. End with a sprinkle of crumble on top because it looks pretty.
Pro tip: use a spoon to gently press each layer down a little. Not too much or you’ll squish everything, but just enough so it holds together.
Things I’ve Learned the Hard Way :
Don’t make this more than a day ahead. The crumble gets soggy if it sits too long, and then what’s the point? Although, if you DO make it ahead, just add the final crumble layer right before serving.
You can totally make extra crumble topping and keep it in the freezer. It’s amazing on yogurt, ice cream, or just eaten by the handful when you’re stress-eating at 10 PM. Not that I’ve done that or anything.
Greek yogurt works instead of whipped cream if you want to be healthy about it. I tried this once when I was on a diet kick, and it’s actually pretty good. Different, but good.
Oh, and if you’re feeling really extra, a drizzle of caramel sauce between layers is incredible. I keep the Ghirardelli squeeze bottles in my pantry for emergencies like this.
Real Talk :
Look, this isn’t going to win any cooking competitions, and it’s definitely not what my grandmother would call “real” apple crumble. But sometimes you just want something that tastes like fall, looks impressive, and doesn’t require you to stress about oven temperatures and timing.
My book club friends still ask me to bring these to every meeting. My teenage daughter’s friends request them for sleepovers. Even my picky eater nephew will demolish a whole jar if I let him.
Is it fancy? Nah. Is it good? Yeah, really good.
The best part is that if you mess up one component, the others usually make up for it. Apples a little too soft? The crumble adds texture. Cream not sweet enough? The apples have you covered. It’s like a forgiving recipe that actually wants you to succeed.
Anyway, try it and let me know what you think. And if you come up with any variations, please share them because I’m always looking for new ways to use up the ridiculous amount of apples I buy every fall 🙂
Happy parfait making!