

Why is it so hard to find a decent apple cider recipe that doesn’t require like 47 ingredients or some fancy equipment I don’t own?
I’ve been searching for the perfect homemade apple cider recipe for YEARS. Every fall I’d buy it from the store or the farmers market, pay way too much, and think “I should just make this myself.” But every recipe I found was either ridiculously complicated or just… wrong somehow.
Then last October, my neighbor gave me a huge bag of apples from her tree (the kind that are good for nothing except cooking because they’re too tart to eat raw), and I finally decided to figure this out. And guess what? It’s actually stupid easy. Like, embarrassingly easy for how impressive it tastes.
Table of Contents :

What Makes This Apple Cider Recipe Special :
Look, I’m gonna be honest with you. This isn’t one of those clear “apple juice” situations you get at the grocery store. This is real apple cider—cloudy, full of flavor, tasting like you spent all day at an apple orchard when really you just threw some stuff in a pot.
The first time I made this, my husband took one sip and was like “Where did you buy this?” When I told him I made it, he didn’t believe me. Had to show him the pot still on the stove as proof.
I think what makes this apple cider recipe different from others is that I don’t strain it too much (some people are obsessed with making it crystal clear, which defeats the whole point), and I use a mix of apple types which gives it more depth. Also, I’m not shy with the spices.
Ingredients You’ll Need for Apple Cider Recipe :
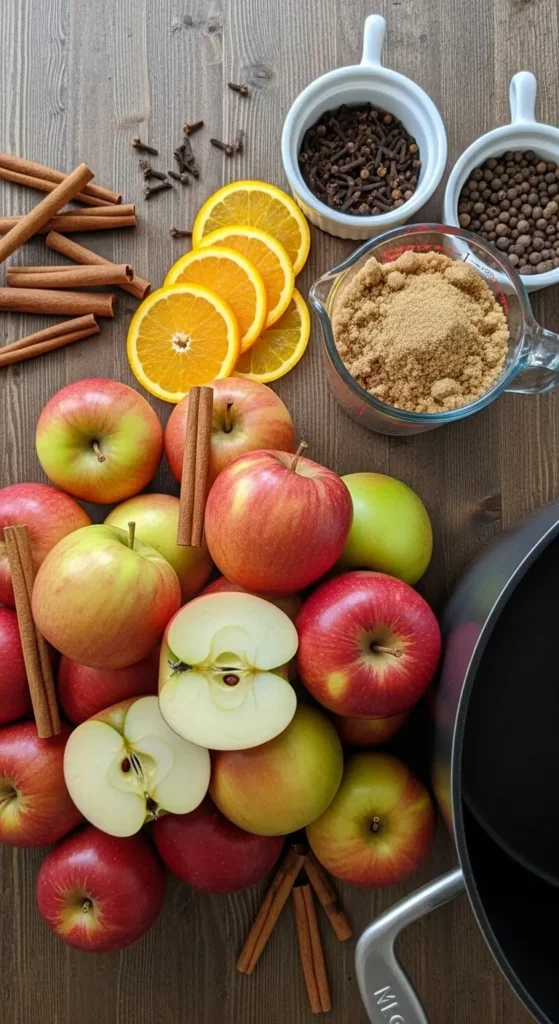
Alright, here’s what you need. And before you freak out about the amount of apples—yes, it’s a lot, but trust me, they cook down like crazy.
Main ingredients:
- 10-12 medium apples (mix of varieties—I’ll explain this in a sec)
- 2 quarts water (that’s 8 cups if you don’t have a quart measuring thing)
- 1/2 cup brown sugar (more or less depending on your apples and taste)
- 2 cinnamon sticks
- 1 tablespoon whole cloves
- 1 tablespoon whole allspice berries
- 1 orange, sliced (including the peel)
- 1/4 teaspoon ground nutmeg
Now, about those apples. Don’t use all the same kind. That’s boring and one-dimensional. I usually do a mix—some Granny Smith for tartness, some Honeycrisp or Gala for sweetness, maybe a few of whatever random apples I have sitting around. The variety is what makes it taste complex and interesting.
You can totally use apples that are a bit past their prime, too. Like, if they’re getting soft or have a bruise, just cut out the bad parts and use the rest. This is actually a great way to use up apples before they go completely bad.
Oh, and don’t buy pre-ground spices for this. Whole spices are so much better. I learned this the hard way when I used ground cloves once and the cider tasted like… I don’t even know how to describe it. Medicinal? Just wrong. Whole spices that you strain out later = way better flavor.
How to Make the Best Apple Cider :
Okay, here’s where it gets fun because this is literally so easy you’ll be mad at yourself for buying it all these years.
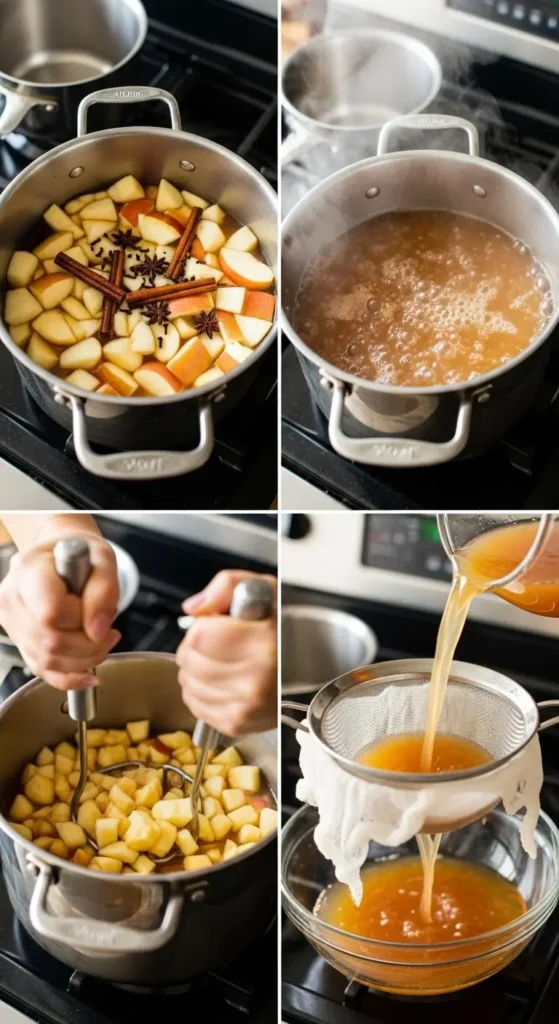
Step 1: Prep your apples
Wash your apples and cut them into quarters. Don’t bother peeling them or removing the cores—seriously, leave all that stuff on. The peels and cores add flavor and pectin which makes the cider richer.
I just cut around any obvious bad spots or bruises. Takes maybe 10 minutes for all the apples.
Step 2: Get everything in the pot
Throw your apple quarters into the biggest pot you own. I use my stock pot that I normally only break out for making soup. If you don’t have a huge pot, you might need to do this in batches or use two pots, which is annoying but doable.
Add the water, making sure all the apples are covered. Then toss in your cinnamon sticks, cloves, allspice, orange slices, and nutmeg.
Step 3: Bring it to a boil
Put your pot on the stove over high heat and bring everything to a boil. This takes about 15 minutes depending on your stove. You’ll know it’s boiling when it’s doing that aggressive bubbling thing.
Step 4: Reduce and simmer
Once it’s boiling, turn the heat down to low and let it simmer. This is where the magic happens. You want to simmer this for at least 2 hours. I usually do 2.5 hours because I forget about it while doing other stuff.
The apples will get super soft and start breaking down. Your house will smell INCREDIBLE. Like, fall-candle-but-better incredible.
Step 5: Mash everything up
After simmering, take a potato masher and mash all the apples right there in the pot. Get in there and really smash them up. This releases all the juices and flavor.
Let it simmer for another 30 minutes after mashing. I know, I know, more waiting. But this is important. Trust me on this one.
Step 6: Strain it
Here’s where I differ from other recipes. Set a fine-mesh strainer over a large bowl and pour the cider through. Use a spoon to press down on the solids to get all the liquid out.
Some people strain it through cheesecloth multiple times to make it super clear. I don’t bother. I like it a little cloudy—it feels more authentic and honestly tastes better.
Step 7: Sweeten to taste
Now taste your cider. Depending on what apples you used, it might need more sweetness. Add brown sugar a tablespoon at a time until it tastes right to you.
I usually end up adding about 1/2 cup total, but sometimes more if my apples were really tart. Last week I made a batch that only needed 1/4 cup because I used sweeter apples.
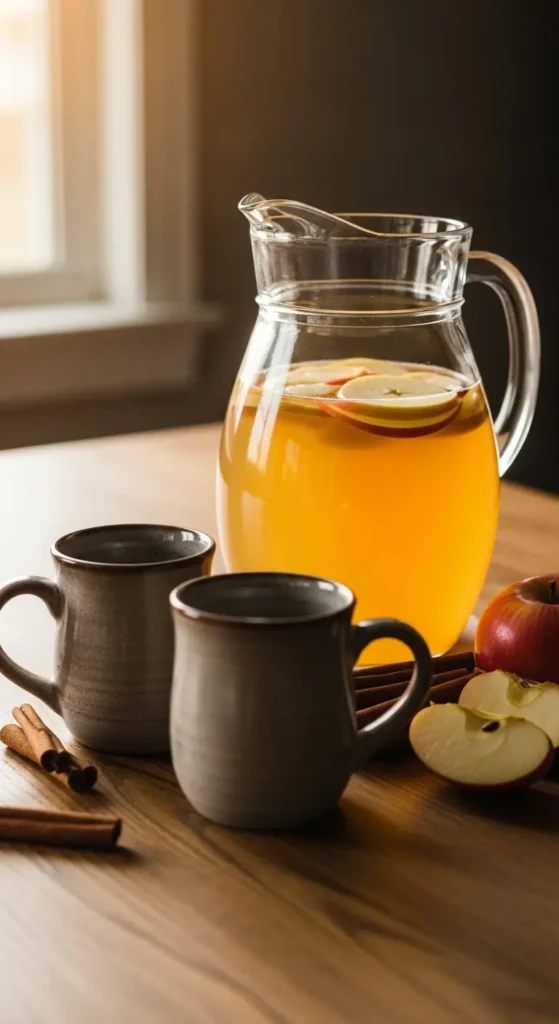
Step 8: Reheat and serve
Pour your strained cider back into the pot and heat it up over medium heat until it’s nice and warm. Then serve it in mugs.
Or let it cool and store it in the fridge. It’s good both ways.
My Apple Cider Tips You Need to Know :
After making this probably 20+ times over the past year (yeah, I got obsessed), here’s what I’ve learned:
Apple variety matters: Don’t use all sweet apples or all tart apples. Mix them up. The combination is what makes great cider. I usually do half tart, half sweet.
Don’t skip the orange: I tried making this without orange once to see if it made a difference. It does. The orange adds this subtle brightness that makes everything pop. Don’t skip it.
Whole spices only: I mentioned this before but it bears repeating. Ground spices make the cider cloudy and bitter. Whole spices that you can strain out = much better.
Simmer time isn’t optional: I know 2+ hours seems like forever, but you can’t rush this. The long simmer is what extracts all that apple flavor. I tried doing it in an hour once because I was impatient. Tasted like hot apple water. Sad.
Save the apple mash: After you strain everything, you’ve got all this apple mush left over. Don’t throw it away! I use it to make apple butter. Just cook it down with some sugar and more spices. Waste not, want not and all that.
Adjust sweetness at the end: Every batch of apples is different. Always taste before adding sugar, then add it gradually. You can always add more, can’t take it away.
Ways to Customize Your Apple Cider Recipe :
The basic recipe is perfect, but sometimes I switch things up for fun:
Spiced rum cider: Add a shot of spiced rum to your mug. This is NOT kid-friendly obviously, but it’s amazing for grown-up fall parties.
Maple apple cider: Use maple syrup instead of brown sugar. Gives it a different kind of sweetness that’s really good.
Extra spicy version: Add a few slices of fresh ginger and a star anise to the pot. Makes it more complex and warming.
Slow cooker method: You can make this in a slow cooker instead. Just dump everything in and cook on low for 6-8 hours. I’ve done this when I need my stove for other stuff.
Caramel apple cider: Stir in some caramel sauce right before serving. My kids are OBSESSED with this version.
Storing Your Homemade Apple Cider :
This makes a lot of cider. Like, probably 8-10 cups depending on how much you reduce it and how much gets absorbed by the apples.
In the fridge: Keeps for about a week in a covered pitcher or jars
In the freezer: Freeze in m
I usually make a big batch and freeze half so I can have apple cider whenever I want without having to go through the whole process again.
To reheat, just warm it up in a pot on the stove or microwave it in a mug. Easy.
Why This Apple Cider Recipe Works Every Time :
I’ve tried at least 10 different apple cider recipes from various blogs and Pinterest. Most of them were either too sweet, not spiced enough, or just tasted flat.
This one works because:
- The mix of apple varieties creates depth
- Long simmer time extracts maximum flavor
- Whole spices give clean flavor without bitterness
- Orange adds brightness
- You control the sweetness level
Also, making it on the stovetop (not in a slow cooker, though that works too) means you can actually watch it and adjust as you go. I like being able to taste it and add more spices if needed.
When to Make This Apple Cider :
Obviously this is a fall thing. Apple season runs from like September through November, and that’s when you can get good cheap apples in bulk.
But here’s a secret—I’ve made this in February using whatever apples were at the grocery store, and it still tasted great. Not quite as good as fresh fall apples, but close enough that it satisfied my craving.
Perfect for:
- Thanksgiving morning (I always have a pot simmering)
- Halloween parties
- Random cold October evenings
- When you have too many apples and don’t know what to do with them
- Anytime you want your house to smell amazing
Honestly, the smell alone is worth making this. My whole house smells like fall for hours after I make a batch.
This homemade apple cider recipe has become such a staple in my house that I actually get annoyed when I run out and have to wait to make more. It’s THAT good.
Make it this weekend. Seriously. You probably have most of the ingredients already, and your house will smell incredible while it’s simmering. Plus, there’s something really satisfying about making something from scratch that tastes better than what you can buy.
Let me know if you try it! And if you come up with any fun variations, share them because I’m always looking for new ways to make this. 🍎☕
Homemade Apple Cider Recipe – Easy Cozy Fall Drink
Easy homemade apple cider made from scratch with fresh apples and warm fall spices. This cozy stovetop recipe creates rich, flavorful cider that's better than store-bought and perfect for autumn.
Ingredients
- 10-12 medium apples, mixed varieties, quartered
- 2 quarts water (8 cups)
- 1/2 cup brown sugar
- 2 cinnamon sticks
- 1 tablespoon whole cloves
- 1 tablespoon whole allspice berries
- 1 orange, sliced with peel
- 1/4 teaspoon ground nutmeg
Instructions
- Step 1Wash apples and cut into quarters. Do not peel or remove cores. Cut out any obvious bruises or bad spots.
- Step 2Place quartered apples in a large stock pot. Add water, making sure apples are covered. Add cinnamon sticks, whole cloves, whole allspice berries, orange slices, and ground nutmeg.
- Step 3Place pot on stove over high heat and bring to a boil, approximately 15 minutes.
- Step 4Once boiling, reduce heat to low and simmer for 2-2.5 hours. Apples will become very soft and break down.
- Step 5Using a potato masher, mash all the apples thoroughly in the pot to release juices and flavor.
- Step 6Let the mashed mixture simmer for an additional 30 minutes.
- Step 7Set a fine-mesh strainer over a large bowl. Pour the cider through the strainer, using a spoon to press down on solids to extract all liquid.
- Step 8Taste the strained cider and add brown sugar one tablespoon at a time until desired sweetness is reached, typically about 1/2 cup total.
- Step 9Pour strained and sweetened cider back into pot and reheat over medium heat until warm. Serve in mugs, or let cool and refrigerate for later.